(Incidentally, I’m not sure on the naming of LONG0500 above. There’s text in the November ’78 game which claims the max score is 500 yet typing SCORE says outright the max score is 501. Also, the commercial version of the game has been rescued off old CompuServe drives and likely should be added as another node off of LONG0751.)
I’ve picked up a few new readers recently, so now is a good time to re-explain my verb list. Verbs marked in green are understood by the game, unmarked verbs are not understood at all.
I don’t do this with every old game I play, but it helps with the particularly ornery ones. I typed every single verb in my standard list (see above) and checked if the verb was understood by the parser or not. (SWIM is understood only to say you aren’t able to swim, so I gave it a different color.)
The process looks like this:
STAB
Mumble? STAB?
HOLD
I don’t understand the word HOLD.
PLAY
Play what?
COOK
I don’t understand the word COOK.
Fortunately, there are two and only two well-defined “I don’t understand that word” prompts so there’s no ambiguity (I’ve played games where I’ve had to either outfox the parser or just give up).
For games with a low vocabulary count, this can help fish out the one unusual phrase a game might need early; even when the density is higher (like here) making the list can help suss out potential issues. For example, RUB is in even though it tends not to be used in Adventure variants (Scott Adams Adventureland, yes) so I need to remember to test it if an object seems like a magical candidate. BUILD is particularly worrisome because it means there’s likely some object that is not previously named that the player will be able to make out of parts (usually it’s a ladder or a bridge). FOLLOW is also fairly rare and not normally one I use; I can think of at least one game where the verb was required to solve a puzzle. CRAWL, KICK, and PUNCH are also worth noting.
The list can help in a “negative space” sense as well; I can tell we are not making much conversation, and SAY only serves to speak a particular word out-loud in the sense of a “magic word”.
While I was busy doing this I also realized something about the safe in the starting building.
GET POSTER
Hidden behind the poster is a steel safe, embedded in the wall.
OPEN SAFE
How?
TURN COMBINATION
I don’t understand the word COMBINATI.
TURN DIAL
I can’t make any sense out of that.
(Only the first nine letters are being used, hence COMBINATI.) I realized the way the safe operated was likely going to be by entering individual numbers on their own lines (like typing “42” just on its own). Because of this, I wondered: would it be possible to brute force the puzzle?
4
I don’t understand the word 4.
5
I don’t understand the word 5.
6
Mumble? 6?
7
“Click.”
With this method I was able to get that 7-22-34 causes the safe to open. This is not randomized. (I did find out how to find the combination properly, but only later; I’ll save it for the end of my post.)
The safe door smoothly swings open.
The safe includes a “rare book” which has a “HISTORY OF ADVENTURE (ABRIDGED)” which is long-ish and I have the entire thing as a text file here. This is the document in Adventure 501 that says the max score is 500; in this version, it adds:
Most recent additions include the great Castle of Aldor, the Elephants’ Burial Ground, Leprechaun Rock and more.
You’ll get to see the outside of the Castle in this post. In addition, I wanted to highlight:
Thanks are owed to Roger Matus and David Feldman, both of U. of C., for several suggestions, including the Rainbow Room, the telephone booth and the fearsome Wumpus.
This means the Wumpus puzzle I mentioned admiring in my last post was actually thought of by one of the people playing the game! Mainframe games were not produced in voids and often had multiple contributors; this includes Woods (of classic 350-point Adventure). In the interview with Woods made for Jason Scott’s documentary GET LAMP, he talks about this process, citing (for example) the passage that was too narrow to carry your lamp as something that was suggested by a player.
Back to the safe, it turns out to be useful to access because just like the thief in Zork (I assume he was the inspiration for this) you can have any objects you drop in the building noodled with. I don’t know if there’s a limit or a specific algorithm but the game is hard enough as it is without having to worry about items wandering from where you expect them. I blame the “tiny little green man” that kicks you while outside at the grassy knoll.
A tiny little man dressed all in green runs straight at you, shouts “Phuce!”, aims a kick squarely at your kneecap, misses, and disappears into the forest.
Speaking of “phuce”–
You’re at top of steps in back of Thunder Hole.
The only way past the wall is through a tiny locked door.
UNLOCK DOOR WITH KEY
The tiny door is now unlocked.
PHUCE
You feel dizzy…Everything around you is spinning, expanding, growing larger…. Dear me! Is the cave bigger or are you smaller?
You are on a wide ledge, bounded on one side by a rock wall, and on the other by a sheer cliff. The only way past is through a large wrought-iron door.
The door is open.
GO EAST
You are on the western shore of an underground sea. The way west is through a wrought-iron door.
A high wooden structure of vast proportions extends into the water.
The door is open.
PHUCE
You are again overcome by a sickening vertigo, but this time everything is shrinking… I mean, you are growing. This is terribly confusing!
You are at the western tip of the Blue Grotto. A large lake almost covers the cavern floor, except for where you are standing. Small holes high in the rock wall to the east admit a dim light. The reflection of the light from the water suffuses the cavern with a hazy bluish glow.
There is a small wooden boat here.
The only way past the wall is through a tiny open door.
This is back at the door where you start by growing with mushrooms, shrinking with cake, but then finding a small door to still deal with. No real logic: I was just trying all the magic words everywhere. This breaks into the grotto I dropped a picture of last time.
Manifested!
To move the boat around you need to be holding the wooden pole; I solved this puzzle “passively” by having the pole in my inventory by accident when I tried to move around in the boat. There is a hint — the wooden pole has the text “_ R O _ _ O” suggesting the word GROTTO.
ENTER BOAT
You are now sitting in a small boat.
GO EAST
You have poled your boat across the calm water.
You are on the eastern shore of the Blue Grotto. An ascending tunnel disappears into the darkness to the SE.
There is a jewel-encrusted trident here!
As I was remembering, this links together two distinct parts of the map, the outside section to the area with the “rainbow” room and the Lost River and the “too bright” corridor and the “tongue of rock” with the whiskbroom sitting there and the bat cave with the shovel. I’ve done my best to show a merging of the two sections:
In one case I simply missed an exit (near where the passage got too bright, you can go north to a ledge and find a wooden casket). The grotto connects with the shore with the trident, as already shown, plus you can go:
a.) South to a “gravel beach” where there is an “apiary” with bees; I was able to bring the flowers I found outside and distract them, revealing a treasure (a honeycomb).
You are in the Apiary. The walls are covered with colorful, intricate, flower-like patterns of crystallized gypsum.
There is an active beehive nearby. The bees hum protectively around the hive.
THROW FLOWERS
The bees swarm over the fresh flowers, leaving the hive unguarded and revealing a sweet honeycomb.
The flowers have a “!” mark but that apparently isn’t good enough to determine if something is a treasure. If you GET TREASURE and it picks the thing up then you know it counts for points.
b.) North to a “dark cove” where you can walk up a “basin” to eventually find a fountain of wine. You can climb up at the fountain to get to the place where you can find the cask. I haven’t experimented with this section and if you need to do some fancy shenanigans to safely get the cask to the wine yet.
c.) North from the trident to a “Bubble Chamber” that has a green stone. Hang out at the green stone long enough and you’ll start to feel unhealthy.
You are at a high rock on the NE side of a watery chamber at the mouth of a small brook. An unknown gas bubbles up through the water from the chamber floor. A bluish light can be seen to the southwest.
Nearby, a strange, greenish stone is glowing brightly.
I remember (from 501) this is because the stone is radioactive and needed to be stored in a special container. I’m not sure if I’ve seen the container yet.
d.) Past the radioactive stone is a “Fairy Grotto”…
You are in the Fairy Grotto. All around you innumerable stalactites, arranged in immense colonnades, form elegant arches. On every side you hear the dripping of water, like the footsteps of a thousand fairies. A small stream runs from the SW corner. A bright glow emanates from the south side of the grotto, and a steep passage descends to the east.
…and if you try to keep going, you end up down a corridor that’s too cold to walk through. I think I have seen the right item for this elsewhere but I haven’t tested it yet (you’ll see later).
Going south from the Fairy Grotto you get stopped because it is “too bright”; a similar message happens elsewhere, so this is clearly the same place being linked two ways.
That’s enough of that section. Let’s hop up to the swamp. It relates to the cloth bag that was part of the “Witt Construction Company”.
You are at the edge of an open area of wet sand. The dense foliage appears to grow thinner towards the northeast. A small sign stuck in the muck reads: “Site of Proposed Municipal Parking Lot — D.M. Witt, Contractor.”
Foul smelling gasses bubble up through the wet sand.
I decided to put construction together with the construction site to see what would happen.
As the grey powder mixes with the bubbling quicksand, the whole mixture gradually thickens to a rocklike hardness.
This opens a brand new section; going north no longer sinks you in quicksand.
First comes a ravine:
You’re in an open field on the south side of a deep ravine. South and west the land is an almost impassible swamp. To the west the ravine merges with the swamp; some distance to the east it ends abruptly at the foot of a sheer granite cliff. A dry drainage pipe six inches in diameter emerges from the base of the cliff just above the floor of the ravine.
You can go in the ravine but you can’t get out again with anything being held. This is unfortunate since the ravine has a statue (a treasure).
You are at the east end of a steep ravine, near where a drainage pipe emerges from a rock wall.
There is an ancient marble statue lying here!
Following the ravine further leads to death; I don’t know if exit is about climbing up or about surviving the “wet and treacherous” area to the west.
Ignoring the ravine, you can also go east to find a “cliff” with vines; climbing the vines reveals a rope, and for a while I thought that was that. (Incidentally note: no TIE or UNTIE on the verb list. I tried playing the flute and that didn’t cause the rope to levitate, so I don’t know how to get it to work. I assume THROW makes it happen somewhere?)
I admit my next piece of insight came from the map, but given you could buy it from CompuServe to accompany your gameplay I just consider it a “supplement”. Notice there seems to be a hole/entrance next to the vines. It isn’t there in the regular description!
You are at the foot of a towering cliff. The sheer rock face is partially obscured by thick vines growing up the cliff.
MOVE VINES
Parting the vines reveals a narrow crack in the face of the cliff.
This allows winding around the ravine, getting a “four-leaf clover” on the other side. You can also walk farther and find a lair.
You are in the lair of Ralph the Giant Centipede. The air reeks with the stench of rotting bits of flesh. Giant centipedes, in general, are not partial to visitors.
A golden fleece is lying nearby!
A giant centipede is eyeing you with a none-too-friendly look.
You can take the fleece and it is rather like taking the cloak from the Wumpus. (Incidentally, I suspect either the cloak or fleece or both protect from cold — I just haven’t had a chance to test it yet.) The centipede starts to chase:
The incensed insect is in full gear now. If you don’t move quickly, his monstrous mandibles may masticate you into murky mush!
JUMP
You are at the bottom of the ravine with a broken head.
I’ll have to play around with this later. The game is large enough that it takes a while to get items together to test a theory. Since I had the boat access I grabbed the whiskbroom and shovel and tried using them in various places, getting a hit with the broom at the “dusty room” above the Complex Junction. (This is one of the standard Crowther/Woods rooms, just it has been repurposed. Adventure 448 had a similar puzzle.)
You are in a large room full of dusty rocks. There is a big hole in the floor. There are cracks everywhere, and a passage leading east.
BRUSH
Brushing the dust from one of the larger rocks reveals some carved characters.
In the rock is carved the inscription:
In Memoriam:
John Dillinger, Liberator of the Little Man.
Died: 7-22-34.
…and that’s how you figure out the safe code if you aren’t brute forcing it. Either that, or you take a wild jump based on the Dillinger Society poster and try the death date. I wonder if anyone did that to solve the puzzle!
I’m not really “stuck”, but I have a lot of moving parts to coordinate now and I’m trying to get through without burning too much lamp power. I have five theories about the area past the chapel (“fnord”) but I need to juggle objects to get them in the right spot in order to test any of them.
I’ve taken a fair chunk of the “501 content” down, although there’s a part that’s either different or I’m not remembering correctly. I’ve made a step into the 751-only-content but have only managed so far a step.
To continue from last time, I had explored the outside and found the usual lamp, food, keys, bottle, and keys, but also a yellow tablet, matchbox, leather sack (empty), cloth sack (with grey powder), large wooden box (empty), mushrooms, flowers, and a wooden pole. The treasures in the building go in a safe (which I don’t have the combination for) and I was stopped by a three-headed perfectly ordinary dog (which we’ll get by later), and a salt marsh/swamp area included one exit I neglected to mention last time guarded by mosquitos:
The air ahead is filled with huge mosquitos, with stingers the size of icepicks! The mosquitos haven’t yet caught your scent. Do you really want to proceed?
YES
Once the mosquitos catch your scent, it’s all over very quickly. Sheesh! You have more holes in you than a pincushion!
Arthur O’Dwyer pointed out in the comments EXAMINE works on some objects, although it doesn’t work on many of them and sometimes it works inconsistently. If you’ve opened the cloth bag at the grate, you at least see the grey powder without spilling it…
It contains:
grey powder
…but you miss out entirely on a helpful message if you don’t examine the bag while it is closed.
The label on the bag reads: “Mix with care. Property of Witt Construction Company”.
This bag is not in Adventure 501 and I have no idea how to mix it yet. Since it is a new item I presume it applies to one of the new puzzles.
At least some of the content is still identical; you can still unlock a grate to find yourself in a long west-east passage, where along the way you can pick up a cage and a rod. (The cage has a “soiled paper” this time around with a “useless” deed for a silver mine.) The bird is along the way who is spooked by the rod and you need to have dropped the rod in order to capture the bird.
The Donovan map includes the fact you can drop from the “all alike” maze which has the pirate treasure down to the bird room.
The bird then can be released to chase off the snake, making the rest of the cave wide open. This seems like a good moment to step back to the big picture.
Above is my current attempt at a “meta-map” where the “new for 501” rooms are marked in blue and the “new for 751” part is marked in green. (Please note directions are approximate, and general areas are compressed into single rooms.) For example, from the snake, there’s one small offshoot to the northeast where you can find a throne room with a crown.
You are in the private chamber of the Mountain King. Hewn into the solid rock of the east wall of the chamber is an intricately-wrought throne of elven design. There is an exit to the west.
GO EAST
You are on the east side of the throne room. On the arm of the throne has been hung a sign which reads “Gone for the day: visiting sick snake. –M.K.”
An ancient crown of elven kings lies here!
While wearing the crown in 501, there’s a sword in a stone you can pull out; you can find it by finding a “whirlpool” (it’s just past the rusty door, if you know Crowther/Woods) and diving in:
You are dragged down, down, into the depths of the whirlpool. Just as you can no longer hold your breath, you are shot out over a waterfall into the shallow end of a large reservoir. Gasping and sputtering, you crawl weakly towards the shore….
You are on a narrow promontory at the foot of a waterfall, which spurts from an overhead hole in the rock wall and splashes into a large reservoir, sending up clouds of mist and spray.
There is a narrow chimney on the east side of the promontory. Through the thick white mist looms a polished marble slab, to which is affixed an enormous rusty iron anvil. In golden letters are written the words: “Whoso Pulleth Out This Sword of This Stone and Anvil, is Rightwise King-Born of All This Mountain.”
A gleaming sword is stuck into the anvil!
Returning back to the Mountain King area:
Two of the treasures have been swapped; the “silver bars” to the north are now a “delicate lyre” and the “diamonds” found near the fissure (the same one you wave the rod to make a bridge) are now a “silver horn”. Both are used to solve puzzles I’ll show later. (I didn’t remember them straight off the bat from 501, but the fact they were treasures changed into tools gave me suspicion.) The magical bridge from Crowther/Woods is technically optional (you can reach the other side via walking a different way) but because of the addition of the Wumpus the bridge is now needed.
You are on the east bank of a fissure slicing clear across the hall.
The mist is quite thick here, and the fissure is too wide to jump.
WAVE ROD
A crystal bridge now spans the fissure.
GO WEST
You are on the west side of the fissure in the Hall of Mists.
There is a silver horn here!
A crystal bridge now spans the fissure.
The Wumpus was my favorite puzzle from 501 and I didn’t even put the solution when I wrote about the game last time.
You’re in the Cloakroom.
A lovely velvet cloak lies partially buried under a pile of loose rocks.
In the corner, a Wumpus is sleeping peacefully.
Specifically, the Wumpus doesn’t wake up until you nab the cloak, at which point it starts chasing you. You can reach a fair number of places on the map in time, but the one you want to aim for is the crystal bridge.
Normal map, not meta-map. Trying to enter the Wumpus area will sometimes randomly drop you in a dead end.
While waving the rod makes the bridge appear, waving the rod again will make the bridge disappear. A formerly “optional” puzzle is repurposed here to now be meaningful.
You’re at west end of Hall of Mists.
The Wumpus is still on your trail! And he’s getting closer!!
GO EAST
You are on the west side of the fissure in the Hall of Mists.
The Wumpus is only a few steps behind you! All this exercise is making him veerrrrry hungry!
There is a silver horn here!
A crystal bridge now spans the fissure.
GO EAST
You’re on east bank of fissure.
The Wumpus is only a few steps behind you! All this exercise is making him veerrrrry hungry!
A crystal bridge now spans the fissure.
WAVE ROD
The crystal bridge has vanished!
As the bridge disappears, the Wumpus scrambles frantically to reach your side of the fissure. He misses by inches, and with a horrible shriek plunges to his death in the depths of the fissure!
(If you aren’t familiar with the Wumpus, I give the history in my Before Adventure series. This is the most notable appearance of the Wumpus in a proper adventure game from this era.)
Some parts are near-identical but still with a change; for example, the long sequence with the troll-chasm-bear normally has the bear appeased with the food in Adventure 350, but this was changed for Adventure 501. This is one puzzle where I forgot what the solution is (I have a suspicion but I haven’t been able to test it yet).
Near the troll bridge entrance is a completely different branch which leads to new rooms starting with “Dante’s Rest”.
You’re at Dante’s Rest, on the north side of a yawning dark chasm. A passage continues west along the chasm’s edge. A decrepit natural bridge spans the chasm. A message scrawled into the rock wall reads: “Bridge out of repair. Maximum load: 35 Foonts.”
GO SOUTH
The bridge shakes as you cross. Large hunks of clay and rock near the edge break off and hurtle far down into the chasm. Several of the cracks on the bridge surface widen perceptibly.
You’re at the Devil’s Chair, a large crystallization shaped like a seat, at the edge of a black abyss. You can’t see the bottom.
An upward path leads away from the abyss.
A decrepit natural bridge spans the chasm. A message scrawled into the rock wall reads: “Bridge out of repair. Maximum load: 35 Foonts.”
I have not tested if there’s a number-of-passes through limit; there certainly is a weight limit. There’s a magic item that allows teleportation so I haven’t needed to pass through more than once.
Just up from the “Devil’s Chair” is a “Rotunda” with a telephone booth; the telephone is ringing. Try to go into the booth and a gnome will jump in before you. (I mentioned this puzzle in my writeup on 501, but I neglected to explain how it gets resolved and I don’t remember. D’oh. I used to do much more skipping around in ye olden days of the blog.) To the east of the rotunda is a brand new room (I think, at least it didn’t make my 501 map) with a Conservatory and a flute.
You’re in the Rotunda. Corridors radiate in all directions. There is a telephone booth standing against the north wall. The telephone booth is empty. The phone is ringing.
Nearby is a small plastic card.
GO EAST
You are in the Conservatory, whence the gnomes often repair to relax with a little music. On one side of the room is an old upright piano.
A delicate silver flute is lying nearby.
The card is a “MERKIN EXPRESS CARD” and does not count as a treasure and is new for 751 along with the flute. I don’t know what either is for yet. Just to compare, here’s the scene from 501:
You’re in Rotunda.
The telephone booth is empty. The phone is ringing.
ENTER BOOTH
You are standing in a telephone booth at the side of a large chamber. Hung on the wall is a banged-up pay telephone of ancient design.
The phone is ringing.
ANSWER PHONE
No one replies. The line goes dead with a faint “Click”.
I don’t know if the change in events suggests a change in how the phone operates (and if there’s a puzzle now that wasn’t here before).
The path leads farther past a “star sapphire” (just a treasure) and into an area I’ll call the Lost River section.
You land from the passage at a “Tongue of Rock” (the whiskbroom was in 501, but again I don’t remember what it was for)…
You are in a level E/W passage partially blocked by an overhanging tongue of rock. A steep scramble would take you up over the tongue, whence continues an upward crawl. There is a small hole in the north wall of the passage.
There is a small whiskbroom here.
….and to the west of here you can pass by a Bat Cave with a shovel, finally ending at a Blue Grotto with a trident; rather, the trident, the one that normally is placed elsewhere and is used to open a clam.
You are on the eastern shore of the Blue Grotto. An ascending tunnel disappears into the darkness to the SE.
There is a jewel-encrusted trident here!
From the Tongue of Rock you can proceed down to a colorfully described Green Lake Room…
You are in a low, wide room below another chamber. A small green pond fills the center of the room. The lake is apparently spring-fed. There is a narrow passage to the north.
A larger passage continues west.
…followed by a Rainbow Room; going any farther west results in it being too bright to make further progress.
You are in a very tall chamber whose walls are comprised of many different rock strata. Layers of red and yellow sandstone intertwine with bright bands of calcareous limestone in a rainbow-like profusion of color. The rainbow effect is so real, you are almost tempted to look for a pot of gold! Poised far over your head, a gigantic slab, wedged tightly between the north and south walls, forms a natural bridge across the roof of the chamber.
GO WEST
You are following a yellow sandstone path. There is a glow to the west.
GO WEST
You go a short way down the bright passage, but the light grows to blinding intensity. You can’t continue.
You can take one more passage north to the side of a river…
You are standing on a large flat rock table at the western end of Lost River Canyon. Beneath your feet, the river disappears amidst foam and spray into a large sinkhole. A gentle path leads east along the river’s south shore. Another leads sharply upward along the river’s north side.
…but let’s leave this area entirely, and jump back upstairs to show off getting by the dog.
You are in a dimly lit passage behind Thunder Hole. Etched into the rock wall are the ominous words:
You are approaching the River Styx.
Lasciate Ogni Speranza Voi Ch’Entrate.
A hideous black dog bares his teeth and growls at your approach.
PLAY LYRE
The air fills with beautiful music. The dog gradually becomes less fierce, and after a short while he lies down by the side of the cavern and falls into a deep sleep.
GO EAST
You are at the River Styx, a narrow little stream cutting directly across the passageway. The edge of the stream is littered with sticks and other debris washed in by a recent rainfall. On the far side of the river, the passage continues east.
I flailed a bit (“GO EAST: How do you propose to cross the river?”) before I realized I could just jump.
JUMP OVER RIVER
You’re on the east side of the river’s sticks.
GO EAST
You are at the top of some arched steps. On one side is a blank wall with a tiny door at the base and a shelf overhead. On the other side a westward passage leads to the sea.
The only way past the wall is through a tiny locked door.
Snrk. From here, thinking of an Alice in Wonderland reference with the tiny door, I tried EAT MUSHROOMS. (Previously, the mushrooms did nothing, but if they were going to work anywhere, here seemed like the place.)
You are growing taller, expanding like a telescope! Just before your head strikes the top of the chamber, the mysterious process stops as suddenly as it began.
You are in a low cramped chamber at the back of a small cave.
There is a shelf in the rock wall at about the height of your shoulder.
There is a tiny brass key on the shelf.
There are some tiny cakes on the shelf.
The tiny key unlocks the door, and the tiny cakes cause you to return to normal size, but the issue is the door remains tiny! So I’m not sure if I’m supposed to be adding another step to my sequence somehow so I can be not just super-grown and normal but also shrunk. (I’m pretty sure this puzzle is in 501 as-is, and I’m annoyed at my past self that I didn’t just explain the solution.)
That’s one instrument used! Let’s take care of the horn next. We’re going back to a scene that’s pretty familiar in Crowther/Woods, where you find a clam and then open it with the trident.
Rather than bothering with the clam at all, though, we’re going up:
You’re in a large room carved out of sedimentary rock. The floor and walls are littered with bits of shells imbedded in the stone. A shallow passage proceeds downward, and a somewhat steeper one leads up. A low hands and knees passage enters from the south.
There is an enormous clam here with its shell tightly closed.
GO UP
You are in an arched hall. A coral passage once continued up and east from here, but is now blocked by debris. The air smells of sea water. Your footsteps echo hollowly throughout the chamber.
BLOW HORN
As the blast of the horn reverberates through the chamber, the seemingly solid rock wall crumbles away, revealing another room just beyond. The wall was most likely worn thin by an ancient watercourse which dried up just before completely wearing away the rock.
You are in an arched hall. The remnants of a now-plugged coral passage lie to the east. The north wall has partially crumbled, exposing a large connecting hole to another room.
This is all still in 501 territory; it leads to a path down to a chapel which is a dead end.
There’s some “ruby slippers” near the church that can be worn and utilized to teleport between the rainbow room and the bridge above it (which adjoins the chapel).
You are standing on a natural bridge far above the floor of a circular chamber whose walls are a rainbow of multi-colored rock. The bridge was formed eons ago by a huge slab which fell from the ceiling and is now jammed between the north and south walls of the chamber. There is a pair of ruby slippers here.
GET SLIPPERS
Taken.
WEAR SLIPPERS
Ok
CLICK HEELS
You are in a very tall chamber whose walls are comprised of many different rock strata. Layers of red and yellow sandstone intertwine with bright bands of calcareous limestone in a rainbow-like profusion of color. The rainbow effect is so real, you are almost tempted to look for a pot of gold! Poised far over your head, a gigantic slab, wedged tightly between the north and south walls, forms a natural bridge across the roof of the chamber.
The new thing is that there are some “brambles” to the east blocking the area.
You can take a candle from the chapel and the matchbox from the start of the game (not present in 501) in order to make a fire.
You’re at the east portal of the Gothic Cathedral.
A sudden draft has extinguished your match.
A NE passage is blocked by an impenetrable thicket of sharp thorny brambles.
Deep within the brambles is growing a perfect, blood-red rose!
BURN THICKET WITH CANDLE
The dry brambles immediately catch fire and disappear in a roar of flame.
Finally this gets to the main new area of the game! The thing I’ve been waiting years to reach… except….
You are in a dull N/S passage beside a tall black rock. On the rock is chisled the outline of a four-leafed clover, under which is the inscription: “Notice: This rock fabricated from ersatz materials.”
Smoke rings curl upward from the rock.
GO NORTH
As you approach the rock, an indistinct muttering sound arises from the general area of the rock. The only word you can hear clearly is “Fnord!”
You’re on grassy knoll.
Agh! Trying to say FNORD here just gets a “snickering sound”. I don’t know if this is just a matter of repetition or finding a new magic word or blindly throwing the axe and hitting whatever is hiding behind the rock or what, exactly. It seemed like a good place to pause, though.
Just to be clear, my main obstacles going forward are:
a.) the tiny door, where I can grow to grab a key and shrink again to normal but I don’t have a way of shrinking to tiny-door size
b.) the mosquitoes at the swamp
c.) the “fnord” rock
d.) being able to rescue that “perfect, blood-red rose” before lighting the brambles (this may help resolve problem c)
There’s always the possibility of something hidden, though. I’m pretty much giving myself free use of the map and it does seem like almost everything left that’s from 751 is past that rock.
I know all this is past the tiny door and I visited it in 501, I just need to make it here.
COME WITH ME TO COLOSSAL CAVE. WHERE MAGIC ABOUNDS AND TREASURES ARE FOUND. BID YOUR FINGERS FOLLOW YOUR COMMANDS AND I WILL BE YOUR EYES AND HANDS. YET BEWARE THE FIERY DRAGON, FOR HE KNOWS NOT WHETHER YOU ARE WIZARD OR SIMPLE CHARLATAN!
HOW BEST TO CONQUER COLOSSAL CAVE? WITH DARING AND SKILL … OH CLEVER KNAVE!
— Early 80s Adventure poster, from the CompuServe Incorporated Information Service Division
Adventure 751 has been, by my reckoning, the most sought-after variation of Crowther/Woods Adventure. It was generally available on the online portal CompuServe from nearly the beginning of the service and it disappeared when they shut down their games in the 90s. Arthur O’Dwyer started a web page in 2016 (with semi-regular updates!) dedicated to hunting down a copy.
To finish off a wild 2025 in game preservation, Arthur O’Dwyer announced the game has been found (by LanHawk, a regular amongst the comments here) and is playable.
Via eBay. You could purchase this from CompuServe. I love how they tried to contextualize this like a swords-and-sandals epic, with a goblin-esque dwarf and the trident used as a weapon. It still includes the bird-in-cage, though!
In 1958, the Electrical Engineering Department of the University of Arizona in Tucson received a donation of equipment in order to form an Analog Computer Laboratory. Analog computers deal with full electrical signals rather than 0s and 1s (think music on record vs. on computer). These could do particular computations (like differential equations) faster than digital devices of the time.
An EAI TR-20 from eBay. $7,495.00 or best offer. As the ad copy notes, “It offers up to 20 amplifiers plus components for addition, subtraction, multiplication, division, integration and generation of powers, roots, logs, antilogs, sine, cosine and arbitrary functions — in one cabinet, and available to one patch panel.”
The University of Arizona’s lab was more cobbled-together than the for-sale-new device depicted above, as they made “two small but flexible computers complete with homemade removable patchboards” to start with but quite quickly changed mission to be a hybrid laboratory. By hybrid, I don’t mean just having digital and analog computers side-by-side, but trying to make computers that use both digital and analog components. Their name officially became The University of Arizona Analog/Hybrid Computer Laboratory. Designs included the “ASTRAC I”, a “iterative differential analyzer”, “APE 1”, a “teaching aid in statistics” that followed a similar design, and an “ASTRAC II” which was now “solid state” and “ultra-fast” and was supported by both the Air Force and NASA.
ASTRAC II. Source: “All analog computing elements other than coefficient potentiometers plug directly into the rear of the shielded analog patchbay.”
(Warning: My next three paragraphs consolidate threedifferentaccounts which differ somewhat.)
Three of the students in the 1969-1970 school year were Alexander B. Trevor, John Goltz and Jeff Wilkins. The trio were discussing the possibility of starting a time-sharing company. This was a little late to the game; Dartmouth with General Electric had developed the concept in the early 60s (where a large computer could have its time split into many parts allowing for multiple computers connected; including remote connections Dartmouth had thousands) and by the time Trevor, Goltz, and Wilkins came to the idea there were other companies like Tymshare and National CSS involved.
A PDP-15 mini-computer which the lab supposedly had. Trevor claims 1969 but the machine didn’t come out until 1970.
Jeff Wilkins’s father-in-law, Harry Gard, Sr., was a co-founder of Golden United Life Insurance; at the time the insurance company was still getting their computing via other companies, but Gard was keen on Golden United having a computer of their own. The original intent was to buy a mini-computer like the PDP-15 but Goltz (who was working with Wilkins and doing the purchase through DEC) got a call that he could have a KA-10 for just “a little more” (one of the PDP-10s, a full mainframe rather than minicomputer). While Goltz was an engineer and not a salesperson, John Goltz managed to persuade the board of Golden United to part with the money for the upgrade. This enabled the computer to more feasibly do time-sharing with many customers.
After graduating Wilkins moved to Columbus (followed by Goltz; Trevor was drafted to the Army so didn’t join them until ’71) to be at Golden United’s new spin-off, CompuServe; Wilkins at the age of 27 became President. Their first developed product was LIDIS (Life Insurance Data Information System); there were plenty of life insurance companies in Columbus to sell to.
The company had rapid success; by 1973 they moved to a new building, and by 1974 had not one but seven mainframes “and were using them not only to support a thriving time sharing business, but also to heat our office buildings.” CompuServe stayed with corporate clients, although Wilkins was alert to trends in personal computers; he hired his brother-in-law to track computer magazine news, given the fact most of the operations done by time-sharing could be done more easily with PCs.
One of those personal computers was the TRS-80, launching in 1977 as part of the “Trinity” with the Commodore PET and Apple II from the same year. The TRS-80 was sold through Radio Shack stores that were already well-established across the nation, but it was still difficult to move product when the concept of a personal computer was only a vague notion to many buyers. A Radio Shack manager in Columbus named Bill Louden bought one of the early models (serial model 10) as Radio Shack refused to give out demo units; his purchase became the only demo available in the Midwest and people wanting to experience a TRS-80 went specifically to Columbus, driving and even flying in.
Simultaneous to this, Wilkins was watching the new market for “modems” which connected personal computers to networks via the phone. He also had computers sitting idle by night (as businesses using them were running them during the day); since he already had the resources, it would be a straightforward matter to have a new commercial-facing venture.
Wilkins thus laid out in 1978 an idea for a new product based on European Videotex services. Videotex is its own rabbit hole that I’m not going to touch on much here; starting in the mid-70s there were experiments with turning televisions into networked services.
The important point here is that the “television as an appliance” thought process was being applied to make “computer as an appliance” and this would help interest computing to the masses. Wilkins launched a new service MicroNET (“to get microcomputer owners’ attention and suggest the power of the computer network”) and tapped the previously mentioned Midwest Computer Club for a “beta-test”.
The test service was launched for free; Bill Louden called it “a hacker’s dream” and a good way to sell modems (110 and 300 baud). Quoting Bill:
We had access to many of the DEC-10’s features, storage, and better processing power, but of most significance we had started using two programs: One was a store-and-forward messaging system, called Infoplex, which allowed us to share text message files with one another even if we were not online at the same time. The other was a modified version of a program that allowed a user to send a live one-line text message to the CompuServe system operator. Our version, modified by Russ Ranshaw of CompuServe, allowed us to send one-line live messages to each other if we saw one another online. We called it the SEND program.
It had all the regular offerings later associated with CompuServe, including games. Both Star Trek and Adventure were available (this is before Microsoft Adventure came out, so it was the original mainframe version). Eventually in the early 1979 a price structure was added: $9 startup, prime time use $12 per hour, non-prime time use $5 per hour, 300 baud more expensive as a “premium” service. Q2 revenues in 1979 were $4.2 million; this was almost a rounding error in the scheme of the business as a whole, but of course personal computers were about to hit the time-sharing companies with fatal blows.
A competitor, The Source, was launched in 1979 but “from scratch” by the entrepreneur William F. von Meister (that is, not piggybacking off an existing time-sharing business). Their main relevance to the story here is not only did they have games (the usual like Star Trek) they also tapped Dartmouth College to work on new games. (Remember these are being developed for mainframes or minicomputers, so we’re not talking about typical personal computer programmers! Hence work being drawn from colleges with access.)
I don’t have an official notice of solicitation — it may even have come via word of mouth — but CompuServe also must have had contact with mainframe/minicomputer sites in order to get their own games. A 1984 games catalog lists House of Banshi, which is simply Dungeon/Zork (“CompuServe’s rendition of the original game of ZORK.”) Dor Sageth from the catalog is another famous “lost game” which started life on an institutional computer (mentioned by Jason Scott back in 2011). Listed on page 2 is both “Original Adventure” (as the service launched with) and “New Adventure”.
In 1977, David Long went to the University of Chicago to work as a computer operator. The college had just bought two of the newest computers from DEC, the PDP-20. One was for general use by the college and the other was for specifically the Graduate School of Business; Long “tended to work 50-60 hours a week on GSB stuff”. 1977 was also the year the “standard” Crowther/Woods Adventure was finalized, and David Long was able to get a copy direct from the author:
Don was kind enough to transmit the source program to the present author in mid-1977.
As he notes, given his work schedule, and the time he spent with GSB affairs, “no one cared if I spent another 10-20 hours on Adventure”. He finished “Adventure 501” by November 1978:
You are inside a building, a well house for a large spring. Off to one side is a small pantry.
There is a shiny brass lamp nearby.
There is a leather sack here.
Taped to the wall is a faded poster.
READ POSTER
The poster has a picture of a thin man with a long white beard. He is wearing a high pointed cap embroidered with strange symbols, and he is pointing a finger at you. Below the picture are the words: “I want you!–To report all good ideas for extensions to this game to me without delay. Remember: ask not what ADVENTURE can do to you; ask what you can do for ADVENTURE.”
“A public service of the John Dillinger Died for You Society.”
A safe is hiding behind the poster. Found treasures get dropped in the safe rather than on the ground.
The John Dillinger Died For You Society was a spoof group made in 1966 at the University of Texas meant to parody Elvis fan groups and “Jesus Died For You” signs.
I’ve played Adventure 501 before; a version had been available for some time (with the mysterious addition of a spider, which isn’t Long’s). The archive LanHawk extracted also includes the authentic ’78 version of Adventure 501, so I was able to cross-check with what I already played.
Further expansions eventually led to a “version 6” in January of 1980, including a new area as well as an “improved syntax parser”. (More on the parser later.) An in game “billboard” gives version updates:
( 19-Jan-1980 ) Congratulations to Robert Silverman, the first adventurer to set foot in the Courtyard of Aldor’s Castle.
( 25-Feb-1980 ) Adventurers may now enter the Castle Keep, although construction continues within. Some scoring bugs have been fixed.
Who will be first to discover the secret of the black bird?
( 3-Mar-1980 ) There is a slight bug on the perfume. For full score, you must drop it somewhere, look, and take it again.
( 7-Mar-1980 ) 6.04 is released. Expansion of the castle continues — it is far from complete. Several unique new features and puzzles have recently been designed and are now being implemented.
The format of most hints has been altered. I hope you agree that the new hints are more in keeping with the flavor of the game.
The game I’m referring to as “Adventure 751” seems to have been entirely wrapped up by the end of the school year. Sometime before the end of the calendar year Long sold the game to CompuServe for “a thousand dollars”. (As they used the PDP-10/20 like Long did, no conversion work was needed and they could run the executable without compilation.) Long seems to have been somewhat protective of his source code so distribution past that point was relatively minimal, although he did give source copies of both 501 and 751 to the Illinois Institute of Technology. (See, comparatively: Woods and his regret freely sending out Adventure 350 to anyone who asked, making it so that when he wrote “v2.0” he was much more careful who had access.)
The parser is “improved” over both Adventure 350 and Adventure 501. There is some sense of trying to “outdo Zork”. (See relatedly: Warp bragging about its own system, and Synapse Software calling their system BTZ or “Better Than Zork”.) Quoting Long:
…Dungeon (Zork) and Adventure-6 were developed almost completely independently. The advanced parser, the object containment facility, and virtually all the game puzzles were designed and implemented prior to our receiving any version of Dungeon. With all due modesty (none), I will point out that Adventure’s containment facility is at least as powerful as Dungeon’s, if not more so, since Adventure’s facility permits searching for contained objects in open containers down to any desired level of containment. Further, the parser permits a few constructs not currently permitted in Dungeon (at least in the version we have at U.C.), such as permitting any number of objects (up to some limits imposed by compiled array sizes) to be specified following transitive verbs. In addition, Adventure’s parser can handle multiple verb constructs such as “GET AND THROW AXE” properly. Finally, Adventure’s parser is slightly better about doing the right things with the various applications of the group words “ALL” and “TREASURES”. A planned enhancement for Release 7 will permit such constructs as “PUSH ALL OF THE BUTTONS” or “TAKE BOTH SACKS”, etc.
GET AND THROW AXE is uncommon even in modern parsers. Trying to GET AND THROW BREAD in Savoir-Faire (2002) gets the response “You can’t see any such thing.”
Dennis Donovan (of CompuServe) made a map in November of 1980 which Arthur O’Dwyer scanned in high resolution with some image cleanup by James Lindell Dean, so I’m going to use it to illustrate the journey.
Arthur tested the build with a walkthrough that has been around for a while to confirm this is indeed the “real” Adventure 751; I’m going to play it normally. I am re-mapping the 501 content although I am allowing myself to look at my old posts if I need to; you can also squint at a blurry version of my 501 map where the blue rooms are extensions to Adventure 350.
You are standing at the end of a road before a small brick building. Around you is a forest. A small stream flows out of the building and down a gully.
GO EAST
You’re in a flat circular clearing surrounded by dense forest. Not far away is a helicopter. Its engine is idling slowly. Several jac-booted Orcs are standing guard around the aircraft.
Going east normally enters the building. Unexpected! Trying to enter gets a message about needing a flight pass.
The building is still there, but you need to use the command IN to enter, and then can go IN again to get in farther.
You are inside a building, a well house for a large spring. Off to one side is a small storeroom.
There is a shiny brass lamp nearby.
There is a leather sack here.
Taped to the wall is a faded poster.
There is a small matchbox here.
IN
You’re in the caretaker’s storeroom.
A yellow pill-shaped tablet, as large as a doughnut, lies nearby.
There are some keys on the ground here.
There is food here.
There is a bottle of water here.
Helpfully, the leather sack works as a container; keep in mind this is not a two-word parser so to operate it you need to use PUT X IN SACK. In fact, it works with multiple items at once. That is…
PUT TABLET AND KEYS AND FOOD AND BOTTLE IN SACK
…will take care of scooping up all four.
Other than the helicopter pad being different, and a slightly different building layout, there’s a new object at the grate that goes into the cave:
You are in a 20-foot depression floored with bare dirt. Set into the dirt is a strong steel grate mounted in concrete. A dry streambed leads into the depression.
There is a large cloth bag lying nearby.
The grate is locked.
The cloth bag is full of grey powder and if you EMPTY BAG it will scatter all over the place and you won’t be able to pick it up again: “Grey powder has been strewn all about.” I assume this is a softlock, simply from checking what’s inside the bag. (Crowther/Woods really was polite when it came to softlocks. It had the vase breaking when you dropped it, ruining a treasure, but the structure of the game was such that getting all the treasures was an aspirational goal rather than a requirement for having a satisfying playthrough. The various extensions, including the one from Woods himself, often were not so careful. You could eat the food early in Crowther/Woods rather than give it to the appropriate creature, but there’s a built in expectation that EAT FOOD is going to remove it from the object list; just checking what’s inside a container doesn’t suggest such a drastic change.)
I’m not going to go underground at all during this session but rather stay outside. The forest, rather than being a method to steer the player back to the caves, includes a “billboard” (as seen earlier, also in the image above) and a castle in the distance.
You are in open forest, with a deep valley to one side. Not far off is a large billboard.
GO NORTH
You are standing behind a large billboard on a ridge above a deep valley. To the north, the forest gives way to dense swamp and then to open flatlands. Far beyond, the land rises sharply towards the impassible Misty Mountains. Nestled at the base of a distant cliff are the stone turrets of a tall white castle.
The outdoors keeps going. At least some of this area I recognize from 501, although it goes a little farther than that game did.
Going west of the building leads to a “dense forest” with some mushrooms…
You are in dense forest, with a hill to one side. The trees appear to thin out towards the north and east.
There are some oddly-colored mushrooms here.
GO WEST
You are at the high point of a wide grassy knoll, partially surrounded by dense forest. The land rises to the south and east, and drops off sharply to the north and west. The air smells of sea water.
…and a sandy beach. The beach includes a “large wooden box” (the box is empty) where you can go up to find an Ocean Vista with some flowers, the first treasure I’ve found.
You’re on sandy beach.
A large wooden box has washed up on the shore.
GO NORTH
You are at a jumble of large broken rocks and blackened shoals.
A gentle path leads up to the top of the nearby cliffs. A narrow treacherous path disappears among the rocks at the foot of the cliff.
GO UP
You are on a high cliff overlooking the sea. Far below the rolling breakers smash into a jumble of blackened shoals. The thunder of the surf is deafening.
There are some beautiful flowers here!
The “blackened shoals” are incidentally a University of Chicago in-joke created by a friend of Long’s (Eric Weber); it refers to the professors Black and Scholes who made a famous mathematical model for financial markets. There’s an entire hour-long documentary called Trillion Dollar Bet about it (“this solved the ancient problem of risk and return in the stock market”); it is blamed for more than one market crash, including Black Monday from 1987.
This is also the location I remembered something very cruel from Adventure 501 that carries over here. Original Crowther/Woods had a limited number of “random” exits that could sometimes go somewhere else (north goes to a different forest than the normal exit, for instance); other authors basing their games off Adventure sometimes ran with this (even affecting home games, like in Phantom’s Revenge). Going north from the shoals will sometimes go to the cliff already seen, and sometimes it will go to a new room altogether. Back when I played 501 I only found the new room by referring to the CompuServe map!
You’re at blackened shoals.
GO NORTH
You are at Thunder Hole, a funnel shaped cavern opening onto the sea. The noise of the surf pounding against the outer rocks of the cave is amplified by the peculiar shape of the cave, causing a thunder-like booming sound to reverberate throughout the cave. Outside, a narrow path leads south towards some large rocks.
GO EAST
You are in a dimly lit passage behind Thunder Hole. Etched into the rock wall are the ominous words:
You are approaching the River Styx.
Lasciate Ogni Speranza Voi Ch’Entrate.
A hideous black dog bares his teeth and growls at your approach.
I do not remember the method for getting by the dog. I assume I need to go underground first. (I’m pretty sure all of this is 501 territory, though.)
If instead of heading west to the beach you head north from the mushrooms/grassy knoll, you arrive at some “salt flats”.
You’re on grassy knoll.
A tiny little man dressed all in green runs straight at you, shouts “Phuce!”, aims a kick squarely at your kneecap, misses, and disappears into the forest.
GO NORTH
You are at the edge of a trackless salt marsh. Tall reeds obscure the view. In the mud is the partial word “-RO–O”. The missing letters have been washed away by the tide.
A wooden pole has been stuck in the mud here.
I’m not sure what the tiny man is about, yet. Saying phuce gets the response “nothing happens.”
The salt flats are a maze that lead up to a swamp which is just a continuation of the maze.
Notice there’s a.) two “dead end” rooms which aren’t really dead ends and b.) one “death exit” from one of the swamp rooms which just kills you for going a particular direction (“You’ve wandered into a quicksand pit and drowned.”). Neither of these are polite and neither of these are used in Crowther/Woods (you could die walking in the dark by falling in a pit, but this was well-telegraphed by the game).
You are at the edge of an open area of wet sand. The dense foliage appears to grow thinner towards the northeast. A small sign stuck in the muck reads: “Site of Proposed Municipal Parking Lot — D.M. Witt, Contractor.”
Foul smelling gasses bubble up through the wet sand.
This room has multiple death-exits, which is obnoxious given the restore-a-save procedure (where you need to decline resurrection, leave the game, restart the game, decline instructions, RESUME to load as save, confirm you are loading a save game, and then finally type what you named the save). I think this is all a dead end although I haven’t checked every exit as of yet (see: obnoxious restore-a-save procedure).
I believe from here I’ll need to plunge underground, so this seems like a good place to pause for now since I know that’s going to open things wide up. Happy 2026!
(If you still haven’t read it, be sure to check out Arthur O’Dwyer’s post; he is planning a follow-up which hacks a bit more at the data. Also thanks to Ethan Johnson for some source assistance.)
For 2025 as a whole I managed to write about 85 games. This includes some older ones that I’ve been able to loop back to: Kim-Venture where an entire adventure somehow fits on a 6-character display (one that had been on my queue for a while but had been giving me technical difficulty). SVHA Adventure was newly-discovered by the efforts of Robert Robichaud (and is one game I might come back to, as the no-save-game aspect combined with extremely deadly dwarves made it too hard to finish).
I also looped back to 1980 for The Troll Hole Adventure, which was one of my most popular posts due to a combination of the funny title and the bizarro Interact computer.
1981 was re-visited with the unusual first person adventure The Maze, the designed-from-another-universe Tiny Adventure (with a very long historical backstory), the historical oddity Citadel (from a Danish author, but written in English) and the children’s game Deliver the Cake.
1982 is where things get out of hand. I’ll point to Arsène Larcin (a French game from Quebec) and The Hobbit (with a large slice of Australian history) as being popular before I broke to 1983, although after the break I also ended up getting to Skatte Jagt (first Danish adventure), Fairytale (a “children’s game” written for a competition), Takara Building Adventure Part 1 (one of the earliest Japanese adventures) and Pillage Village (an undocumented Apple II game that slipped the net where one of the authors went on to write for Origin).
(The reason I can miss a game varies a lot. In general I take the existing lists of games from Mobygames and CASA and then supplmenet them with a lot of research, but any games that aren’t on either of those sources at the time I start the year can easily go missing. For the games above, Skatte Jagt didn’t have a year attached until I puzzled it out, Fairytale I had on a different year due to the original being lost, Takara was a “lost game” only recently dumped, and Pillage Village simply slipped the net and is still only available in a “warez” version.)
Finally, I did get to a fair number of 1983 games, like the wildly ambitious Ring Quest which includes all of the Lord of the Rings on one giant map, The Palms which was the first Japanese adventure solely available on disk, Ringen which was another lost game (more Tolkien, but in Norwegian), The Dark Crystal which adapted the movie (and I give the history of the movie and game simultaneously), Puzzle Adventure which was all about Japanese wordplay combined with ancient poetry, Madhouse which was a “fangame” for the Deathmaze 5000/Asylum series nobody even remembered existed, and Valley of the Kings which was (again) thought long-lost.
Happy New Year and all that.
There’s quite a few more games (and histories about the games) than that and I’d recommend checking the All the Adventures list if you’ve built up a reading backlog.
(Random survey question: how do people read my blog anyway? I test any new posts on both computer and on phone, and I also test things on Reader.)
As far as what’s coming up for 2026 goes, it’s hard to say with my schedule, as people keep discovering things. Loosely, I know I have (not in this order)
a completely unknown and gigantic game recovered from a Data General drive with the scale/scope of Warp/Ferret
another “contest” game like Krakit and Alkemstone, but this time where it’s real buried treasure and the treasure is still out there
The Coveted Mirror
Twin Kingdom Valley
At least five Japanese games (I’m now up to ~50 for 1983 based on my research so I need to keep playing them regularly)
And one thing I’m keeping under my hat until the time comes.
My deepest thanks to everyone who contributed comments and helped in other ways. The idea of the blog being a collaborative effort was baked into the very title, so I appreciate all of you.
From last time: our protagonist had entered a room with a “blue lift” available and a postcard, mirror, and dead dog in the room. To see these things in the game you need to LOOK; typing LOOK then prompts (in some rooms) if you want to use a computer terminal. Using the terminal gives you what floor you’re on, although it can also cause a funky visual effect.
I also neglected to mention that for some reason we start with a screwdriver. (The only thing we could sneak past an initial screening? Always fun to go on secret missions equipped with almost nothing.)
The mirror is useful on an early puzzle, as is the screwdriver; the dead dog isn’t useful at all. The postcard says LOAD to KILL. This will be very important later. The screen upon entering the lift:
You just push the button B, G, 1, or 2 to operate it.
The complex is a tower with multiple lifts: a blue lift on the west side, a pink lift on the east side, and a green lift which will take the player to the end. A general map, although this is without the one-way arrows and other complications:
The problem is that the phrase “other complications” elides quite a lot. Here’s a zoomed out-view of the “real” map…
…but even on this one I’m missing some up/down connections. There are lots of “stairs” and “trap door” rooms which aren’t even really rooms proper even though they get displayed that way; when entering it you automatically go up or down a certain number of floors. I originally got very disoriented until I realized that the central “hall” of each floor is the only set of “real” rooms.
This looks off-center for good reason. I’ll get back to this later.
Here’s floor 1 (the floor above “ground”) to start with:
So on floor 1, you start in a regular corridor with the note READ POSTCARD and then going north falls down a trap door (which drops two levels) and going south leads to some stairs which get used automatically (dropping down one level). Try to go east and you are blocked by a laser beam unless you are carrying the mirror from the start.
Fortunately (although it wasn’t clear to me yet until finishing the game) you can drop the mirror here and not touch it again, and pick up the item found by using LOOK (a badge). Going south leads to “stairs down” and going north leads to “a locked glass door leading to stairs” (remember that for later, along with the LOAD to KILL postcard and the weird off-center screenshot from earlier).
Going east again leads to the first of the “color rooms” of the game. They all are described in code the same way in order to save space, with slight variations.
Here’s the actual code in question. While there’s technically a parser and world model most aspects are being “faked” so to speak; a Scott Adams game would have each item implemented as an object in code whereas these are just text strings, with conditionals for customizing the various rooms.
5000 PRINT”you can see:”:print”a large cupboard, a blue door,”:print”a red door,”
5002 print”a tv with a “;
5004 ifq=1thenprint”button”:print”and neutralisation equipment.”:az$=”press”
5008 ifq=3thenprint”control knob,”:print”and reorientation equipment.”:az$=”turn ”
5010 ifq=4thenprint”button”:az$=”press”
5012 ifq=6thenprint”lever”:print”and dehypnotising equipment.”:az$=”pull ”
5013 ifq=2thenprint”lever,”:print”decontaminator,”:printa$(47):az$=”pull “
The room can have a “decontaminator” (this floor, floor 1), “neutralisation equipment” (basement), dehypnotiser (ground floor) or “reorientation equipment (floor 2). Each one clears up a general effect on the player. The TV effect with the strange text is undone via dehypnotiser. Some exits cause “disorientation”…
This is animated with the “text window” bouncing around the screen. I didn’t even know that was possible on the VIC-20.
…and that screen earlier that was off-center was a result of the orientation issue. It’s possible to keep playing (it just looks funny) but you do want the effect cleared up by the end of the game.
Going back to the big list of objects, there’s a TV with a gizmo you can push/pull/turn that will activate a puzzle. With the cyan room, “pull lever” will do the trick.
The game is prompting a button (1 through 6) as the answer. On the puzzle above, “1 over 8” is 9, and so 4 below that is 5, meaning the answer is 5. The puzzle gets selected randomly from a big list.
handy bunch: 5, because 5 fingers.
riap otherwise: the “otherwise” is indicating the “riap” gets flipped around to be “pair”, so the answer is 2.
square corners: 4. (They’re not all hard.)
roman start to vic: 5, because V is 5 in Roman numerals. This answer annoyed me the most as it could have been VI so I went with 6.
The randomization gives a true adventure-roguelike feel although if you play for long enough you start to see repeats.
Pushing the wrong button drops you down a trap door.
Pushing the right button causes “LOUD CLICKS” and the various doors to open. That is, the red door, blue door, and cupboard are now all accessible (they otherwise are shut tight). The red and blue doors simply lead to elsewhere (on floor 1, red goes to the far east of the floor next to the pink lift, and blue jumps down to the basement), and the cupboard has an item which may or may not be useful. The cyan room’s item (that is, the one on floor 1) is a laser power cartridge which is worth keeping. The cyan room incidentally also has an item on the floor (a metal detector) which you should completely ignore.
(Of course, I didn’t know when playing what I could ignore or not-ignore. This turned out to be particularly frustrating in that this game has a three item inventory limit. Even rooms have a three item limit, so if you try to drop something in a room that already has three items, you are not allowed to.)
Continuing our tour, let’s step back to the corridor prior to entering the cyan room and go down some stairs to Floor G. The blue lift only connects to the starting room, so you have to enter via going up or down or the pink lift. What’s even messier is that the two corridor rooms don’t even connect to each other:
The east side (which you can reach going down stairs right where the mirror was used and we found the badge) has an “old control box” and some “screws”. If you try to go east you’ll get blocked by a force field. With the screwdriver from the start in hand you can UNSCREW BOX to get the forcefield down; the really wonky part is this doesn’t work until you’ve gotten stopped by the force field.
This takes you directly to the pink lift, which I’m still going to pass over in order to look at the west side of Floor G. North takes stairs down and south takes stairs up, like normal; to find the red room on this floor, you need to go west twice.
It took me a long time to find this in my playthrough, but I’m going to take care of it now.
The red room looks just like the cyan room, except it has a radiation counter instead of a metal detector (but similarly useless)…
…and solving the puzzle attached to the TV reveals a tape.
The radiation counter seems like it might be handy because going east (the last direction we haven’t tried) runs the player directly into some radiation. According to the source code, having the counter doesn’t matter.
From here you get a time limit and you have to pop back to the floor above to enter the cyan room.
One last thing about the west side of Floor G: there is a key on the floor. The key is toxic…
deadly phylox germs on the key! find yellow room entrance.
…and just like the radiation, a counter starts where you need to find a particular room, in this case the yellow room in the basement. So let’s head down there next:
The room includes a “pass” which is needed to unblock passage east. (It also gets used equivalently on Floor 2, so you can’t just assume an object can be discarded right after use.) There you can find a yellow room.
The “neutraliation” is for the disease, although I think now is a good moment spring another surprise the game can have at random.
Sometimes, you get attacked by a robot when entering one of the color rooms. Notice you get dispensed a hand cannon at the start of the sequence.
I had immense trouble here; any keypress I did seemed to cause death. I tried typing LOAD. I tried making sure I had the charger pack (maybe that would help with the hand cannon). I tried going through every letter on my keyboard and reloading with a save game state. I started to suspect maybe I was hitting a bug. I was not, but it would not be until much later that I would resolve this issue; since it appears at random I was able to juggle just avoiding having them show altogether. This isn’t silly for this game — my winning run ended up skipping quite a lot — for example, that key I mentioned, which requires decontamination to survive even being picked up? I tried it on the glass locked door, no dice; I tried it on other exits which also mention a locked door, and nothing happened there either. You don’t need the key at all; it is a red herring. Hence, I figured perhaps the robot fights could be evaded in a similar way.
One other item of note is that the basement is essentially the bottom floor (there’s a special floor at the end of the game although it’s unclear if it’s “beneath” or “sideways”). This means if you go down farther, you will get dropped into a special area. For example, you might wander into a room with a trap door, or you might push the wrong button at the color room puzzle (trap door) or you might even spend too many turns in a room trying to figure out the syntax for something (trap door, just at random it seems after X turns).
Here you need to (as shown) type LIGHT SWITCH to make any further progress. Then a TV shows a short sequence of letters, and four doors are revealed.
There are multiple variants, but the one here I was stuck on (even though I had the right answer, I couldn’t explain it). I checked on Bluesky, Mastodon, and Discord and got answers from all three (thanks to Tyler Bindon from Mastodon, Mike Piontek from Bluesky, and tjm from Discord); I think my problem was that the second screen is timed so I thought it would be something solvable quickly and also would generate a sequence that would keep going. This is not the case here.
ABCDEFGHIJKLMNOPQR
R (skip three letters) N (skip two letters) K (skip one letter) I. In case you get it wrong, you get a second puzzle, and if you get that one wrong, you get a “ceiling crush” effect and you die.
Animated!
All of that material is completely optional. In fact, other than the pass at the start, you don’t need to go into the basement at all. The yellow room has a circuit board on the floor and a disc in the cupboard, and both seem like they would be useful defeating a rogue computer, but they are absolute red herrings. (I do want to emphasize how much easier the game is with me telling you this kind of thing; imagine you’re juggling an item limit of 3 this whole time and trying to pick up things like the disc you are sure are useful, while simultaneously getting dropped into trap doors for arbitrary reasons and getting attacked by robots that you can’t defeat.)
Time to hop up to Floor 2! At least this time there’s some reason to be up here.
I haven’t been talking about them, but the red exits are dead ends like “a locked door” or “a killer robot lurks”. In both cases you might think there’s some way to handle them (like that deadly key) but they really are just dead ends.
The pass from the basement opens the green room on Floor 2.
The metronome, of course, is useless, solving the puzzle opens the cupboard revealing a gun.
Sum 1+2+3+4+5+6 = 21 is the “total”, and the “next” after 6 is 7, and the “over” is division, so the puzzle is fishing for 21/7 = 3.
If you are holding the gun and the cartridge at the same time you can LOAD GUN to charge it. (The command here isn’t obvious hence I thought it is what the postcard was referring to.)
ok…gun loaded
Despite you having a gun already if you get into one of the robot scenes after there’s still the gun that gets dispensed (and still the issue where you need to hit the right keystroke).
Now it’s time for the last(-ish) floor, Floor 3. There is no button for it on the blue lift, so you have to ride the pink lift instead, and the lift won’t let you get to floor 3 unless you are carrying the badge.
The map here is a little more straightforward than the other levels. The red exits on the map below are locked doors. (Again, no luck with the key.)
The blue room straightforwardly has a “transmitter” in the cupboard and just as straightforwardly the transmitter is useless. (I carried it around with me most of the map assuming it would have some effect.) Past that, assuming you don’t get tripped up by the geography, you can walk around a corner to find a third lift, a green lift. Try to enter the lift and a robot attacks, and there is no weapon given to you beforehand. The reason you need a charged gun is for this encounter.
It took a giant and absurd leap of insight to get through here. It would not take as big a leap for someone playing on actual hardware. You see, the VIC-20 has four “function keys”:
The postcard was trying to hint that the way to kill the robots is to press the F7 key on the keyboard, which gives LOAD text in certain circumstances.
Pimania had a bit where you needed to hit the “pi” key on the ZX Spectrum keyboard but at least the button was marked that way! (And it was needed to start the game; it wasn’t in the middle of what seemed to be a different kind of puzzle.) From what I gather not everyone used or even understood the function key use. (The article I just linked includes the line “The four function keys on the right hand side of the VIC 20 are probably the most neglected part of the whole computer.”)
Past this, while in the green lift, no matter what button you push you plummet to the “U” floor.
You do not want to use a disc. The way to win the game is INSERT TAPE.
Based on how hard I had to push to reach this screen, I was hoping for at least a laser show.
This is another case where I think a numerical rating would be deceptive; I’d probably rank it 1 out of 5 stars if I had to write a review on IFDB. However, I am in admiration of just how much complexity the author managed to stuff into so small a package, and just how far they were willing to go to toss in a little misdirection. The key in particular was what I call a second-level red herring, as in a red herring that keeps the joke going a bit longer (with the cure, plus what seem like potential uses which aren’t). Similarly, the fact LOAD GUN is required makes it seem like the postcard has been used already, even though it was hinting at an entirely different puzzle.
It is possible we may run into the author again. Sumlock did publish an adventure game of their own in 1984 called Salvage. It is for Commodore 64, but shares some resemblances to Secret Mission. In addition to the game having character art, you need to get the digits of a pass code (by collecting individual digits) in order to escape a shuttle.
The tape packaging of the original 1984 version actually comes with author names: A. Pomfret and T. Picking. I assume Pomfret is related to Mike and Tony of Sumlock (I would say maybe “A” is Tony but he was already at Ocean by then), but could Picking be the Kew Enterprises author? This will need further investigation when I reach that game in the future.
To be clear from the start, I am writing today about an extremely obscure VIC-20 game from 1983, but to do justice to the story, I need to start just a little farther back–
The University of Tübingen. Located in modern-day Germany, depicted here in the early 1600s.
While the German Johannes Kepler is now one of the most famous names in the history of astronomy, his work reached the scientific world in a slow burn. His first law of motion, describing the orbits of planets as ellipses (contra Copernicus and his “circles with epicycles”) was published in 1609 but not accepted until many years later.
Part of the issue was simply the quality of the astronomy data being collected. The obsessive work of Tycho Brahe (another one of the astronomy greats) was compiled by Kepler himself over a period of 22 years into the Tabulae Rudolphinae, a set of star charts and planetary tables with accuracy far superior to that which came before. Kepler was not a fan of the labor, writing in one letter:
Do not sentence me completely to the treadmill of mathematical calculations, and leave me time for philosophical speculations, which are my only delight.
His lack of enthusiasm for mathematical tedium was shared by another German polymath: Wilhelm Schickard. (By “polymath” I mean he was a Professor of Hebrew, Oriental Languages, Mathematics, Astronomy, and Geography.) Both Kepler and Schickard had affiliations with Tübingen University and were sometimes collaborators. We know from letters between the two that they had discussions on the labor-saving invention known as Napier’s bones (1617), rods intended to allow easier calculations; these rods, however, were still entirely manual work, needing to be placed against a frame.
Schickard got the idea: what if he could make a full “calculating machine” akin to Napier’s bones that would work automatically, like (literal) clockwork?
He got a device working and described it in some detail to Kepler in a letter, including a picture.
The device includes actual Napier bones in the mechanism, and uses an “accumulator wheel” that would cause a digit to go up by one. This involves a tooth of the wheel needing to move exactly 360 / 10 = 36 degrees and while it was unclear what exact method Schickard used, he likely had a spring set up to allow the internal gears to stop at specific points. It had the issue that an overflow (999999 + 1) could actually damage the gears.
Unfortunately, the picture in Kepler’s letter was not found until much later (it was on a separate paper being used as a bookmark) so despite Schickard being the first to create an automatic calculator he was not influential. Instead, the icon for kicking off automatic calculation was Blaise Pascal, yet another polymath, French rather than German. He obtained fame in mathematics, science, and religion (his biggest contribution in science being to prove that pressure changes with altitude, hence the unit of atmospheric measurement being a Pascal).
From a lithograph of Pascal after a painting by François Quesnel the younger.
Blaise was born in 1623, hence the story now is squarely in the Thirty Years’ War (1618-1648), which started to be the utter ruin of all of Europe. The Pascals (father: Etienne; mother: Antoinette) were a rich family that lived in the small town of Clermont. Etienne had the aristocratic job of “tax collector”. (Blaise did not mention his mother much as she died when he was three.) Etienne decided (with Blaise at age nine) that it was better to be closer to Paris where intellectual and political life was blazing. Etienne sold his tax post and invested in government bonds instead, which would normally give the Pascals a generous income while in Paris. However, the Thirty Years’ War lasted (squints) a long time, and the government cut back on their interest rates of those aforementioned bonds while spending vast amounts on war. Etienne made a protest as part of a group; displeased, the King’s Chief Minister (Cardinal Richelieu) ordered those protesting arrested. Etienne ended up fleeing Paris (back to Clermont) and leaving his governess in charge.
Richelieu on the Sea Wall of La Rochelle, painted in 1881 by Henri-Paul Motte. The Siege at La Rochelle (1627–1629) ended up being a major victory for the Royalists. It was one as well for the Cardinal, who was trying to centralize power to the King.
Events turned by a stroke of luck: the wife of Louis XIII, Anne of Austria, was finally pregnant. This, in best Louis XIII fashion, was cause for great celebration. One of the invitees was Jacqueline Pascal (aged twelve) who was known for acting and reciting poems. She made an appearance during the event and talked to the Cardinal while there, getting a promise of rehabilitation for her father rather than arrest. This ended with his father being given an appointment as tax collector of Rouen, capital of Normandy.
To be clear, this was only halfway-generous on Cardinal Richelieu’s part. Etienne still had angered the Cardinal. His place of appointment was not an easy place to collect taxes. Its location near the Channel (and former affiliation with the English king) made it a prime spot for English and Scottish Catholics and it had a general reputation for chaos.
The calculations for tax collection were onerous. Blaise was recruited to help, leading the polymath in 1642 to devise an instrument: the Pascaline. It resembles Schickard’s device in using gears although it is addition-only (Schickard’s could do subtraction). On the other hand, Pascal’s device allowed gears in increments other than 10, making it better suited for financial use (example: 12 deniers = 1 sous).
Since there was no built-in subtraction function, it was instead done with the 9’s complement method.
Because it is genuinely important for the story, a brief explanation how the 9’s complement method works. Suppose you want to do 68 − 34, but want to do it with addition rather than subtraction. Take the first number (68 in this case) and subtract it from 99; except, you don’t need to actually do the subtraction! All 0s will swap with 9s, all 1s will swap with 8s, all 2s will swap with 7s, etc. So 68 − 34 turns into 31 + 34. Do the resulting addition; with the example you get 65. Then take the end result and do the “subtract from 99” trick (or rather, digit swap) and you get 34, which is the correct result.
Another example. 572 swaps digits to be 427. Add and you get 612, then swap back and you get 387, which is the result of subtraction.
The length and difficulty of the ordinary methods led me to consider quicker and easier ways in order to relieve me of the complex calculations I had done for some years regarding positions you honored my father with in the service of His Majesty in Upper Normandy.
…and he made multiple Pascalines over his lifetime, some which still exist today, it was expensive and only available to the very rich. Still, this method led to a general approach to automatic calculating devices which lasted much longer than you might suspect. Lurking closer to our ultimate goal, in the 19th century, the comptometer was designed very much like Pascal’s mechanism but with straight rods rather than rotating dials. (The prototype used meat skewer rods in a macaroni box.) It even still used the 9’s complement method.
The buttons of the device have two numbers on them; the smaller numbers represent the 9’s complement, so a fluent operator can think in terms of swapping the 9’s complement quickly. What I mean by this is that it wasn’t as terrible a system as it might seem to modern eyes, and the device had a fantastic feature: you could press multiple buttons at the same time. That is, on a standard electronic calculator, you might need to press 4, 7, 3, and 2 in sequence to get the number 4732, but an operator of a comptometer doesn’t have to wait: they can press all four buttons simultaneously. Furthermore, the 9s complement system means that with number-buttons only a fast operator can rapidly move through additions and subtractions in mixed order without slowing down to specify what operation they’re doing.
All this is relevant to the company of Bell Punch Co., Limited, founded in 1878 in the UK, which obtained the patent rights to a ticket punch machine already in use in America. It was used for trains to — as the name implies — punch tickets; it was generally the case beforehand that people paid a flat fee for an “area” rather than their actual distance travelled. With the punch tickets, you can have an exact number of stops marked automatically.
In 1924 they expanded into dispensing movie tickets (by purchasing the company Automaticket); in 1929 they expanded again into race betting tickets. (In between these, they formed Control Systems, Limited as a consolidation company.) Bell Punch tried putting an adding mechanism to go along with one of the ticket mechanisms, and got the rights to an adding machine design (the Petometer, 1933) in the process. They soon began creating just the adding machines by themselves. The video below shows the “Plus Adder S” manufactured from 1936 to 1940 based on the Petometer model.
During WW2 they made a subsidiary brand, Sumlock, specifically for the manufacture of calculating machines. A 1943 ad highlighted the “more-work-less-staff-problem” being faced during the war. After the war they pushed even harder into the calculating space.
From a 1948 brochure.
They consequently were poised to hit a remarkable milestone of 20th century technology: they made the first fully electronic desktop calculator.
The genesis of Sumlock’s device (code-named ANITA) started at Birkbeck College in London, where Andrew Booth led one of the groups in the UK looking to build digital computers, and due to limited resources tried to think small, embarking work on an Automatic Relay Calculator (or ARC).
December 1946. Kathleen Britten, Xenia Sweeting, and Andrew Booth. Kathleen Britten was soon to be Kathleen Booth.
He visited the United States for six months, including two very important meetings. One was Warren Weaver of the Rockefeller Foundation. who was interested in funding a computer project as long as it led to research in “natural language translation”. (Odd for a calculating device, although Birkbeck College ended up becoming a center of automated language translation research.) Andrew also met with von Neumann at Princeton; the ARC was consequently redesigned with von Neumann architecture and Kathleen and Andrew wrote a paper about the possible methods of producing such a computer.
This design was picked up by Norbert Kitz who was a graduate student at the college in 1950.
I was collecting data on the older types of conventional calculators for an introduction to my dissertation on digital computers. While studying those old calculators in the Science Museum, the thought struck me that there was actually one more important page to be written in the book of their history. I had some knowledge of electronic digital computers and it seemed to me that it must be quite possible to use this knowledge for the construction of an electronic desk calculator.
He thought about such a device for some time but it wasn’t until 1956 that he met with directors at Control Systems; Sumlock was still busy at work making giant mechanical machines with 9’s complement markings on the buttons but they were keen on forming a new electronics department; by now Kitz had worked on the Automatic Computing Engine (originally Turing’s design) so had plenty of computer experience. Kitz not only was concerned with the fundamental mechanics of the arithmetic calculation, but he also needed to design the keyboard and the method of display (as prior to all-electronic calculators the displays were mechanical). As Kitz points out in an interview, “our greatest difficulty” was keeping the price down; they were aiming for the £350 to £400 range rather than the usual £50,000 for a computer.
Sumlock introduced their Mark 7 and Mark 8 fully electronic desktop calculators at the Hamburg Business Equipment Fair in 1961, and started selling in 1962, beating everyone else to market. (Sharp, for instance, had Atsushi Asada lead an R&D group in 1960 towards that goal, but they weren’t able to announce the fruit of their labors — the Compet CS-10A — until 1964.)
The follow-up Mark 9 from 1964. Notice how it still follows the form of the original Comptometer, which was itself based around the mechanics of the original Pascal device. Via the Centre for Computing History.
By 1970 (now owned by a new company called Lamson, with Kitz still in charge of calculators) they were at the peak of the UK market.
The company claims to have just under 50 percent of the U.K. market, a market that is expanding. Sales are mainly in the U.K. but outlets do exist overseas through distributors.
A March 1970 market report states they “doubled” their unit sales even with “pressure from competition supported by the full weight of the Japanese electronics industry”. However, Sumlock’s mainstay was the business industry and started selling calculators of other companies in order to fill niches.
Mostek introduced a “calculator on a chip” in 1971 and companies like Texas Instruments soon after introduced their own. (In the UK, that is — Texas Instruments had the first calculator chip to market worldwide, it was used in Japan.) Sumlock tried to jump into the fray getting a chip from Ferranti (which failed) but they ended up going with Rockwell in 1972. Quoting John Lloyd, Chief Engineer:
In 1972 Rockwell, the American defence company, approached us with an offer to put all our calculator circuitry on to one chip. Previously we had always bought from British suppliers because of the need to keep close technical back-up of these suppliers in a high-tech industry. It was a change of policy which was to prove fatal.
Development was started and the prototype of a pocket calculator was produced, the ANITA 800. I was then chief engineer of Sumlock Anita Electronics and Norman Kitz was technical director of the Bell Punch group. He came into my office looking very shaken and put the prototype pocket calculator on my desk and asked what I thought of its sales potential. I said that I thought that with good production engineering we could get the cost down to about £25 and sell a million on the home market and the sky’s the limit for export. ‘Yes I agree with that John’ he said, ‘I have just shown it to our M.D. and he can’t see a market for it’.
The prototype was fully engineered and could have been in production in weeks, but it lay in a drawer of Kitz’s desk for months.
Then Clive Sinclair brought out his pocket calculator. The sales director rushed into Kitz’s office in a panic asking what could we do about it. Kitz opened his drawer and said ‘We can do this’.
Sinclair had beaten the company to market with their Sinclair Executive; as Lloyd claims, “our engineering vision was not matched by our management’s vision”. According to a report from The Times, in 1972 Sumlock went from £1.1m profit to £290,000 loss. Rockwell ended up buying Sumlock in 1973 (separating it from Bell Punch, who was still producing ticket devices, tax counters, and cash collectors); both Kitz and Lloyd stayed with the Bell Punch. Prices of calculators started to plummet as there was a race to the bottom; by 1976 Texas Instruments was able to sell a scientific calculator, the TI-30, for a mere £14.95.
Sumlock still had plenty of expertise and could have diversified into other office machine areas (like word processors) but not long after the sale, Rockwell got a NASA contract for the Space Shuttle and started to lose interest in their foreign investments. Everyone in the main company was “made redundant” by July of 1976 and the various branches worked out splitting off into their own franchises.
Branches tended to land on computer sales; the 1980 Commodore PET price list includes Sumlock Bondain (London), Sumlock Tabdown (Bristol) and Sumlock Electronic Services (Manchester). Even when selling calculators they diverged to other brands. Sumlock-Bondain, as reported by Practical Computing, originally kept selling Sumlock calculators but eventually went to Texas Instruments and Hewlett-Packard.
All this finally leads to the Manchester branch, run by Mike Pomfret. Rather than just being reduced from a mighty engineering company to a sales company, they decided to produce their own software line under the name Sumlock Microware. Mike’s son, Tony Pomfret, was working at the store when he got recruited by Ocean (located “just down the road” from Sumlock) and Tony even makes an appearance in the infamous Commercial Breaks documentary featuring Ocean succeeding and Imagine failing utterly, the latter frittering away money on a game called Bandersnatch.
Retro Gamer: In the programme, you are shown working on Hunchback II, and in one scene, the whole team is sitting around a table, discussing the game’s design. Is that actually how it worked?
Tony Pomfret: That was utter bollocks. It was all staged. I did that game on my own.
Imagine also crosses paths with Sumlock in 1983, as Sumlock’s products included a clone of Frogger called Jumpin’ Jack for VIC-20 (every British company had a Frogger clone, it seems) and a year later Imagine also accidentally hit a nameclash by calling their C64 version of the game Jumpin’ Jack. The two companies managed to work on a plan where neither name would be changed but when Sumlock released their C64 version of Frogger, they called it Leggit.
For today we’re concerned not about C64 games, but VIC-20 games.
Sumlock released a set of games they called a Puzzle Pack written by Kew Enterprises, like Rainbows (“complete the series by typing in the next three letters”), Knight’s Move (“fill all squares of the chess board starting at the marked corner using the knights’ move”), and Graphic Twister (“rearrange each bottom square to look like the top display”). Their ad copy gives a little clue who the proprietor of Kew Enterprises is.
A compendium of six intriguing puzzles, games and IQ tests for the unexpanded VIC20. Specially written by an expert in puzzles to be both entertaining and educational for all ages and abilities. Programs include: ORBITS, KNIGHTS MOVE, GRAPHIC TWISTER, RAINBOWS, SLIDE PUZZLES, DIGITS.
The “expert in puzzles” plus educational aspect make me think we’re dealing with yet another math schoolteacher turning to games, but that’s just a guess (the address of the company is residential).
The Puzzle Pack games were eventually republished for MSX and Plus/4 under the name Can of Worms, with a few modifications, and Kew Enterprises still mentioned on the game’s screens. What’s puzzling is after this game was picked up Kew Enterprises started advertising their game Secret Mission on their own, using magazine classified ads.
I don’t think there was some kind of animosity, especially given the continuing use of the other product. It might simply be a matter of platform; Secret Mission was a VIC-20 game (for systems with a 16K expansion) and Sumlock started to focus on C64 games from this point, adopting the label LiveWire (but still “published by Sumlock”; they’re the same company).
From Everygamegoing.
Our job is to infiltrate a building and disable a rogue computer.
This is animated.
You need to LOOK in every room in order to see items. Furthermore, for many rooms the game starts by prompting if you want to use a computer terminal while there; the terminal indicates which floor the player is on.
Sometimes the terminal produces an visual giving the side effect of the player being “hypnotically distressed”.
While I’ve finished the game, it is far more complicated than you’d expect from a VIC-20 game, so I’m saving the rest for a part 2 where I’ll do my playthrough. The game includes one of the most outrageous puzzles I’ve run across in an adventure game and it is overall convoluted enough (and obscure enough) it is possible the number of people in the past who finished are in the single digits.
Liverpool and Stonehenge, the two important locations for today.
While concerts at Stonehenge on the summer solstice had been around since the 1890s, attracting crowds in the thousands, it wasn’t until the 1960s that “rowdy behavior” had started to annoy the locals enough to coax them into installing temporary barbed-wire and restricting access; only Druid revivalists were allowed starting in 1964.
Despite this prohibition, hippies kept showing up on the solstice anyway. One police report indicated “people came and strummed guitars in the field next to the monument”. The popularity of solstice gathering remained and in 1969 a group of two thousand crashed through the fence, interrupting the Druids who were busy with their own ceremony. This eventually led to Phil Russell, a “hippy icon” also known as Wally Hope, founding the Stonehenge Free Festival. The first happened in 1974, advertised by hand-written flyers from Russell himself.
Every Day is a Sun Day. Every One is a Wally. Every Where has a Heart. Every Festival is a Cosmic Battle Honour. Every Body is a Department of the Environment.
After the festival was over a group of 30 people calling themselves the “Wallies of Wessex” stayed in order to “discover the relevance of this ancient mysterious place.” They were evicted but simply returned later.
The festival tradition continued the next year as well, although Phil was not able to attend (he had been arrested for possession of acid); even after Phil died under mysterious circumstances in 1975, the festival kept going. Quoting my main source:
…when over 5,000 people turned up for the Stonehenge festival, hundreds of the festival-goers staged an invasion of the temple on the day of solstice, honouring Phil’s memory by scattering his ashes from a box, inscribed with the epitaph ‘Wally Hope, died 1975 aged 29: a victim of ignorance’…
The festival became a movement of freedom, sort of akin to the earlier iterations of the Burning Man festival in the United States. Hippies and travelers used it as a reason to gather, and the academic Kevin Hetherington notes that Stonehenge was “a kind of space in which people could do things that they couldn’t do anywhere else.”
The druids kept coming, even as the crowds got larger. Photos of the 1980 festival by Paul Seaton.
One of the attendees in the early 80s, when the crowd had reached tens of thousands, was a young Matthew Smith (born 1966), a celebrity of the British computing scene. He created an absolute sensation when he published Manic Miner with Bug-Byte Software (1983).
He had started programming in 1979 when he received a TRS-80, and even after the Spectrum ZX came out he still did his writing on a TRS-80. (Compare this to The Hobbit, which similarly was a port from TRS-80 to Spectrum as it used the same underlying chip.) From Matthew:
I did some of the graphics for The Birds And The Bees and then did Styx for Bug Byte. But Manic Miner took just eight weeks. There were 20 levels, but I did most of the testing on the first level. Once it was going, then it was just about designing the levels.
To modern (especially modern non-European audiences) it might seem puzzling looking at the game now, but it was a sensation. He did things with the graphics and sound that seemed impossible for the ZX Spectrum (the sound plays continuously, which was essentially unheard of; as Matthew explained “you simply interrupt the action very frequently to send a signal to generate a tone”). Even a modern take calls it “the ZX Spectrum platform game — not equalled for many years.”
Due to payment issues (Bug-Byte owed 25,000 pounds at one point, according to Matthew) and the fact he had a “loophole” in his contract, he soon withdrew publishing from Bug Byte and left with Alan Maton to form his own company, Software Projects. (For a while, there were two versions of Manic Miner, one sold by Bug Byte and one by Software Projects; Bug Byte could keep selling the game as long as they still had stock.) The follow-up to Manic Miner, Jet Set Willy, was as hotly anticipated an item as software could be in the 80s. Alan Maton, Matthew’s business partner on the new venture, said:
Everyone went mad trying to rush them into the shops. We had people turning up at our offices all through the night — one guy flew up from London by plane, rushed in with his docket, collected his copies and flew back on the same plane which he had waiting for him.
Despite the influx of new money, Matthew was still not only a young teenager but one inclined to attend hippie Stonehenge festivals and (allegedly according to the press) he was “partying, getting drunk and falling over a lot” and there were later allegations of “debauchery” and a “self-destructive” spiral, potentially induced by so much fame and expectations. Even when making Jet Set Willy he was under immense strain.
Well, there was a lot of pressure, when you’ve had a success the pressure to follow it up is even more than there was to produce the… to succeed in the first place. And a lot of the pressure is supposed to be supportive, but it becomes actually just a nuisance. Like people waking you up because you’re sleeping too long and things like this… if you’re like having trouble finishing something, if you wake somebody up every time they’re alseep they’ll get it done quicker. It’s just like, I mean, probably anyone who’s had any success with anything has felt that kind of pressure… and some of them haven’t buckled under it. But I was buckling.
I should be careful to note despite the two games (Manic Miner and Jet Set Willy) being Software Project’s two best selling game by far, they do have a catalogue of other games they produced while still alive, including Spectrum ports of Dragon’s Lair, Lode Runner, and the Sierra On-Line educational game Learning With Leeper.
From Spectrum Computing.
After his two-fer of best-selling games (and an effort to create “Manic Miner III” that was aborted after four months) Matthew Smith eventually disappeared for a time and became a legend. He re-surfaced in the 2000s and started to give interviews. In 2013 a psychedelic band named The Heyze immortalized him in song on a concept album.
Now we need to step back to 1983, because Matthew Smith is not our author today, but rather a 14-year-old D.J. Coathupe (also known as “Dave Coathupe” or “David Coathupe”). He had gone to a Bug-Byte in Liverpool with a text adventure he had written in BASIC for the BBC Micro.
I had no formal knowledge of programming … I remember being so proud of my 28 pages of code that I’d show family friends the length of the printout, rolling it out across the lounge floor.
While there Alan Maton showed him Manic Miner, which hadn’t come out yet. Dave was impressed, deciding (after the game became a hit) to make a BBC Micro conversion.
I hand copied the levels onto graph paper and wrote a small program to extract the character animations from the Spectrum version. I purposely mirrored the music from the Spectrum version despite the BBC Micro having more audio capability.
In order to get the game to work in high-resolution mode as he wanted he needed to do fancy screen-swapping tricks (“post Vsync timer interrupts using the 6522 VIA chip and then reprogramming the video control chip mid screen refresh and back again at the end of the frame”) which unfortunately caused flashing on some monitors but clearly indicated a technical proficiency. Despite Coathupe making the port all on his own, Maton was impressed and the game was published by Software Projects.
The royalties bought me more computer hardware and introduced me further into the Acorn computer scene.
This was when Software Projects was falling apart. (Jet Set Willy 2 came out, but that was the result of taking a CPC version of Jet Set Willy — which added levels — and backporting it to Spectrum, rather than any kind of new initiative on Matthew Smith’s part.) The timing here possibly helps explain why Jet Set Willy never made it to BBC Micro and Dave stayed away from games for a time. After graduation Dave instead went on to work on graphical utilities like image processing software for the Acorn Archimedes and the ill-fated desktop publishing program Tempest (which probably was never released). He eventually got back into games (still in graphics, now 3D), but we are floating way past the target, those 28 pages of code in BASIC our author was so proud of.
Via the Museum of Computer Adventure Game History.
Old Father Time’s staff and hour glass have gone missing and you need to find them “before the sands of time run out.”
Unusually for a BBC Micro game, text is in ALL CAPS. I am not sure the reason for this.
The game starts in what appears to be a standard forest maze. I spent a fair amount of time trying to map it imagining there were loops and dead ends everywhere.
It eventually dawned on me that this was not a maze but rather a regular grid, and in fact the best way to start was to simply go through each square of the grid and plot it out. The star below is the start point.
Along the edge, each room states “YOU ARE THE EDGE OF THE FOREST DO NOT VENTURE OUT OF IT WHATEVER YOU DO.” Disobeying this direction causes the player to “FLARE UP IN A PUFF OF SMOKE”.
(The fact you have been “summoned” and this curious behavior here makes me think we’re not supposed to be a “human” protagonist but rather some sort of daemon or sprite. We never get details on that aspect.)
One room has a “tall tree”:
The important command here is not GET LEAVES but MOVE LEAVES; there are four places where you can find things this way. Two are simply clues (marked on my map with green leaves).
The second clue (about digging for a key) will get used quite shortly; the clue about NOT AN OBJECT YOU MUST DROP is sort of a meta-clue which applies through the whole game. You are not allowed to drop things in general (they’ll vanish in a poof) and this ends up being very important for the end of the game.
The other two leaf-hidden things are objects: a bag of gold coins and a magic rod. In case you’re wondering, no, this is definitely not a “treasure hunt”, the gold is meant for a specific use case. To the east of the gold coins there’s a sign about “YOUR DESTINY LIES TO THE EAST” and if you go east you will eventually reach a cave with a boulder.
?MOVE BOULDER
YOU ARE AT THE ENTRANCE TO A CAVE. THERE IS A LARGE BOULDER BLOCKING THE WAY IN. YOU ATTEMPT TO MOVE THE BOULDER BUT IT IS MUCH TOO HEAVY FOR YOU.
“WAVE ROD” dispenses with the boulder (you can “LEVER BOULDER WITH ROD” as well but I only found this out looking at a walkthrough later).
To the west and east are “small damp caverns” that are apparently empty; based on the hint from the leaves, we’re supposed to go east and DIG three times.
After this, I took the key back to the door and … couldn’t open it. I tried UNLOCK DOOR and UNLOCK DOOR WITH KEY and USE KEY and INSERT KEY; it doesn’t help that the game has a weird “follow-up question” prompt it will sometimes use.
If you see the follow-up prompt, you’re doing it wrong. Also if you don’t you’re probably still doing it wrong.
I finally hit upon — well actually, no I didn’t hit upon, I got so befuddled I checked the walkthrough and found it wanted OPEN DOOR WITH KEY.
YOU INSERT THE KEY INTO THE LOCK. THE DOOR LETS OUT A LOUD CREAK! AND SWINGS OPEN.
There’s a second nasty trick right here I’ll come back to, but let’s look at the general map for this area first:
If you go all the way north and try to go east, you get fried by a light beam
The x5 part is a corridor where there are letters “too dim to read”, and we’ll get to those in a moment.
Without any real prompting or hint, you’re supposed to DIG at the catacombs. This will reveal “GEMS” that “ARE SET IN SUCH A WAY THEY MAKE A WORD” which is “EQUILIBRIUM”.
AS SOON AS YOU’VE READ THE WORD THE SOIL FALLS BACK OVER THE ROCK.
I tried the word everywhere, and you’re supposed to notice there’s two different messages that get displayed. In most rooms it says…
NOTHING HAPPENS.
…but if you are at the far end of the hall next to the deadly light, it says…
NOTHING SEEMS TO HAPPEN.
The game is going meta. In a pragmatic, physical sense, there is no difference between the two results; rather than engaging with a game just at a conveyance-of-plot level, you’re supposed to get at it as a piece of software, and since the two messages are different, nothing seems to happen means that the light is no longer deadly.
From here I was very stuck and I needed the walkthrough again. This is yet another meta-moment — or at least I think the author considered it that — but it comes across as a bug instead. After you dig and see the word EQUILIBRIUM, you can LOOK and you’ll see a LAMP in the room. If you leave and come back later and LOOK, the lamp won’t be there, so this isn’t even a matter of “you didn’t notice a lamp physically there” but rather a lamp only appears because you typed LOOK after typing DIG. This just doesn’t make physical sense any more.
At least I had some straightforward moments from here. With the lamp I could turn it on (or just type ON) and go over to the long corridor with the letters too faint to read. They spelled, individually, “EGMOA”.
EGMOA just gets the response “EH?” which the game was using for not-understood verbs, so I spent some time rearranging and got OMEGA.
NOTHING HAPPENS.
This is good! It means the verb was understood. While this was going on I wandered over to the southwest of the map and did LOOK (because of the weird lamp thing, I still don’t know the logic) and found a MIRROR in the darkness.
With the mirror and the word OMEGA in hand, I was able to get to the next part of the game.
To be clear: first you need to be holding the mirror to disperse the dazzling light, then you need to use OMEGA to warp to the next section. At this point, my inventory had: ROD, COINS, KEY, MIRROR, LAMP, although the LAMP doesn’t last long unless it gets turned off, because
A SWARM OF THIEVING MOTHS ATTRACTED TO LIGHT HAVE JUST STOLEN YOUR LAMP.
I needed the lamp back (just a game restore, and do OFF before OMEGA) but at least being in the darkness gave a hint as to what to do next.
Being invisible helps you get through the corridor, which has TERRY THE TROGLODYTE where AS HE GREETS YOU HE CLONKS YOU WITH HIS CLUB AND KILLS YOU. I don’t think I’ve played a Britgame with this much compacted weirdness and death and difficulty since Zodiac.
Doing things in the proper sequence: lamp off, wave rod, get through corridor, lamp on — leads to another difficult (or at least arbitrary) section which I managed to barely figure out.
While playing with verbs earlier, I knew that BREAK worked on things to vaporize them; this plus the common myth of “seven years bad luck” with a mirror let me to test BREAK MIRROR.
Whoops! Unfortunately things get even more arbitrary. To the north is a SMALL DARK ROOM where you SENSE SOMETHING MAGICAL but the game gives no further detail. I had neglected up until now to EXAMINE MIRROR (which at least I did because while I was trying to figure out how to avoid getting hit by the curse).
The genie comes out of the lamp via RUB LAMP, but unfortunately it isn’t like Adventureland and some other games where you just do it anywhere. The genie only comes out of the lamp while in the SOMETHING MAGICAL room, and I really don’t think there’s a hint; the game is just expecting people to keep testing everything everywhere, I suppose.
At least the mirror hint made it clear what to do after I summoned the genie.
While holding the STAFF OF POWER from the genie, you now can safely break the mirror and remove the dwarf curse.
HE GIVES YOU A GOLD RING AS A REWARD. THE CURSE IS DESTROYED BY THE STAFF OF POWER AND THE MIRROR IS RESTORED.
There’s additionally a nearby pit you can now JUMP safely down into. Previously, JUMP was fatal. (It’s a good thing the game is linear, otherwise this would be outright impossible.)
This leads to the final section of the game, and would you believe it gets even more unfair?
To start with, there’s a sword just to the south of the pit landing you can pick up (no writing or weird hints on it, it’s just a sword). A little bit farther there’s a MEDUSA, and as hinted at by the mirror, you need to be holding the mirror to survive engaging with the creature at all; sadly it does not cause a bounce-and-turn-to-stone thing like some games. Instead you’re supposed to use the sword to kill the medusa.
Except KILL MEDUSA WITH SWORD and CHOP MEDUSA WITH SWORD and STAB MEDUSA WITH SWORD don’t work, and astonishingly, this is intentional. The right verb to use is a puzzle. Go back to the hint: it very specifically says you need to “slay” the medusa, hence the only correct command is SLAY MEDUSA WITH SWORD.
Also, the serpents are independent and you need to SLAY SERPENTS WITH SWORD as well in order to get by.
YOU STRIKE OUT AT MEDUSA’S HEAD TO ENSURE ALL THE SERPENTS ARE DEAD.
Well. At least I could solve the next puzzle. It involves a waiting room followed by a marble room, except the marble room is a dead end. Based on the fact that switching between light and dark helped earlier, and just some old-fashioned intuition, I tried OFF while at the marble room and got a clue.
Back at the waiting room you’re supposed to WAIT many times in a row, and eventually a passage will open.
And here, at the very last room of the game, is where things get very very evil.
First off, back at the door much earlier, you’re supposed to GET KEY after using it; it sort of gets implied that it is stuck in the door, and I missed doing this the first time (the hint about hanging on to everything does meta-imply this is a problem that can come up, though). The key is used to unlock the chest: OPEN CHEST WITH KEY.
The key has the long-sought after hourglass, but if you pick it up and just try to book it out (to the north) you’ll die.
One helpful message is how if you GET CHEST the game says you are only allowed to take one item out of the room, and that isn’t it. The game is implying that you have to take very specific items out, namely the things of your quest given at the start: the hour-glass and the staff.
But — you can’t drop items! If you drop anything, it vaporizes on the ground and it makes you unworthy. (Mind you, the game never explains the logic of worthiness — you simply can’t get through, and it isn’t clear if there might be something else causing the problem.)
What works is the syntax of DROP ITEM IN CHEST or DROP ITEM INTO CHEST.
This is sort of a hint-based reality; with magic of course anything can happen, but on the player’s side the only motivation for trying this is to imagine there’s some way to defy the hint. There’s not even a good reason to assume you’re supposed to only have the staff and hour-glass (other than the weird comment about leaving with one item — but even that’s a bit deceptive, as the “one item” is the hour-glass and you get one-more item with the staff).
The End.
Those who have followed my journey enough know that this sort of outside-the-box thinking isn’t that outrageous for Britgames (see the Program Power version of Adventure, for instance). It isn’t like it was impossible for other countries to have the same meta-aspect, but something just seemed to be in the air in Britain to get Pimania and Urban Upstart and that modification of a Haunted House game that turned the undead into squirrels.
Maybe there was. Returning to Matthew Smith, when asked if there was any “mismanagement or irresponsibility” of his company:
I was at Stonehenge in ’84 but not in ’85. Things were getting heavy, man.
To explain: while the Stonehenge group always had a political bent, the early-80s had more overt action going on everywhere. The pressure from the Thatcher government — especially after the Falklands invasion — made it seem like the country was dying, and unemployment was on the rise (it didn’t even reach its peak until 1984, at 11.9%). Riots started rocking the country.
From one of the “Stop the City” demonstrations in 1984.
With Stonehenge in particular, and the 1985 reference Matthew Smith made, he was talking about the Battle of the Beanfield, one of those most infamous instances of police violence in British history. The government was putting its foot down: the festival was too wayward. Some accounts from the book Battle of the Beanfield:
I noticed policemen running amongst the traffic jam on the road, smashing windows. Six officers were in my mate’s crew cab van. I didn’t think they should be bundling him off for sitting in his van on the Queen’s highway. When I told them this, they told me to get lost or I’d be for it. The next thing I know, I turn round and there’s eight policemen with truncheons raised, charging at me from a gate, so I legged it.
I was struck by a brick thrown through the windscreen. There were hundreds of police, about 50 round every vehicle. The police were ultra-heavy. They smashed every window in our bus. The boys tried to get off the bus peacefully and were beaten rather badly.
Six officers with riot sticks surrounded the front of the coach and started smashing the front windows. Glass flew everywhere. I handed the baby back to her guardian and noticed one officer go round to the driver’s window, where Lin was still seated, and smash it with his stick, then the big window directly behind that, where her baby slept, oblivious. I shouted, ‘Peace, peace, there’s a baby on board’, and proceeded off the coach, where I was arrested.
There are videos, but most of them are age-restricted and aren’t allowed to be embedded into a post, like AMBUSH IN THE BEANFIELD 1985 (THE NASTY FILM). The main point here is that the era of freedom of festivals was ending, and this extended to other arts. One of the ways the British authors expressed themselves in this complicated era was with surreal platformers; another was errant text adventures.
Coming up: a story that starts in the 19th century and a company that falls very far indeed.
This is a great echoing chamber. The ceiling is so far above that your flashlight can’t reach it. A broad flight of stairs leads down from here, and there are other rooms to the south.
GO SOUTH
The chamber you are in is lavishly painted with scenes from the ancient Egyptian view of the afterlife. The picture that stands out the most is one of the soul of the deceased being weighted against a feather, in a balance scale. There is a wide doorway to the north of you, and a rather narrower opening on the east.
A large tarnished coin has been dropped on the ground nearby.
The closest comparison game I can think of — despite the light presence of magic, and heavy presence of magic at the ending — is the game Polynesian Adventure. Much of the interest is “touristic”, trying to create a location to just hang around in, with more care taken to scenery than the other Dian Crayne/Girard games. There’s even a modicum of research! If you want a modern comparison, consider how the Assassin’s Creed series now has educational spinoffs.
Most of the locales don’t have obstacles as much as exploration, and the two parts I ended up being (briefly) stalled by in my last push both had to do with trying to force-fit the whole thing into the Crowther/Woods format.
To continue directly from last time, I had gotten past a camel (via feeding it a carrot) and unlocked a door (with a key that was just lying around outside).
The flashlight is now on.
This is the west end of a long sloping corridor. The east end of it leads down into a what looks like a large room. A door in the north wall is open to the bright light of day.
This is a more extensive complex than the previous ones we’ve seen, although it still is relatively linear. The top floor, to start with, is a temple of Maat.
Treasures include a rug from the “18th dynasty”. That would be very valuable indeed as no rugs exist that last back that far (1550 to 1292 BC) as the materials used (like reeds) simply would not persist that long. There’s also a shrine to Maat with an “idol”, another treasure.
This room holds the shrine to the goddess Maat, represented as a winged woman holding a great ostrich plume. The only visible exit from the room is a door that leads out of the east wall.
An idol of the temple goddess, beautifully carved, stands here.
It isn’t like the rooms were always event-free, because by now I had triggered the Priests of Set who were appearing every so often like the dwarves of Adventure.
THROW AXE AT PRIEST
You killed the priest! He — or it — sinks to the floor and crumples into a heap of dried skin and rotted cloth. A sudden breath of incense-scented air scatters the dust that is left.
The mechanics are simply that
a.) if they appear, they only attack if you move
b.) if you move, you have a random chance of dying from an attack
c.) you can kill them by using THROW AXE AT PRIEST repeatedly but sometimes it takes many tries
with the end result being that there is no danger at all as long as you pause through the annoyance of dealing with the priest at random points in the game. (The dwarves could sometimes hit you randomly even if you did everything right. This is “unfair” but it also made them have more agency; they’re another exhibit in how some historic game design choices seem outright bad but at least did serve a purpose.)
The upper Maat level is followed by a “treasury” which is a very small maze…
There’s a “star ruby” treasure along the way. The green-marked room will come back later.
…and the next level down includes a “votive altar” next to “an odd ritual object, covered in diamonds.”
This area includes one puzzle, one where I knew what to do almost instantly, but struggled a little with the parser.
This is the west end of a long stone corridor. The end of the corridor is blocked by a large fall of stone from the ceiling. The corridor opens up to the south, where a chasm splits the ground. You can see across the chasm to a short, dark tunnel.
Back at the Nile (right after feeding the crocodile) there was a plank; this is where it gets used. I tried many iterations of THROW PLANK and PUT PLANK ON CHASM (which said something about there not being a switch) with no luck. PUT PLANK OVER CHASM similarly did not work. There really didn’t seem to be any other way through, so I finally hit upon the right preposition.
PUT PLANK IN CHASM
With a little bit of work, and after knocking down quite a bit of rock, you manage to slide the plank across the chasm.
IN chasm? Argh. (Checking the walkthrough from Exemptus which just came up, it looks like ACROSS works too.)
Exploring the area after the chasm:
This includes the “Feather Chamber” I quoted earlier, an “emerald sundial”, a “gold ring”…
You are at the bottom of a small air shaft. You can climb up into the shaft, or you can take a cramped eastward exit.
A small gold ring lies gleaming on the floor nearby.
GO EAST
This corridor is lined with paintings of the great Egyptian god of the dead, Osiris. The pictures show his death at the hands of the jackal-headed god, Set, and his rescue by his wife Isis. A rather cramped exit leads off to the west, and there is a doorway to the north.
…and a semi-aggressive mummy.
This chamber is rather large, but has a low ceiling. A frieze along the east wall shows a hunt scene, with the pharoah riding in his chariot, shooting arrows at some brightly colored birds. There is a doorway in the south wall, and another to the north. There is a lidless sarcophagus standing next to the north door. Inside it is a wrapped mummy, arms crossed across its chest.
GO NORTH
To your horror, the mummy steps awkwardly out of the case, and lurches toward you, linen-wrapped hands outstretched for your neck! Seeing you retreat, the creature returns to its coffin.
sigh I guess there had to be one. I guessed (correctly) I wasn’t able to take the mummy down yet and escaped; one of the passages drops you at the pyramid, so the idea is you’ve walked underground all the way from the secret door in the mountains to the pyramid.
One of the items taken from the mummy area is a “large tarnished coin”. I thought to READ COIN thinking it might give more information.
“Fifty Piasters”
(After you’ve found the coin, the person at the souvenir shop offers to sell you batteries for your flashlight for the same value as the coin. This is straight from Crowther/Woods, where the vending machine can get batteries and add to your turn limit, but in this game the light limit is so generous you don’t need to even think about it.)
The obstacles I had remaining were the door with the seal (“dog, with nine little men”), the statue of Ramses (“blocked by a monumental statue of Rameses The Great”) and the mummy. On a hunch, and hanging out at my treasures anyway, I went through each one and did READ on each one looking for more information. The lyre (from the very small area found south of the pyramid) and the charm (found in an above-ground tomb) led to useful things. Let’s deal with the lyre first:
The inscription says it belongs to the pharoah Rameses II.
I already knew PLAY LYRE worked (but didn’t sooth crocodiles or work to break open seals) but I hadn’t tried it on the statue yet.
There is a thrill of sound from the lyre’s golden strings. You hear a grating sound, and see a large piece of sandstone between the statue’s ankles move aside, showing a path east.
GO EAST
This is a rather narrow crevice, and you’re luck you aren’t any thicker through the waist. Ooof! You can go east from here to a tunnel of some sort, and it’s the obvious way out. A bright patch of sunlight shows an exit out to the west.
Rather than “levels” this area has essentially a “west section” and an “east section”. Looking at the west first:
Again, essentially no obstacles at all, but the scenery was interesting enough to make up for it. The great tour of every important deity continues:
This is the center of the Temple of Isis. It must have been really magnificent when it was in use. Those huge columns are nearly forty feet high and it probably took several hundred men to move them into place. The great statue of the temple deity is south of you, and the temple entrance is north.
GO SOUTH
This is the south end of the Temple of Isis. An immense statue of Isis, nearly 35 feet high, towers over you, wearing her throne-shaped crown, and holding the infant Horus in her arms. The only way out of her dark implacable gaze is to go north.
There is an ancient Roman fibula pin here, made of platinum.
Of the treasures here (Roman pin, bracelet, table of marble, water clock) I was briefly tricked by the last one, as the description flowed in such a way I didn’t realize I was dealing with a separate object in the room.
This is the robing room. Exits lead to the north and south.
There is an ancient wooden clock here, the sort that measures time by dripping water. It must be Roman; it stopped at IV.
There’s one non treasure, some “dry leaves”. I tried the “read” thing again (I was starting to do this out of habit) and despite a tongue-in-cheek response it was helpful anyway.
There is a small bundle of dry leaves on the ground near you.
GET LEAVES
Okay.
READ LEAVES
I might try reading the traditional tea leaves, but these are tana leaves, and there’s nothing written on them.
The game doesn’t otherwise say they’re tana leaves. Tana leaves are an entirely fictional type of leaf that features in The Mummy’s Hand (1940) where it serves as the vehicle for eternal life.
Hence it is pretty clear where these should go back to, but let’s take care of the east side of the map first!
This has an ankh, gold bull, and jade…
You are at the Altar of Apis, a large square room carved out of yellow sandstone. The north wall is carved into gigantic representations of the sacred bull, Apis. There are dark halls leading out of the room to the east, south, and southwest. On the west there is the opening of what looks like a long tunnel.
There is a beautifully carved piece of jade lying here.
…but besides me hinting something about the ankh (it will be important later), there were two things of note. One is that this is where the tomb robber started stalking me (aka this game’s “pirate” with the exact same mechanics, just different room messages).
A tall dark tomb robber, dressed in old rags and carrying a large leather sack, steps out of the darkness, comments “I’ll just take that, thank you,” and grabs up your treasure before you even have a chance to blink!
Note, despite it being essentially a text swap, the robber does not declare where the treasure is going. The pirate Woods put in announced the treasure was going in the maze, but had the pirate’s spot hidden in such a way that someone specifically searching for the pirate treasure would have an easier time finding it. Here (and in essentially all other renditions of the “pirate”) there is no such consideration.
Additionally, there’s an oddness to one of the rooms where I can’t figure out if it is meant as a bug or not.
You are walking through the ancient Tombs of Apis.
DROP JADE
Okay.
SE
You have reached a dead end.
NW
You are in the tombs of Apis.
There is a beautifully carved piece of jade lying here.
SE
You are in the tombs of Apis.
For this room in particular the room description is sometimes “in the tombs of Apis” and sometimes “a dead end”. I thought Dian had briefly succumbed to something that happened in Phantom (derived off the forest in Crowther/Woods), where exits would randomly go to different places, but then I tried dropping an item at the “dead end” and realized it and the other room were the same, just with the room description shifting.
With all that cleared out (except me missing the clock until later) I gathered everything back in base camp and took the leaves over to the mummy. I still wasn’t expecting to get through, yet; the fictional leaves usually have to be concocted into a brew of some sort, but I figured even if I failed to get by the mummy I might learn some useful information. GIVE LEAVES TO MUMMY:
The mummy breathes deeply, and steps out of the coffin. Taking the leaves, it crumbles them to powder and rubs them all over it’s linen-wrapped body. There is a heavy aromatic scent in the air, and a shimmering light. To your amazement, the linen melts away to reveal a handsome young Egyptian man. He smiles, points to the north door, and then vanishes into thin air.
Well. No way that can go wrong. This opens the way to a small area whose only purpose is to dispense some “pale blue pearls”.
This is the “Shrine of the Great Pharoah Userkaf, Justified.” The walls reflect back the beam of your flashlight with the warm golden glow of bronze. The only exit is in the west wall.
A long string of pale blue pearls has been dropped here.
I didn’t remember Userkaf even existed! He was the founder of the fifth dynasty. His pyramid is now so ramshackle, for a time it was called a “heap of stone” by locals.
All that leaves only the mysterious seal with the dog. I also mentioned READ worked on the silver charm; while the silver charm is out in the open, the ankh is buried in the tomb with Isis and Apis and hence there’s a good chance this tomb will be explored last by the player. At the very least it feels like the climax of the game.
READ CHARM
There isn’t any writing on it, but a worn engraving on the back shows a crouching jackal and nine men bound with rope.
This matches the picture of the “dog, with nine little men”. All you need to do is be carrying the charm and you can walk through. (This incidentally makes the spot quite liable to suffering the Parallel Universes Problem where a player might enter without realizing they were even solving a puzzle, get stopped a little way in, and try to come back without realizing the charm was helping them earlier!)
You are at an open doorway. Through it, to the east, you can see a passageway that leads down into silent darkness. To the west there is a staircase leading up to the sunlit desert. There is a large seal impression over the lintel of the door.
EAST
This is a descending passage, partly filled with chips of pale granite and dark flint. It runs roughly east and west.
EAST
You have reached an open doorway. To the west you can see a sloping passage. To the east there is a large antechamber. A design has been carved into the floor in the center of the doorway, and looks as fresh as the day it was made.
EAST
You start forward, but a shimmering figure appears in the doorway and some mysterious force holds you back!
There is a doorway here, with rooms to the east and west. A design has been carved into the floor in the center of the doorway, and looks as fresh as the day it was made.
READ DESIGN
It seems to be a large cross with a loop at the top.
The second door is what requires the ankh. Nothing written on it this time, you’re just supposed to recognize the shape. With the ankh held, you can enter the “last section” of the game (except it might not be last for a particular player, it was just last for me).
This is a fairly large antechamber, filled with an incredible collection of miscellaneous items intended for the use of the dead pharoah. An inscription, written on the wall in gold, says “The Beautiful God, beloved, dazzling of face like the Aten when it shines, The Son of Aten, Akhenaten.” Evidentally you have found the lost tomb of the great heretic king himself!
This is the tomb of Akhenaten, the one who tried to convert Egypt to worshipping only the sun.
There is an odd sound echoing through the air. It sounds like a flute. A slow tremor goes through the earth.
I’ll explain that shortly, as I rewound time a bit. I knew I was still short on treasures elsewhere, as I hadn’t found where the tomb robber had taken my things! (I was able on one run to avoid him appearing altogether, but given how closely this matched Adventure it had to be the case that he has his own treasure that only appears after he steals yours.) I went back over the entire map and couldn’t find his stash. I ended up looking at the map of Exemptus; it’s back in the Treasury where I marked the room in green. This yields a “large leather sack here, full of ancient jewelry” along with anything you’re holding. While I was busy doing this I also found the clock I had missed the first time around.
Back to that flute: this has everything from Crowther/Woods, including the cave collapsing when you’re at a certain point; the cave “closes” and the endgame eventually triggers. (Hermit and Phantom don’t copy this!) The thing that collapses is the tomb you’ve been depositing the treasures in; you can have a suboptimal and confusing ending (just, you hear the collapse, game is over) if you’re not inside. If you are inside:
There is a rumbling sound from the tomb entrance, and the room spins around you. You blink, and to your amazement you see a
whole throng of people, dressed in the magnificent robes of ancient Egyptian aristocrats! The tomb has vanished, and you see that you are standing in a palace. The people hail you as their next Pharoah, miraculously sent to them by the gods!
You have solved the secrets of the Pharoah, and found all of the treasures of the Ancient Ones! Certificate number:041122HC
You have conquered Pharoah’s Curse!
Your final score is 191.
To reach a higher rating would be a really neat trick!
Congratulations! You are an Adventure Grandmaster!
This turned out enjoyable for most of my playtime, with the hiccups either technical (parser weirdness, especially with the GIVE issue) or from the engine still slavishly following in the steps of Crowther/Woods. The re-dress of the fanatics and the tomb raider kind of work, and they at least serve to make the puzzle-less sections have the occasional moment of tension, but I found the essence of the game was more in the “tourist” aspect than in the puzzles. To recap, assuming you think to READ at the right moments:
a.) the carrot goes to the camel
b.) the meat goes to the crocodile
c.) the plank goes to a gap in the floor
d.) the key goes to a locked door
e.) the shovel is needed to dig out something buried
f.) the crowbar is used to lift something heavy
g.) the Lyre that says it was from Ramses goes to Ramses
h.) the charm with a picture of 9 men goes to the seal with 9 men
i.) the ankh goes to the ankh-shaped design
j.) the leaves go to the mummy
Excepting j (which is a cultural reference) this is far simpler puzzle scheme than either Hermit or Phantom (and from what I hear, the later games in the series as well); there was clearly a conscious choice here to simplify the puzzle solving and lean into atmosphere. It’s just some elements were a little too stuck in the past.
Isis nursing Horus, from The Met, Ptolemaic period.
We certainly aren’t done with the Craynes; there are three games to go, two which likely had the involvement of Charles. In the meantime, coming up: a return to Britgames; I’ve got a few on the queue, and all of them have background histories I didn’t expect.
Things didn’t quite go down as expected. When I was mapping the ancient caves, I had apparently accidentally looped to a room I had already reached and thought the area was larger than it really was.
I am now marking rooms with treasures in blue.
The only benefit of entering them (as far as I can tell) is getting a moonstone.
This cave is more like a tall shaft. When you look up, you see stars instead of the sun. Exits lead north and northeast.
There is a beautiful pale moonstone here, as big as your hand.
It’s atmospheric at least?
This cave is almost circular, and the walls are painted with an astounded collection of colorful paintings of animals and birds. A cramped passage leads off to the northeast, and some broader paths go to the northwest, southwest, and south.
I’m still wondering if I’m missing something just because of structural solving reasons. That is, the section was relatively tricky to get to; asking the tour guide to take you to the Sphinx really is the only way in (more on that in a moment) hence entering the caves felt like a dramatic “break in” akin to finding the underground in Hermit. I combed over multiple times for missing exits or possible uses of “magic” and no luck.
Somewhat stumped, I decided at least to work out the orientation of the Sphinx with the rest of the map. It attaches to the desert such that there are one-way exits to the north. If you go directly north from the Sphinx you’ll arrive at the temple (the one where going down led to a lyre and a rockfall); keep going directly north and you’ll end up going by the pyramid, and then the tour guide.
Not sure what to tackle next, I tried various attempts at the hungry crocodile. My best guess was taking some “rotting meat” that was up near the base-camp tomb and feeding it. This seemed to be the wrong approach.
You have reached the bank of the Nile, at a narrow cleft in the surrounding rocks. The Valley of the Kings is north of you, and the river bank stretches off to the east. Across the river you can see the modern buildings of new Luxor. A twenty-foot crocodile is resting lazily on the bank, sunning himself. He looks asleep, but his beady little eyes are open.
FEED CROCODILE
Your offering isn’t acceptable.
GIVE MEAT
It’s not hungry.
Just for fun, given I had an “axe” from the fanatic, I tried KILL CROCODILE and died in an unexpected way.
An Egyptian wildlife official appears from behind a rock, where he was studying the migratory habits of the black ibis, and is so furious that he drowns you in the Nile.
Oh dear, I think … I’m afraid … yep, you’ve gotten yourself killed. I could try to resurrect you. Would you like me to give it a try?
As this is a derived-from-Adventure-source game, of course it includes the same resurrection code. It does seem appropriate for an ancient Egypt game, so I tried yes.
Okay, here goes, but remember that I’m not really up on the reincarnation methods of the ancient Egyptians. I never have used that old spell in The Book of the Dead, but it goes something like “Oh King, live foreve…”
****** Ka-Pow! ******
Wow! That was spectacular. A huge gout of blue smoke, smelling of incense, exploded all over the place. I feel a bit dizzy myself. Take a look around, and you’ll see …
You are at the Visitor’s Center in the Valley of the Kings. A dark-skinned tourguide, wearing a bright red fez and a white linen suit, bows and asks, “Where would you like to go?”
I should point out the “live forever” line doesn’t show up in the actual Egyptian Book of the Dead, but it does show up in a book by that name published by the “Supreme Council of the Order of Rameses” in the early 20th century. Maybe that’s where the fanatics with axes come from.
For more slightly off-canon underworld fun, Grunion Guy (who blogs about text adventures) discovered you can ask the tour guide to take you to HELL.
A dark-skinned tourguide, wearing a bright red fez and a white linen suit, bows and asks, “Where would you like to go?”
HELL
You are standing in the middle of a blazing inferno. Your skin sears, and your hair is begining to burn off. You can see the shapes of other hapless humans around you, and hear their awful shrieks of pain as their flesh eternally cooks in the flames.
GO EAST
This is the shore of a great featureless ocean, an endless sea that stretches out to the ends of eternity.
Exemptus (who has already beaten the game) reports in the comments this is an “Easter egg” and it is possible to escape from Hell, but I’ll work that out some other time. In the meantime I was still trying to make regular progress, and I had still had lurking parts of my map unfinished, so I decided to crunch through.
Specifically, lots of exits that went to “mountains” but I never figured out where the landing points were. I went to the mountains adjacent to the desert (with the assumption they would form some or all of the landing points) and dropped unique objects in every room, plundering even from my already-deposited treasure to have every room uniquely tagged.
I then went to those previously red-marked exits and tried each one, using a saved game in order to make things go faster.
I found that all the red-marked exits went to already-mapped mountain territory. (The hope would be I would find a new set of rooms, but it appears Dian decided not to hide anything this way. I can’t discount the possibility I’ve made a mistake, though; this is a big map.)
I went back and combed over the puzzles I had remaining:
1.) The camel near the base camp, which “spits at you”, and “playfully tries to kick your head off”. He blocks your way east, but you can enter from the other direction, so there doesn’t seem to be any reason to bother. Just like the meat with the crocodile, the carrot seemed to be the most promising, but I got the same responses as before (“it’s not hungry” / “your offering isn’t acceptable”) and that even happened while giving the meat, so this seemed to be barking up the wrong tree.
2.) The door with a seal that has a “dog, with nine little men.” We get stopped with “magic” (a “shimmering figure” and “mysterious force”) and I did test a few items out in case I could WAVE CHARM and get a result but nothing worked. (WAVE gets interpreted as digging by the parser, it’s a little confused.)
3.) The rockfall near the lyre didn’t even like me referring to it as a noun, so likely anything that needed to be done there doesn’t make direct reference (like blowing a horn; and before you ask, playing the lyre does nothing there).
4.) A statue of Ramses I believe I forgot to mention previously, close to the crocodile area, which is blocking a path from a canyon to the east.
You are walking along the base of a sheer cliff. A paved road leads off to the north, and the face of the cliff continues to the east, where it runs against the hills to form a canyon. The east end of the canyon, hardly more than a crevice at this point, is blocked by a monumental statue of Rameses The Great. The only visible exit from this area is back out to the west.
GO EAST
There is no way to get through in that direction.
5.) Any possible other tourist destinations, although I think I may have run the guide dry.
6.) The crocodile from earlier.
I finally looped back to the crocodile, which I will remind you, the game said was not hungry. However, the game also said my offering wasn’t acceptable, and the parser was having the occasional error, so … maybe …?
FEED MEAT TO CROCODILE
The croc snatches the stinking hunk of carrion and waddles off into the river with it, his beady eyes glistening with greed.
You need to use the entire phrase; the two-word command doesn’t work. Usually this sort of moment where you have to contradict a previous parser message to solve a puzzle makes me audibly growl at my computer (see Pillage Village for some of that) but it did seem so appropriate to give the meat to the crocodile it felt worth giving it a few more tries.
Past the crocodile you can walk along the Nile and find a plank (haven’t used yet) and climb up a rockfall which appears to be on the other side of that temple…
A narrow trail leads up to the northwest from here, along the canyon wall. The canyon used to extend north, but now it is blocked by a rockslide. The only other exit goes to the west.
NW
You are on a very dangerous trail, just above the floor of the chasm. A path leads up from here to an awkward clamber, and another trail goes southeast down to the bottom of the chasm.
U
You are inching along an awkward clamber on the wall of a very steep canyon. A steep trail leads up from here, and a dangerous looking trail extends down into the darkness.
…and find yourself in a jungle.
Again, mostly just for the scenery and atmosphere, and dispensing one treasure: a Roman helmet.
You are walking through a humid tropical jungle, surrounded on all sides by waving ferns, tall palms, and clumps of papyrus.
W
You are wandering through the jungle. There is a tumbled mound of rocks here, and next to it a skeleton dressed in the rotted shreds of Roman armor. He was probably trying to mark his path.
A dented, but still impressive, ancient Roman helmet is here.
However, I was again now stuck. It took me a few more beats — mainly because of the sequence I had tested things — to realize while I had tried feeding a carrot to the camel, I did it using the “bad” parser syntax. Heading back with carrot in hand, and using GIVE CARROT TO CAMEL:
The camel takes the carrot as if he’s doing you a great favor. He turns his back on you, kicks a little dirt in your face, and pretends he’s never met you. Typical camel, actually.
E
You are in the desolate Theban Mountains, at a narrow rift. A section of stony cliff has been smoothed off sometime in the past, and a massive door, dark with age, is set into it. The door is held firmly shut by an ancient iron lock.
The key I just have from the outside (it was north of the carrot).
UNLOCK DOOR
The huge door creaks open slowly, its hinges stiff with age. Behind it, to the south, you can see a dark, sloping hallway.
S
It is now pitch dark. If you go on, something may eat you.
TURN ON FLASHLIGHT
The flashlight is now on.
This is the west end of a long sloping corridor. The east end of it leads down into a what looks like a large room. A door in the north wall is open to the bright light of day.
And this seems like a good place to pause for now! It turns out all I was really stuck on was a syntax issue, but that dragged me down for a few hours (at least enough time to get those mountains mapped). I’m hoping I’ll be able to coast to victory next time barring any last moment surprises.
Shabti of Seti I, via The Met. Found in the Valley of the Kings. These would be inscribed with a spell to bring them up in the afterlife in order to do the work for the ruler.
Some background points to get through before diving into the game itself–
First, I’m putting the author name as Dian Girard. I am doing this because on the previous Dian games we’ve covered (Hermit’s Secret, Phantom) there is ad copy that says they are by “Dian Girard”. The games themselves do not give a credit. The article she wrote later (where she is credited with the 1983 games) uses the last name Crayne, but it also says she writes her fiction under Girard, so my assumption is she is including “interactive fiction” under her pseudonym.
Second, quoting her from the aforementioned article:
My own adventure games are built from two basic parts: the driver program and the text files or “script.” The script contains all of the vocabulary words that the driver recognizes, plus the object and place descriptions. There is also a builder program that converts the text in the script to machine-readable tables. Because the games are script-driven. I can build 70 to 80 percent of a new game without ever touching the actual program source code.
The original engine seems to be based on a Charles Crayne port of Adventure, so subsequent uses of the engine keep the same elements. There is always a pirate (in Valley of the Kings, tomb robber) stealing treasure; there are always dwarves throwing axes (in this game, a “slender young man with a rather fanatical gleam in his eye”). There are always “magic words” that jump you around; here, they are given as instructions to the tour guide rather than “real” teleports. Phantom managed to creatively put in a plot despite the constraints; this game doesn’t try as hard, but does manage to build an atmosphere of Egypt that is more linked in reality than other games of this time period.
The Curse of the Pharaoh (1982), for instance, had a pyramid and a mummy, but was mostly freeform (giant clam with a fuse in it, pit with a snake); the cultural touchstones of ancient Egypt imagery without any of the content.
By contrast, in Valley of the Kings, to the west of the start point, near a “souvenir shop”, there’s a tomb of “Thothmes I” made by “the architect Ineni during the Eighteenth Dynasty”. Ineni was a real architect from Ancient Egypt we have biographical information about.
Inspection was made for me, I was the reckoner. Source.
Just inside is the “ushabti room” (see top of this post) where
Display cases hold the collection of ushabti, or “answerer” figures that were found in the tomb.
(Also called “shabti”.) Realistically for a random tomb in the Valley that’s easily accessible, the sarcophagus is no longer there.
This is the sarcophagus room, where the coffin holding the pharoah’s mummy was placed. The only exit is to the northwest.
Someone has left an interesting old silver charm here.
(The charm is a treasure, though!)
To the west of the room with the charm is a room purely there for scenery.
This large chamber was probably used to hold the great king’s hunting equipment. Nothing was found in it, but the paintings on the wall show the pharoah hunting antelope from a chariot. A doorway in the north wall is the only exit from the room.
There’s one other section of the tomb that’s also been cleared out, although someone left a hacksaw (remember that for later).
There are enough small touches that I get the impression the author at least touched an archaeology book at some point, rather than making everything up. This is comparable to Crystal Caves, which had a realistic cave at the upper level (including a park ranger that would follow you around), and you had to solve a puzzle in order to get to the “magic section”.
From TT81, also known as Ineni’s Tomb. By unbekannt, Maler im Alten Ägypten – Eberhard Dziobek: Das Grab des Ineni. Theben Nr. 81, Tafel 13, FAL. Source.
The “magic” in this case is in the tomb of Thothmes I, a piece of paper with the shabtis:
Hmmm. It’s a prayer of some sort — “Lion of the Sun, hear my prayer …” It’s written in Coptic, and looks very old.
I’ll use this at the end of the post. (Also, another small touch: would our previous Egyptian adventures reference “Coptic”?) In the meantime let’s get familiar with the aboveground, starting with a metamap.
This simplifies the overarching map structure into its general areas. You start at the tour guide, you can go south to a “desert” area with a pyramid and temple, north to a “Valley of the Kings” area which has its own downward entrance, go west to the Thothmes tomb (already seen) and the base camp (ditto, from the last post). The mountains interconnect everything and they were enough of an annoyance to mapping, I sometimes just marked an exit in red if it went to mountains. Finally, the Sphinx I was unable to reach by conventional methods (…maybe if I bothered to map the mountains more…) but could only reach via the tour guide.
Near the “Thothmes tomb” is a “parking lot” which has an “iron key” to the north (I haven’t used it yet), a “wilted carrot” within, and the Nile to the south with a “crocodile”.
There is a large asphalt-paved parking lot here. Driveways to the north and east lead out onto a paved road. The banks of the Nile river are south, and mountains rise to the west. There is a large orange carrot here, wilted from the heat.
S
You have reached the bank of the Nile, at a narrow cleft in the surrounding rocks. The Valley of the Kings is north of you, and the river bank stretches off to the east. Across the river you can see the modern buildings of new Luxor. A twenty-foot crocodile is resting lazily on the bank, sunning himself. He looks asleep, but his beady little eyes are open.
The crocodile snaps at me if I try to go east. It is not hungry for carrots.
Going over to the Valley of the Kings next, where you’ll see some of those red-exit-means-mountains spots:
The map has a lot of loop-back-to-the-same-room exits, so many I marked them as stubs rather than with arrow-loops.
You are at the Visitor’s Center in the Valley of the Kings. A dark-skinned tourguide, wearing a bright red fez and a white linen suit, bows and asks, “Where would you like to go?”
N
You are wandering around in the Valley of the Kings.
W
You are wandering around in the Valley of the Kings.
There’s a piece of rare coral here, carved into a fish.
SW
You are wandering around in the Valley of the Kings.
There’s a piece of rare coral here, carved into a fish.
The only important spot (other than the coral) is a “rectangle”. Just as a reminder, the base camp tomb included a “shovel”, a “crowbar”, and a “flashlight”; here both the shovel and flashlight are useful.
You are wandering around in the Valley of the Kings.
S
You are near the center of the bleak Valley of the Kings. An eroded rectangle of sandstone, about three feet long by about 10 inches wide shows above the surface of the sands.
DIG
You dig for several hours, moving what feels like tons of sand. Eventually you uncover a flight of sandstone steps that lead down into the ground — the entrance to a hidden tomb!
D
It is now pitch dark. If you go on, something may eat you.
(If you DIG somewhere random, the game says “Sure, go ahead. It’s not going to accomplish anything.”) Applying the flashlight:
The flashlight is now on.
This is a sunken stairway entrance leading down below the sands of the desert, where it roofs over to become a passage some ten feet high by six feet wide that continues down.
D
You are at an open doorway. Through it, to the east, you can see a passageway that leads down into silent darkness. To the west there is a staircase leading up to the sunlit desert. There is a large seal impression over the lintel of the door.
READ SEAL
It’s a picture of what looks like a dog, with nine little men.
E
You start forward, but a shimmering figure appears in the doorway and some mysterious force holds you back!
I haven’t gotten past here yet; I assume some item or set of items is needed.
Anubis, from The Met. I don’t think this is necessarily the dog meant here.
Moving on the desert with the pyramid (and some of the mountains):
The exits off to the west are another route to the base camp; to the far southeast there is a “prehistoric egg” which counts as a treasure. The important point of note is not the pyramid (at least, not that I can find) but the temple a bit south. Instead of using the shovel we’re using the crowbar:
You are wandering through the burning sands of the desert.
S
There is a tiny ruined temple here, its roof long vanished and half of its yellow columns fallen. There is desert all around you, and on the horizon to the north you can see the silhouette of an immense pyramid etched against the blue sky. The center of the floor is made up of one huge sandstone slab.
LIFT SLAB
The end of the bar fits easily into the crack around the slab and, straining every muscle, you manage to pry it up and move it aside. There is a dark passage of some sort down below.
Again, though, we can’t get too far.
D
You are in a small, square, room, hardly big enough to turn around in. A flight of well-worn stone steps leads south. The ceiling slab has been moved aside, letting the sunlight stream in from the desert above.
The steps go down to a “chasm floor” where there’s a “beautiful lyre” (a treasure) but a rockfall immediately after.
This is the floor of a narrow, high canyon, hardly more than a chasm. It used to extend down to the south, but a massive rockslide has tumbled down and blocked the passage. Now the only exit is the chasm floor to the north.
If we can pass through I assume it comes later. (Maybe through the other side; the Dian games have been big on opening up alternate exits throughout the game.) Where the big break comes is instead at the Sphinx:
You are at the Visitor’s Center in the Valley of the Kings. A dark-skinned tourguide, wearing a bright red fez and a white linen suit, bows and asks, “Where would you like to go?”
SPHINX
You are standing between the front paws of an enormous sphinx, carved out of a monolithic sandstone rock. There is a small dark doorway to the north, that leads inside the monument.
N
You are in a tiny room, carved out of the solid sandstone. It is about 12 feet square, and there is an exit on the south. A ancient stone altar, eroded by time, fills most of the space.
READ PAPER
Hmmm. It’s a prayer of some sort — “Lion of the Sun, hear my prayer …” It’s written in Coptic, and looks very old.
PRAY
As you chant the ancient prayer the dim light streaming into the small room gets strangely brighter, and to your amazement the ancient altar slowly turns in the middle of the floor!
This opens the secret temple of the Sun God.
This is the secret Hall of Amon-Re, god of the sun. A dark hallway leads out of the east wall, into a huge chamber.
Upon trying to step in, I was attacked by the “dwarf stand-in” for this game. I guess we’re supposed to be American.
A slender young man with a rather fanatical gleam in his eye runs around a corner, throws an axe at you — which misses — and then runs off into the darkness yelling something about “Yankee imperialism.”
Just to show off the temple a little:
You have reached the secret Temple of Amon-Re. All around you are fantastic carvings and paintings, showing the Sun God on his journeys across the world. The great altar, lit by some incredible light, is to the south. A doorway in the west wall leads to a large hall, and another door goes east.
S
A brilliant flame, giving off a strong scent of petroleum, lights up this end of the vast Temple of Amon-Re. There is a huge stone altar here, with carved figures of the ancient Egyptian gods. The great Temple stretches out to the north.
A roll of papyrus has been carefully set down on the floor.
The papyrus is a treasure, and the game is even clear that it is a fragile historical artifact and you should be carting it over to the archaeologists rather than noodling with it.
Not much farther there are some bars, but here is when the hacksaw comes in.
There is a hint of dampness in the air, and the surprising sound of dripping water. Your flashlight reflects from a tiny natural spring that wells up in one corner of the room. Irregular openings lead out to the north and southwest.
SW
This is an ancient corridor, part natural, and partially finished off by human hands. You can go east or west. A set of heavy iron bars have been set in concrete across the passage to the west. Through them you can see a large cavern.
CUT BARS
The hacksaw is rather dull, but you eventually cut through several of the bars and are able to pry them apart enough to get through.
W
This is the entrance to a complex of ancient caves. There are some marks on the walls that may have been made by stone-age men. A passage goes north, and an ancient corridor leads east. There are strong iron bars across the passage to the east. Some of the bars have been cut through and pried apart.
From here the caves kept going and going and I suspect this is the main entrance to the “dungeon” part of the game so it seemed like a good place to pause. So far the puzzles are straightforward, which isn’t necessarily a bad thing; the atmosphere seems to be more the point this time around than any kind of mental stumpers.

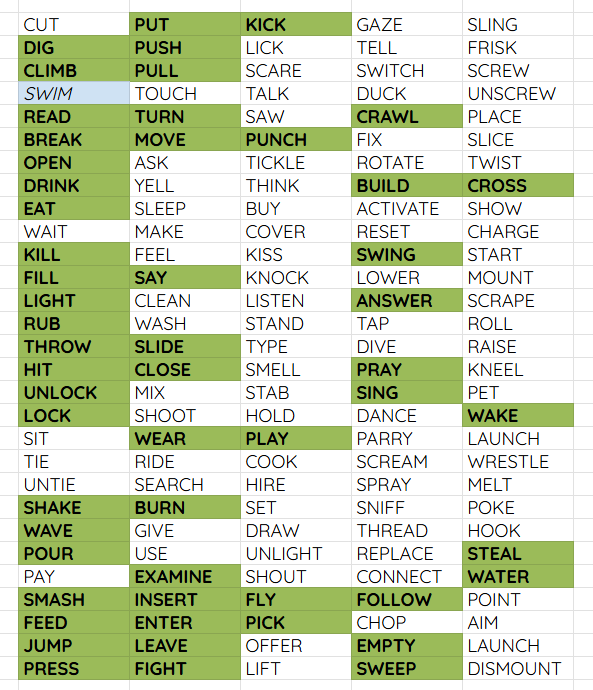

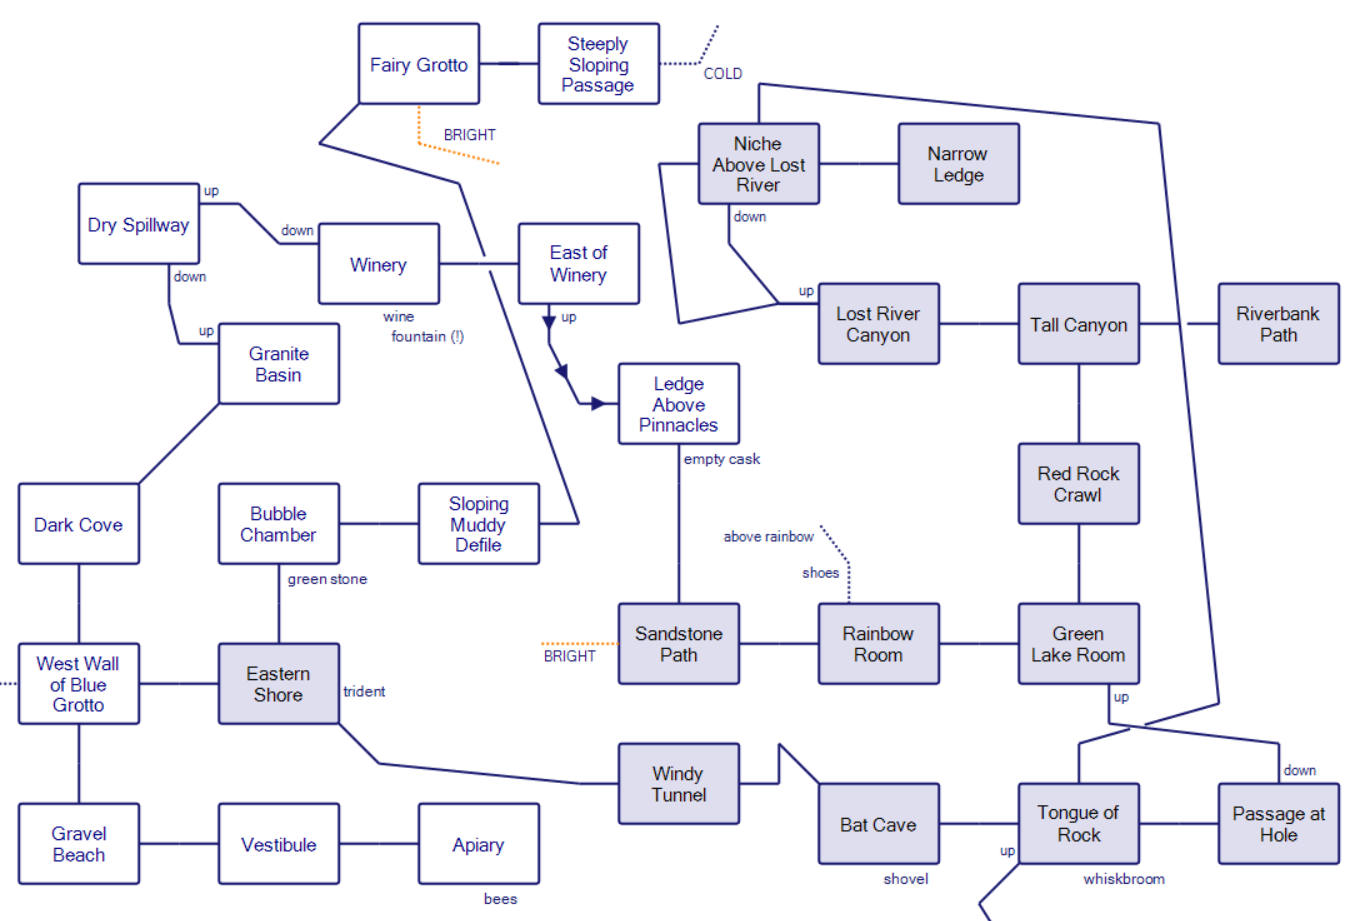
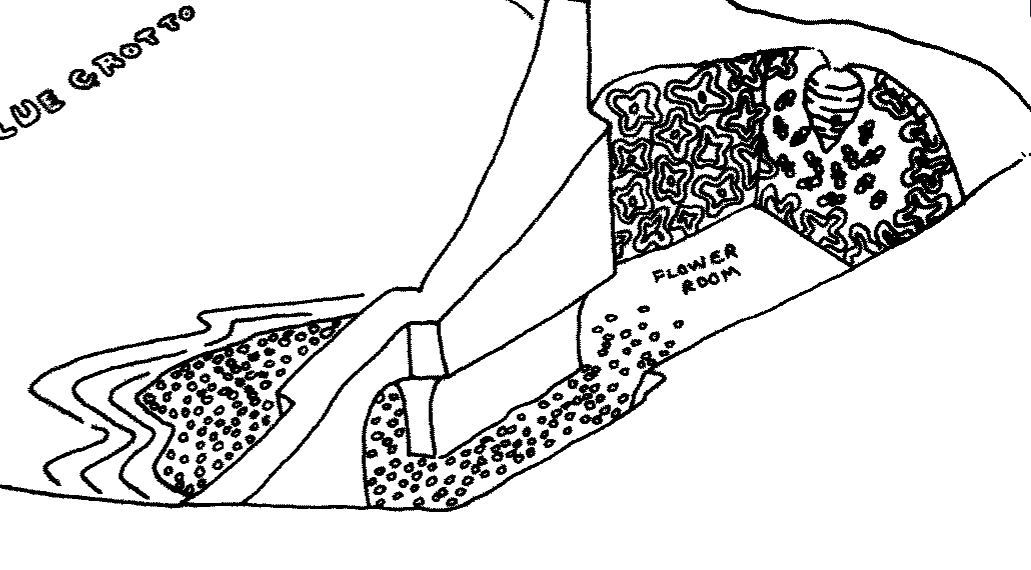
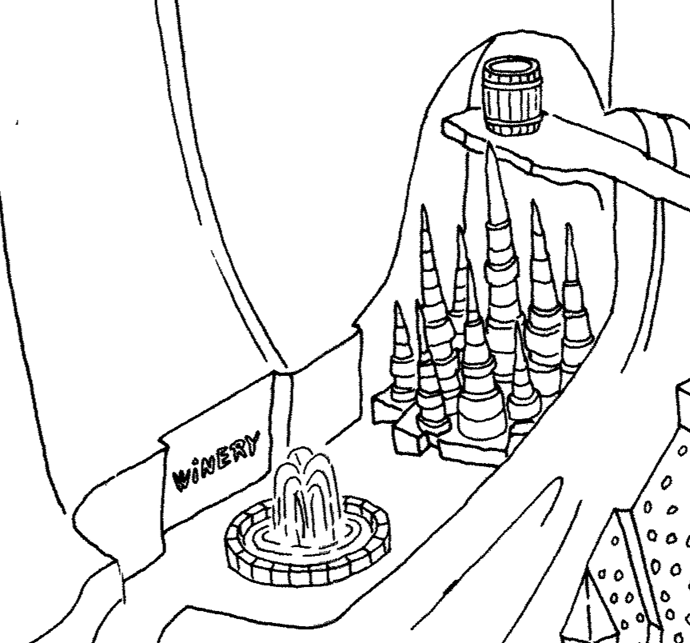
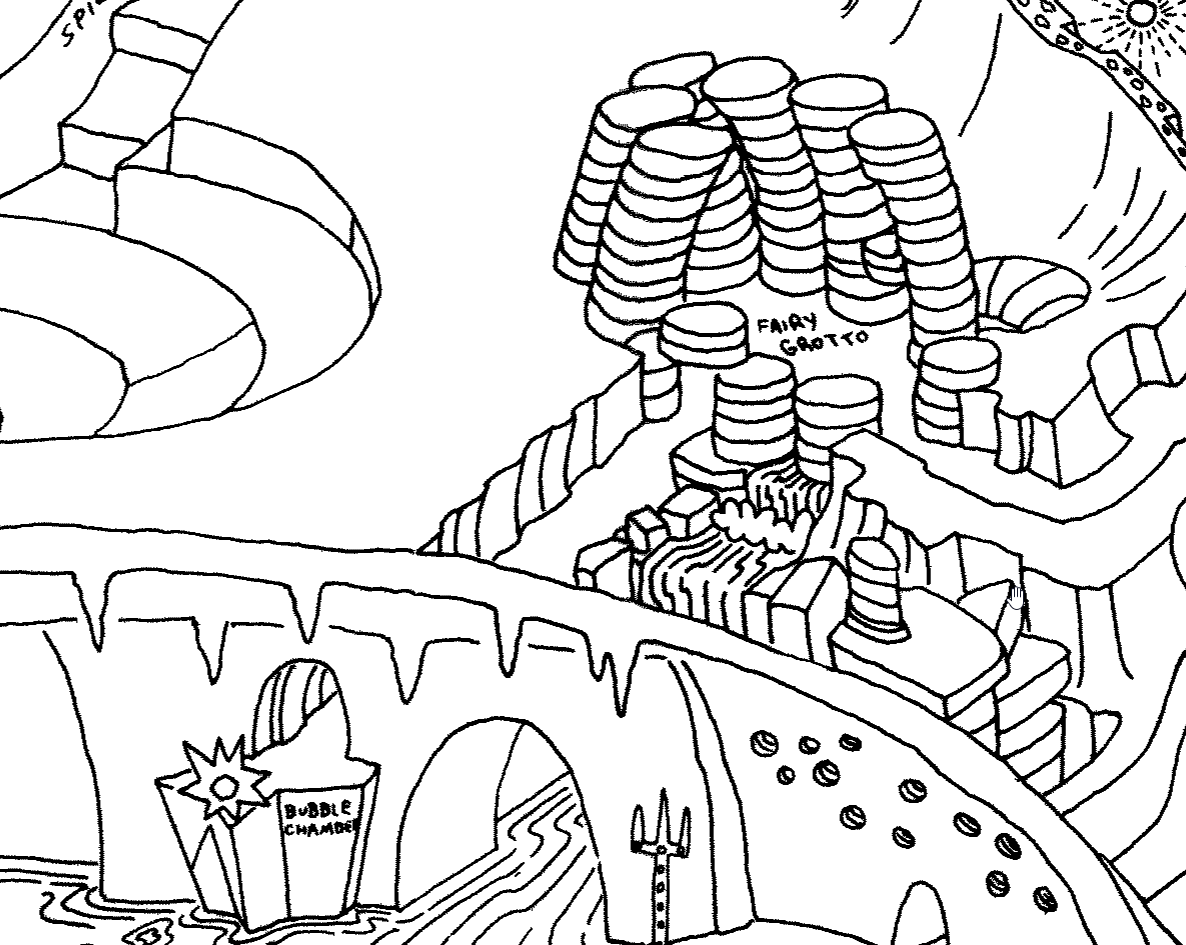
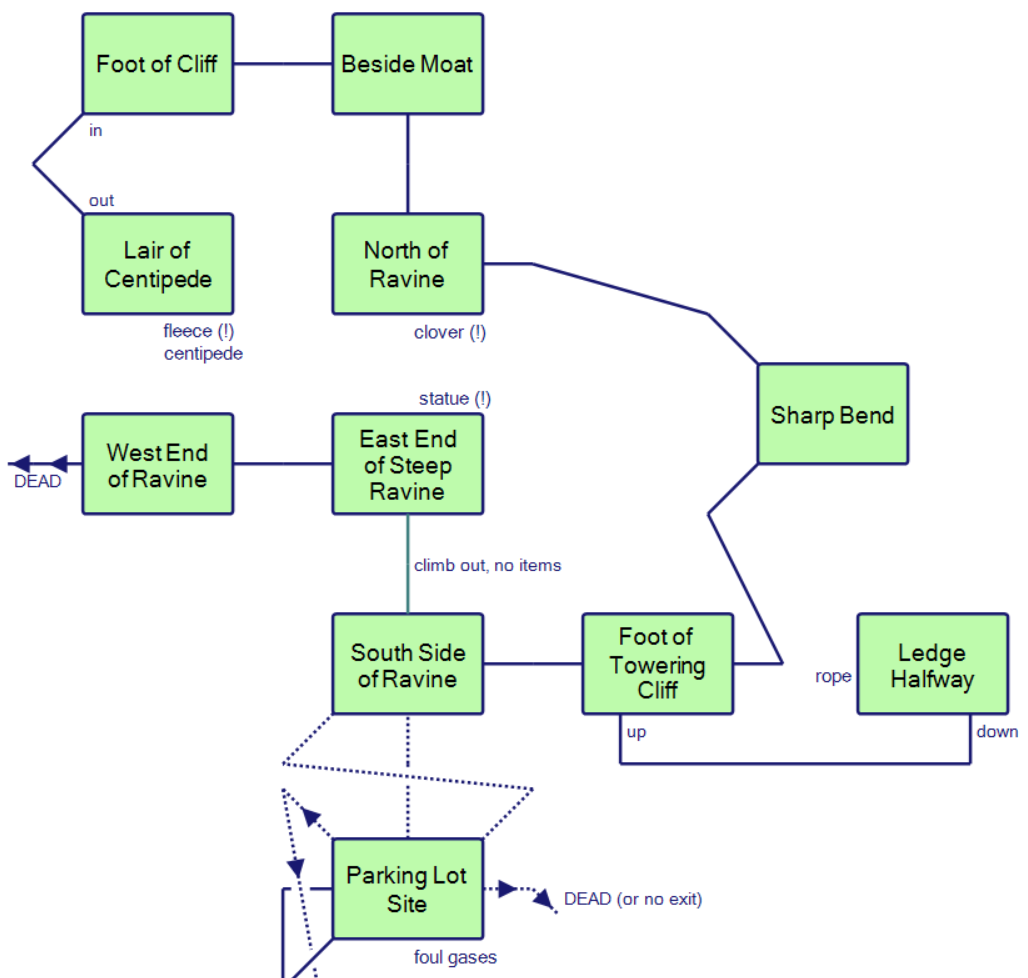
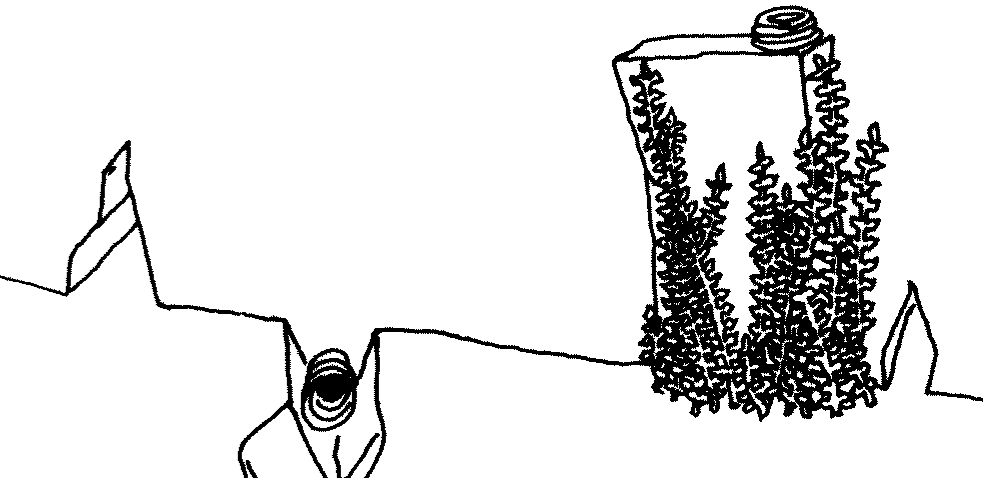
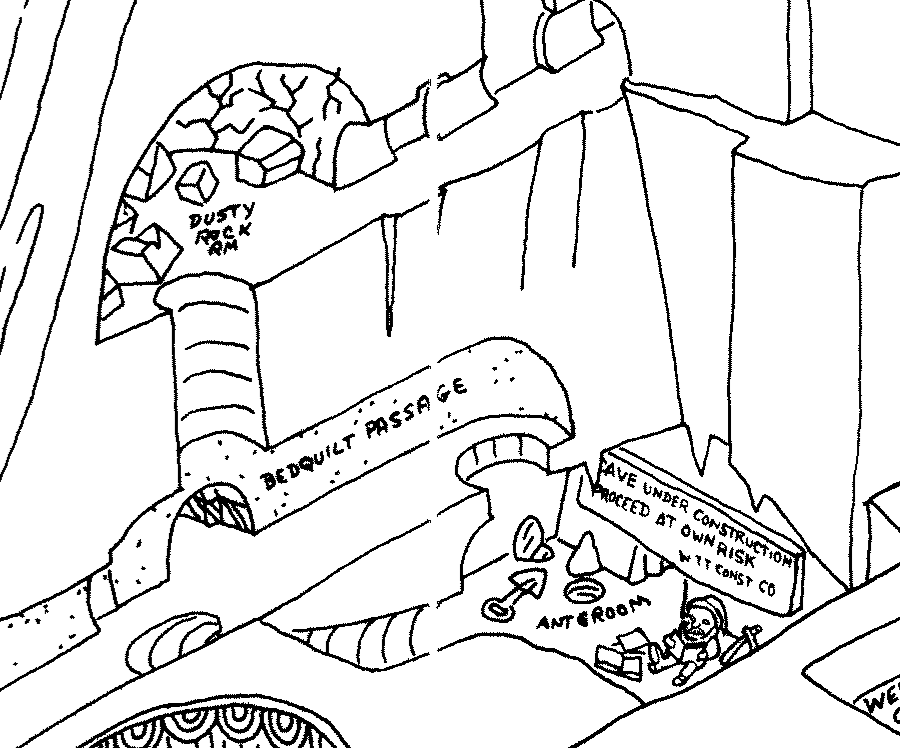

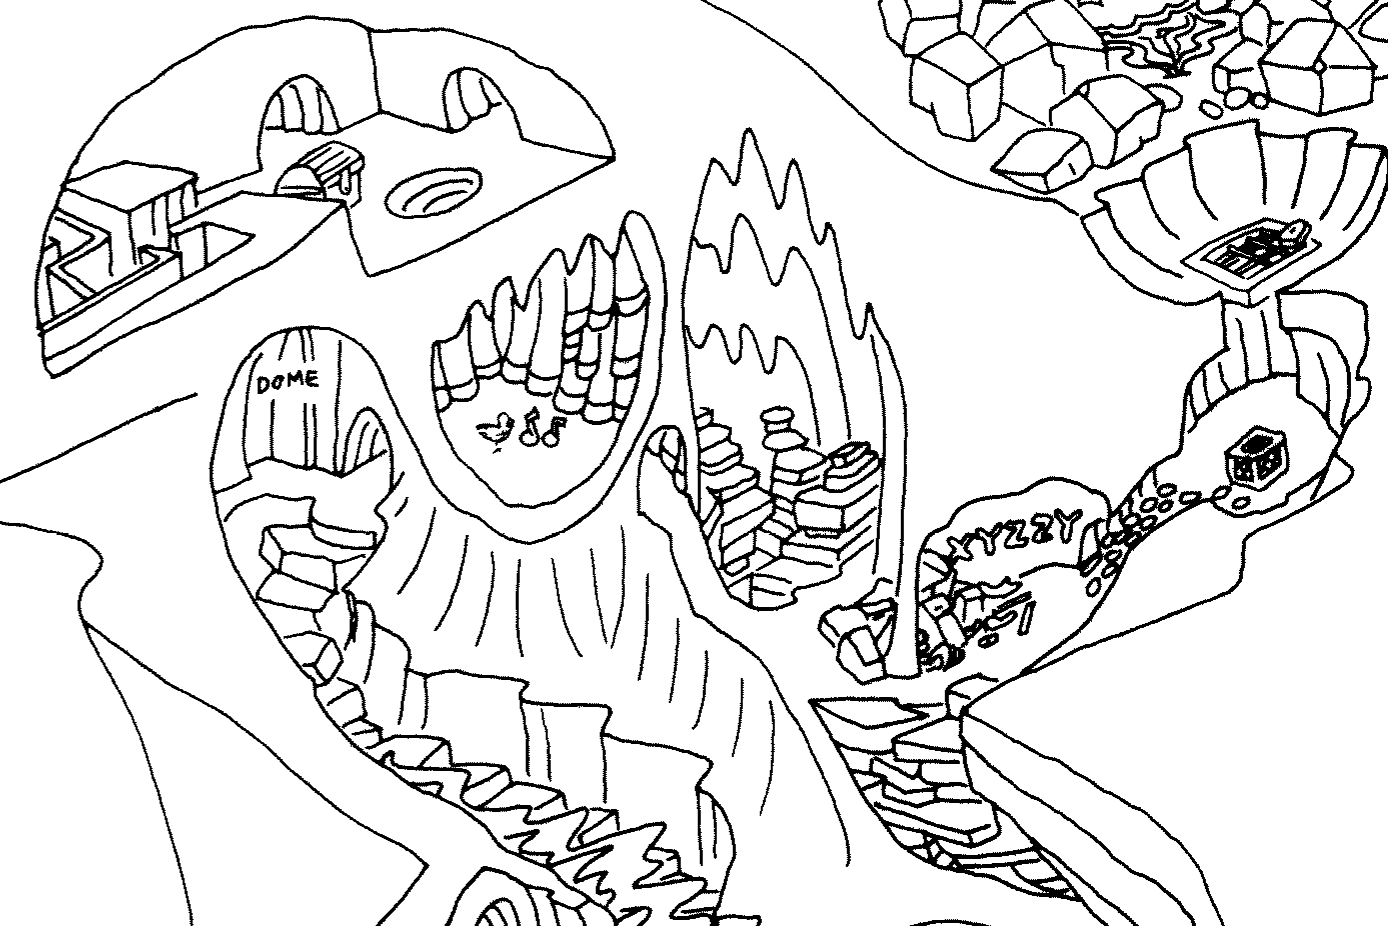
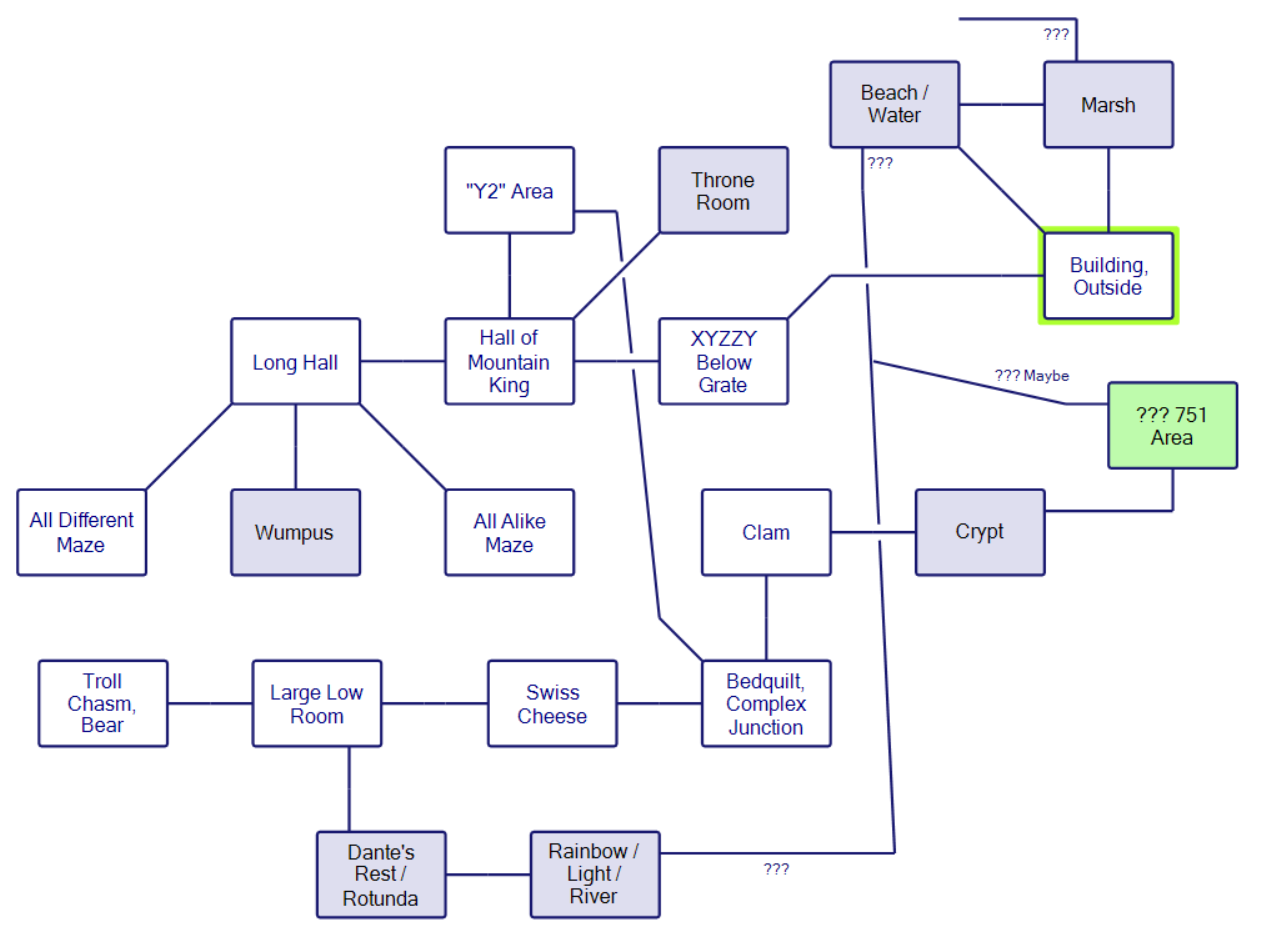
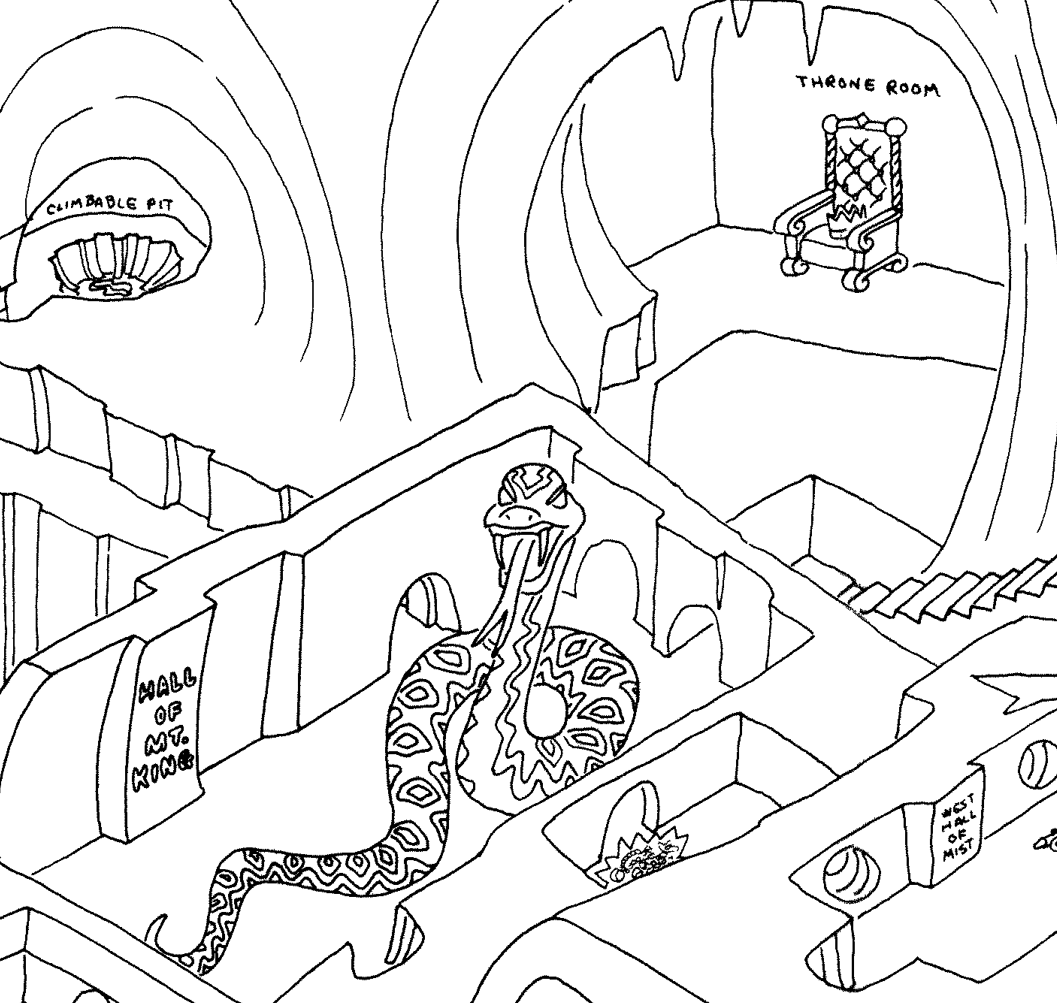
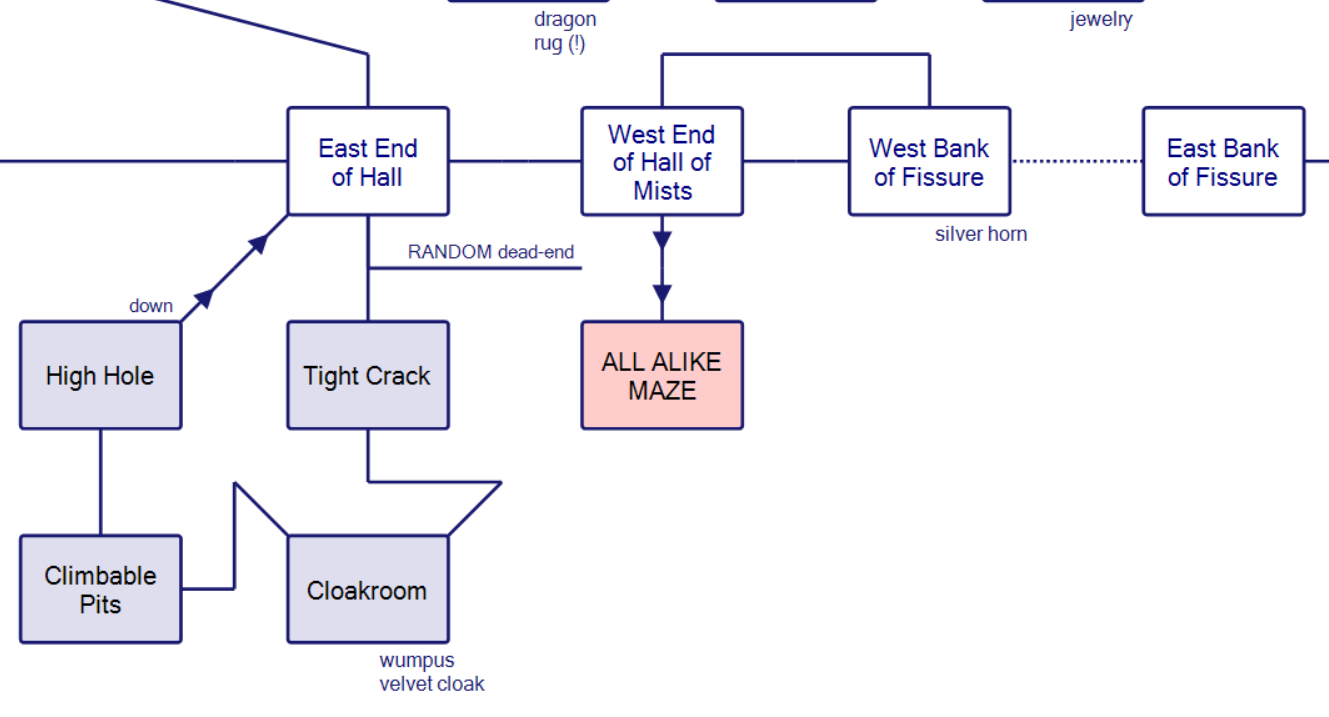
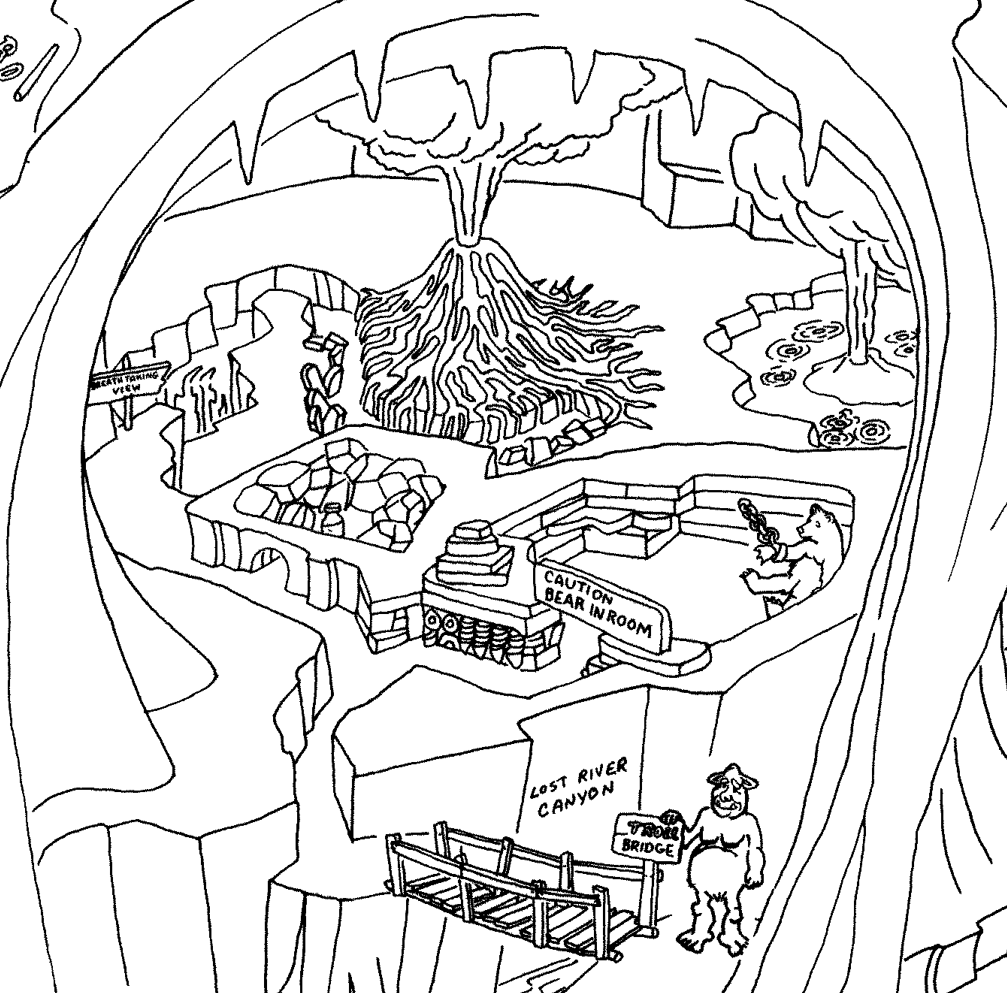
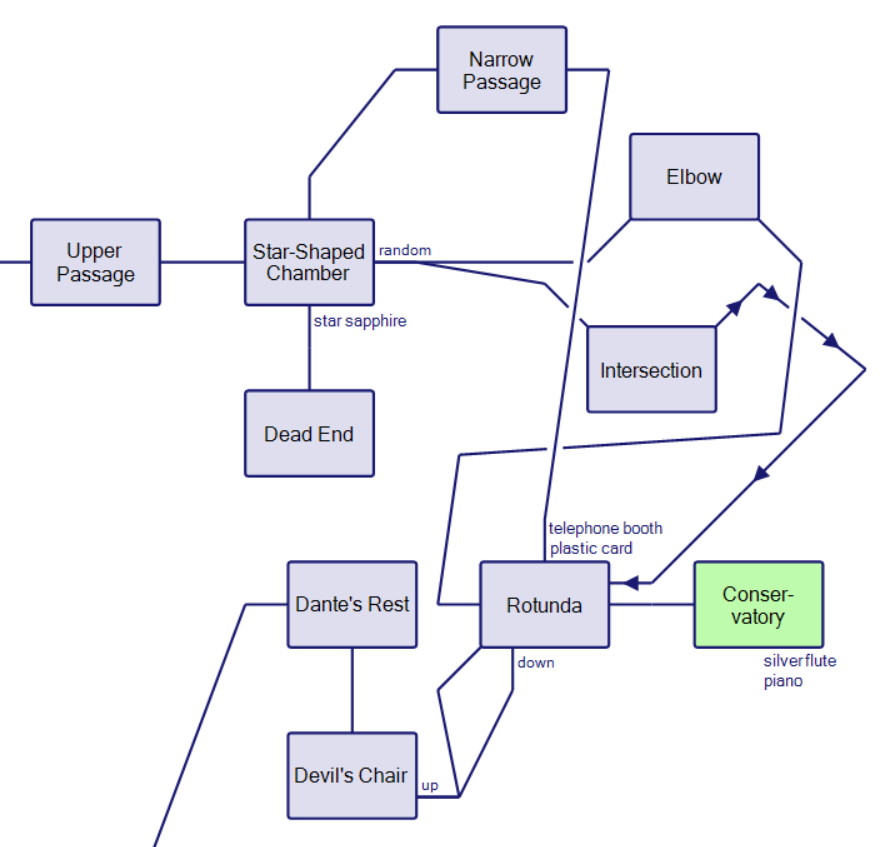
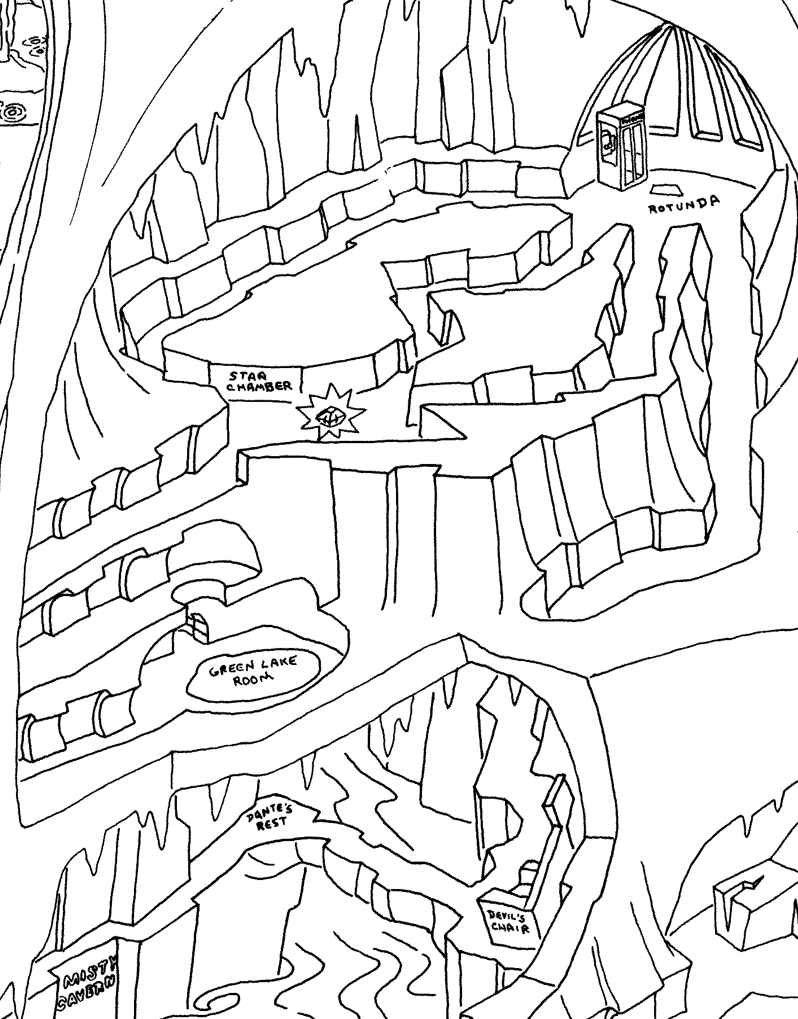
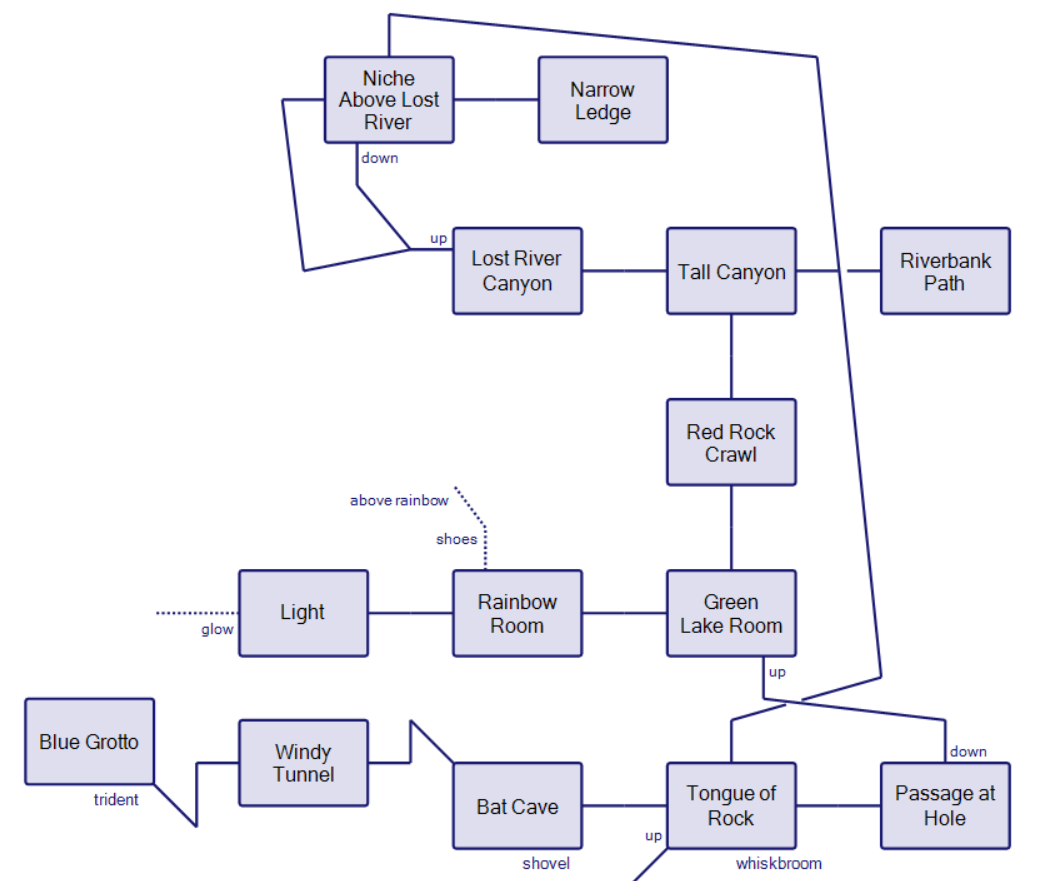
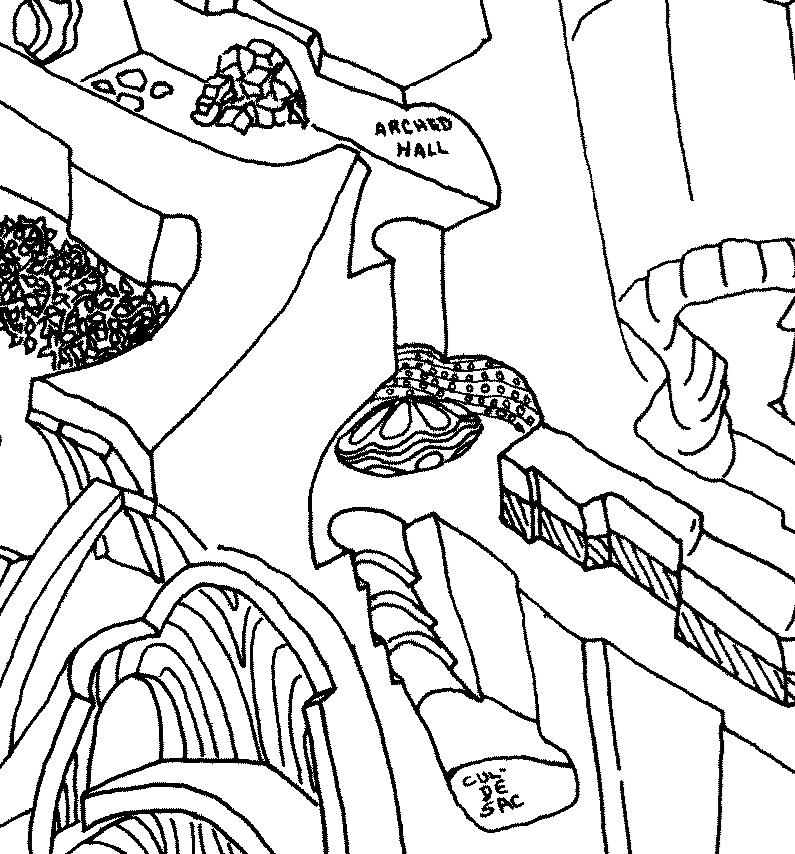
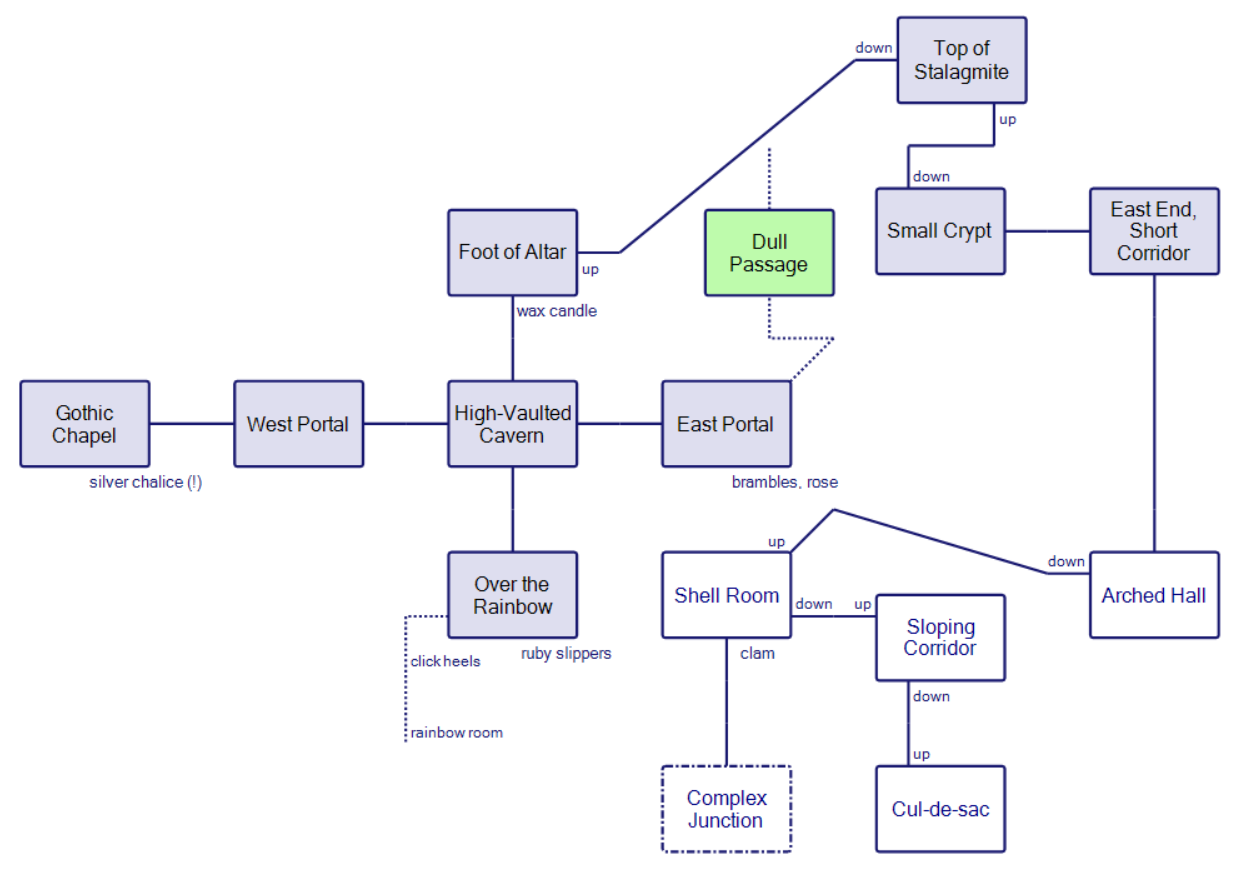
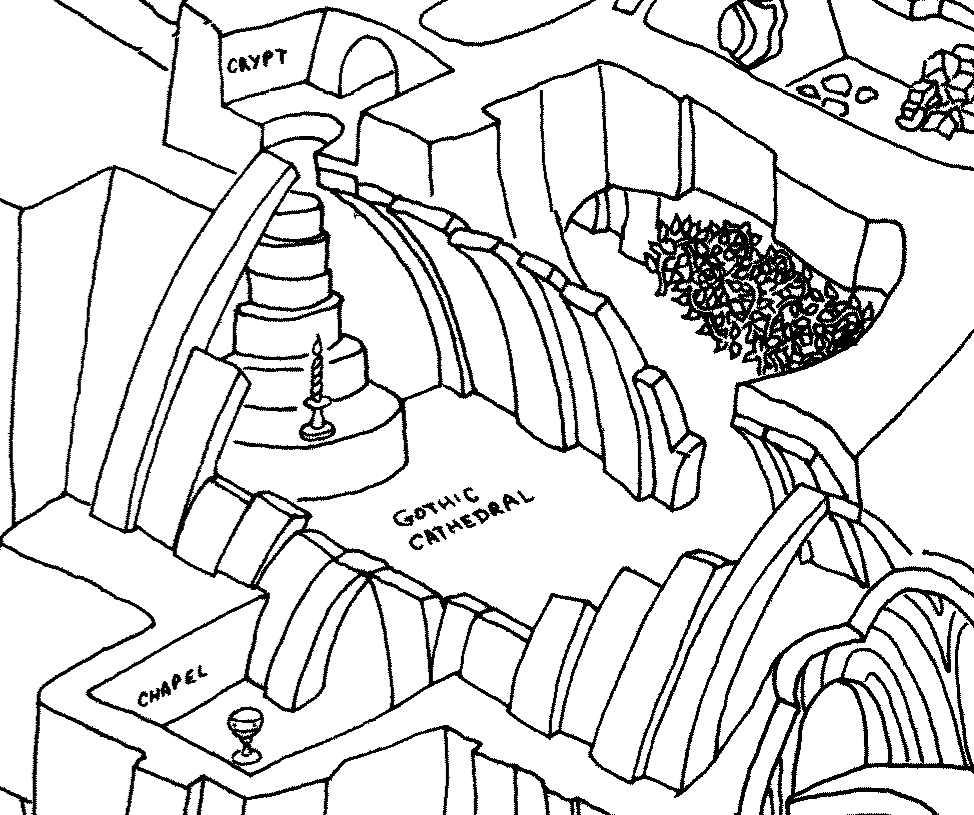
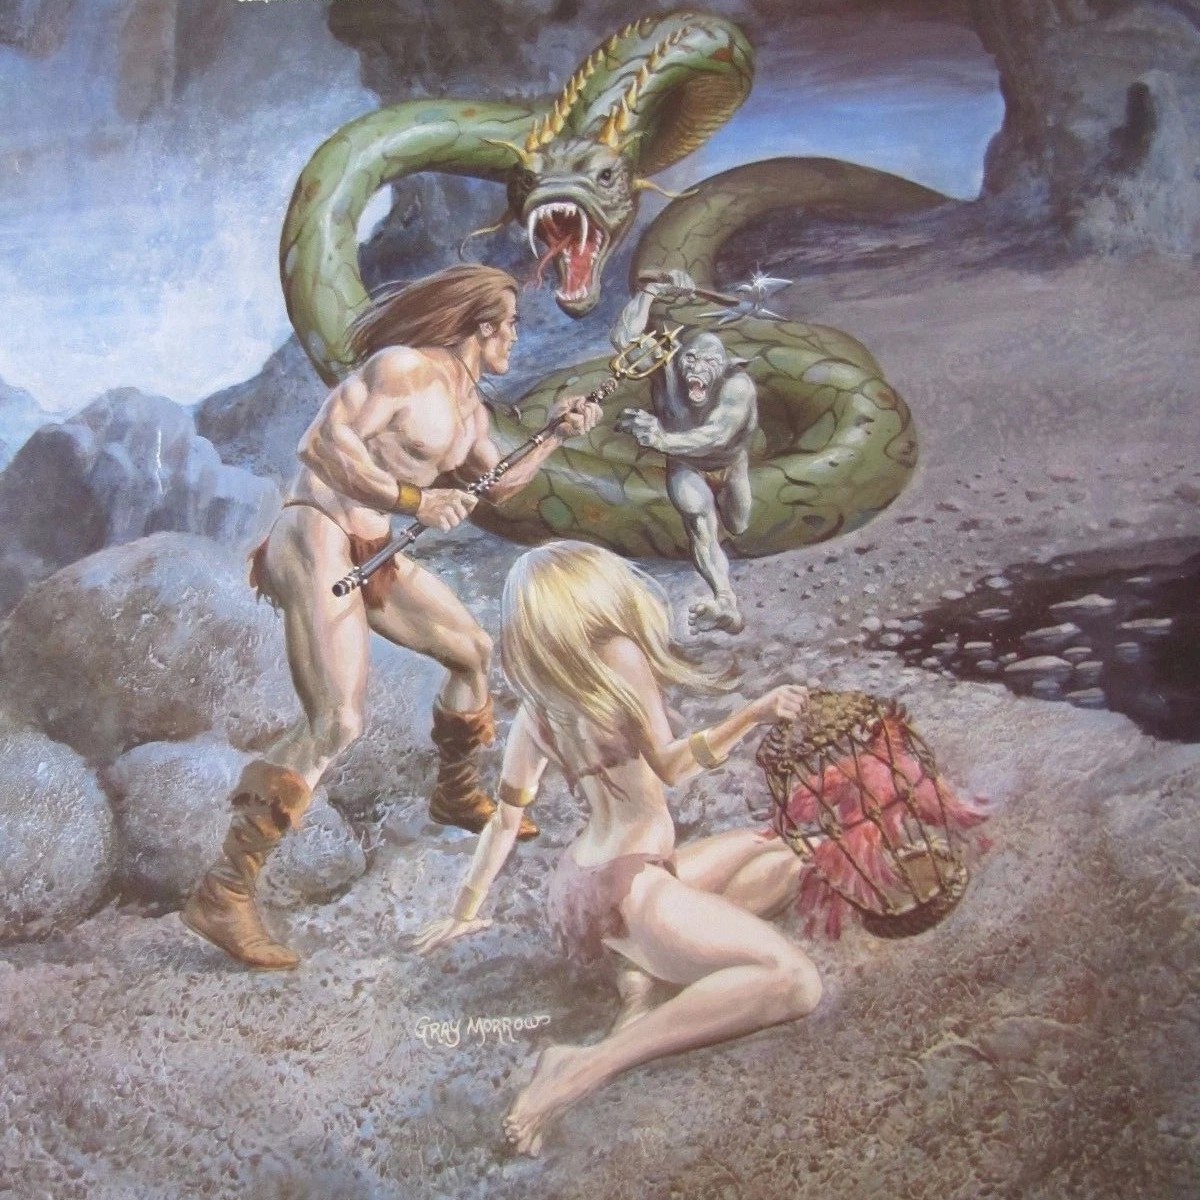


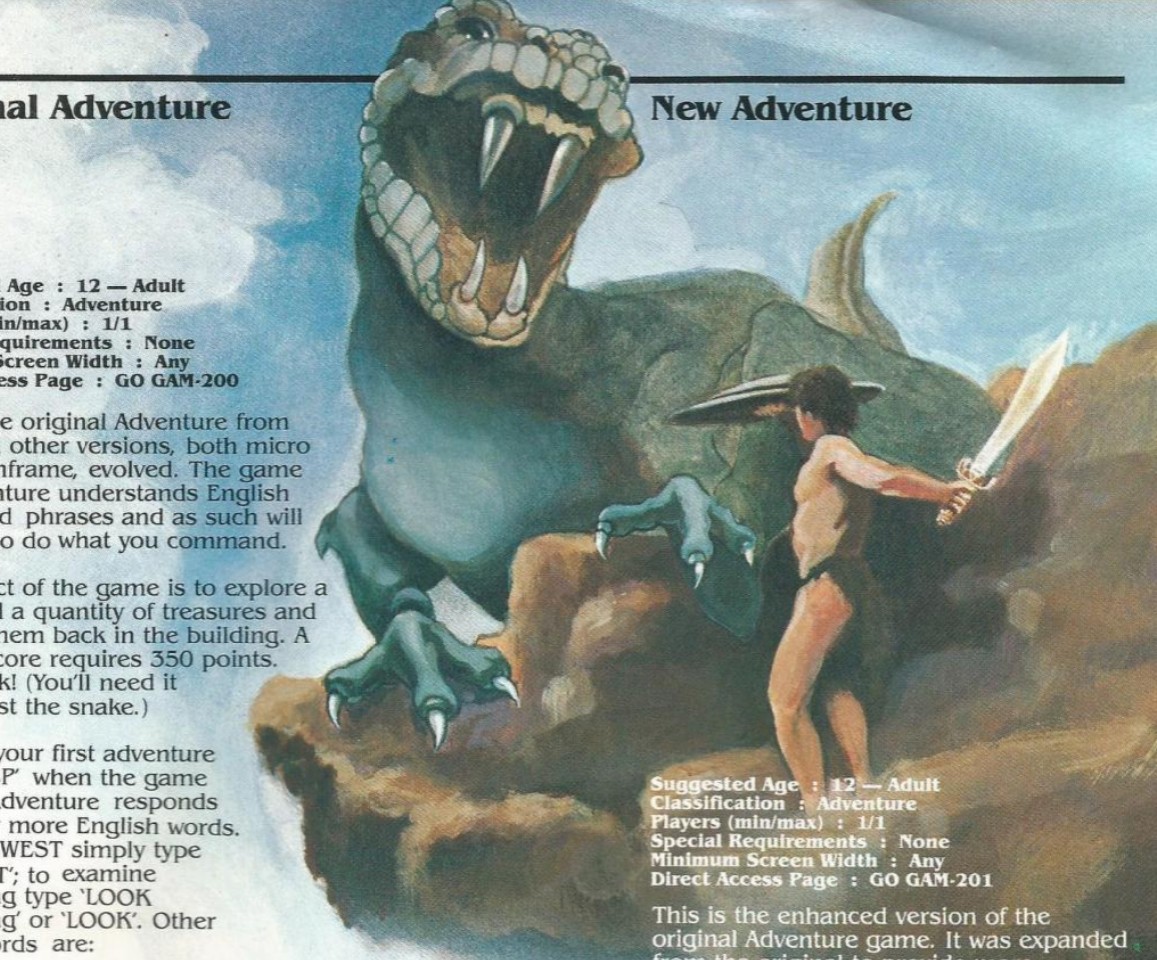

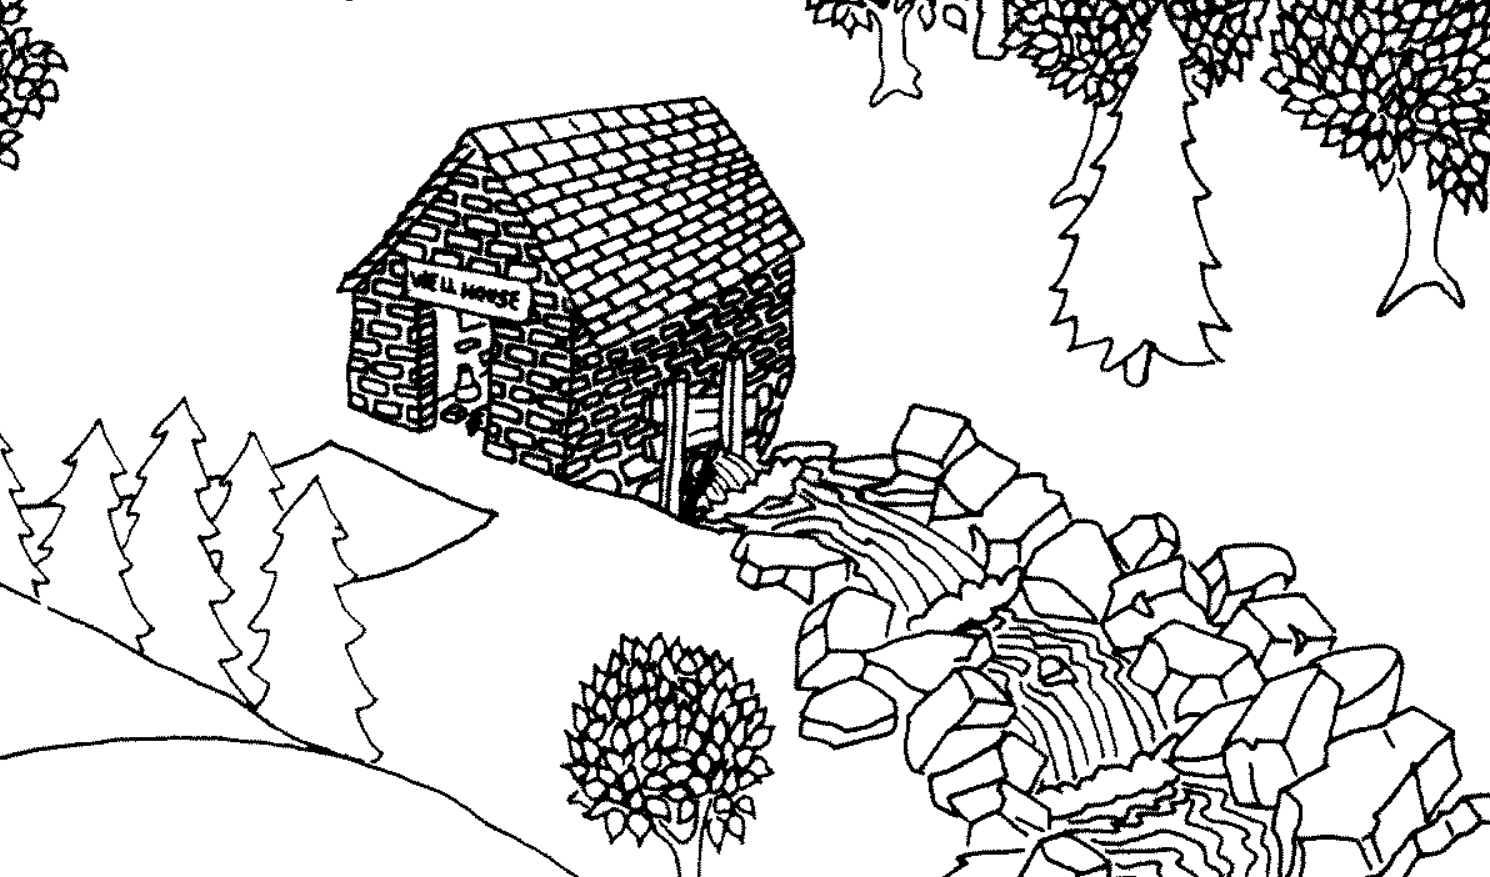
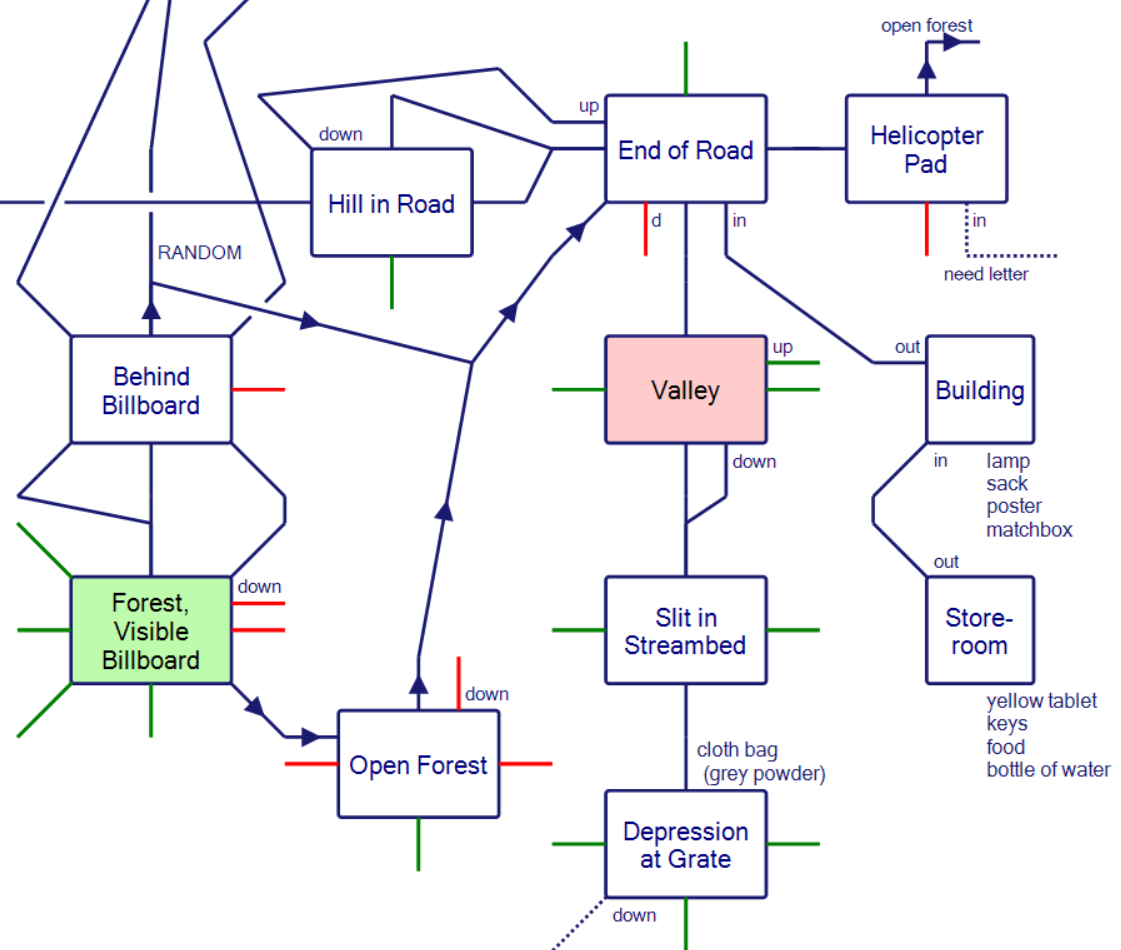

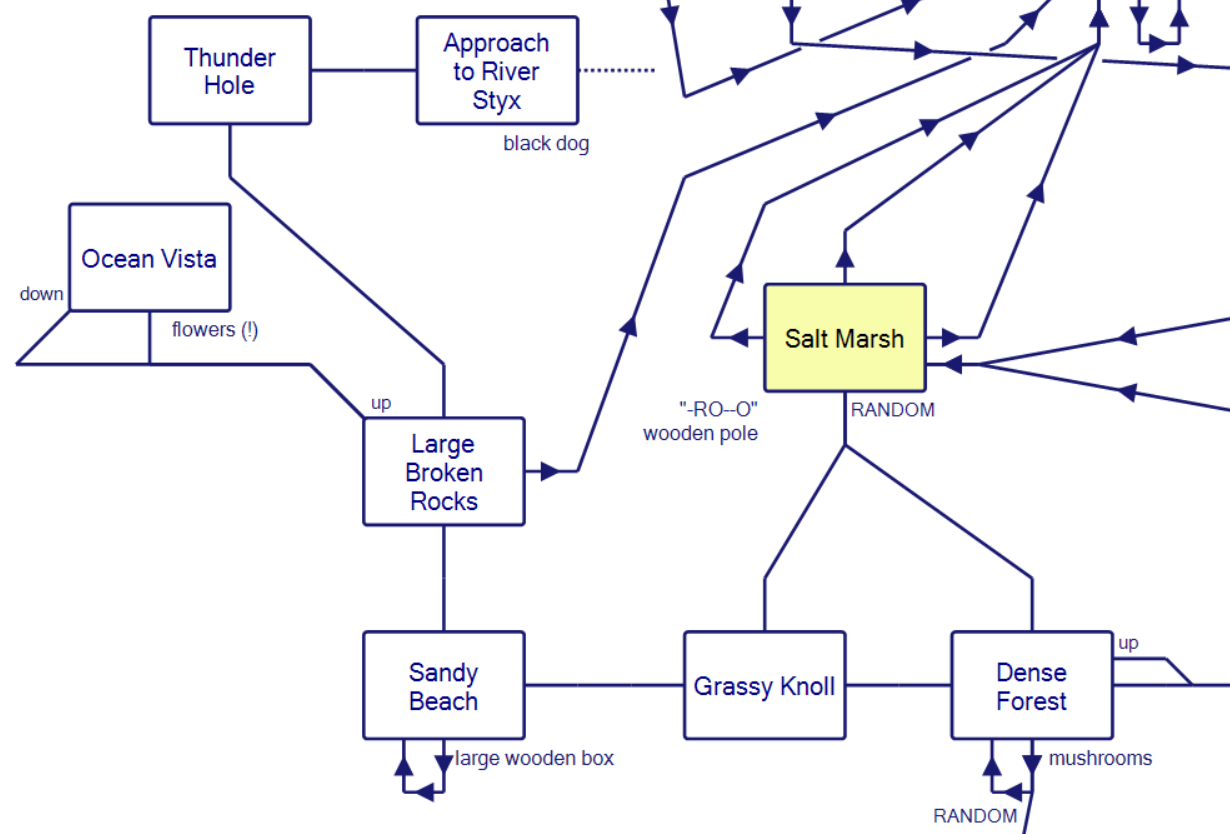
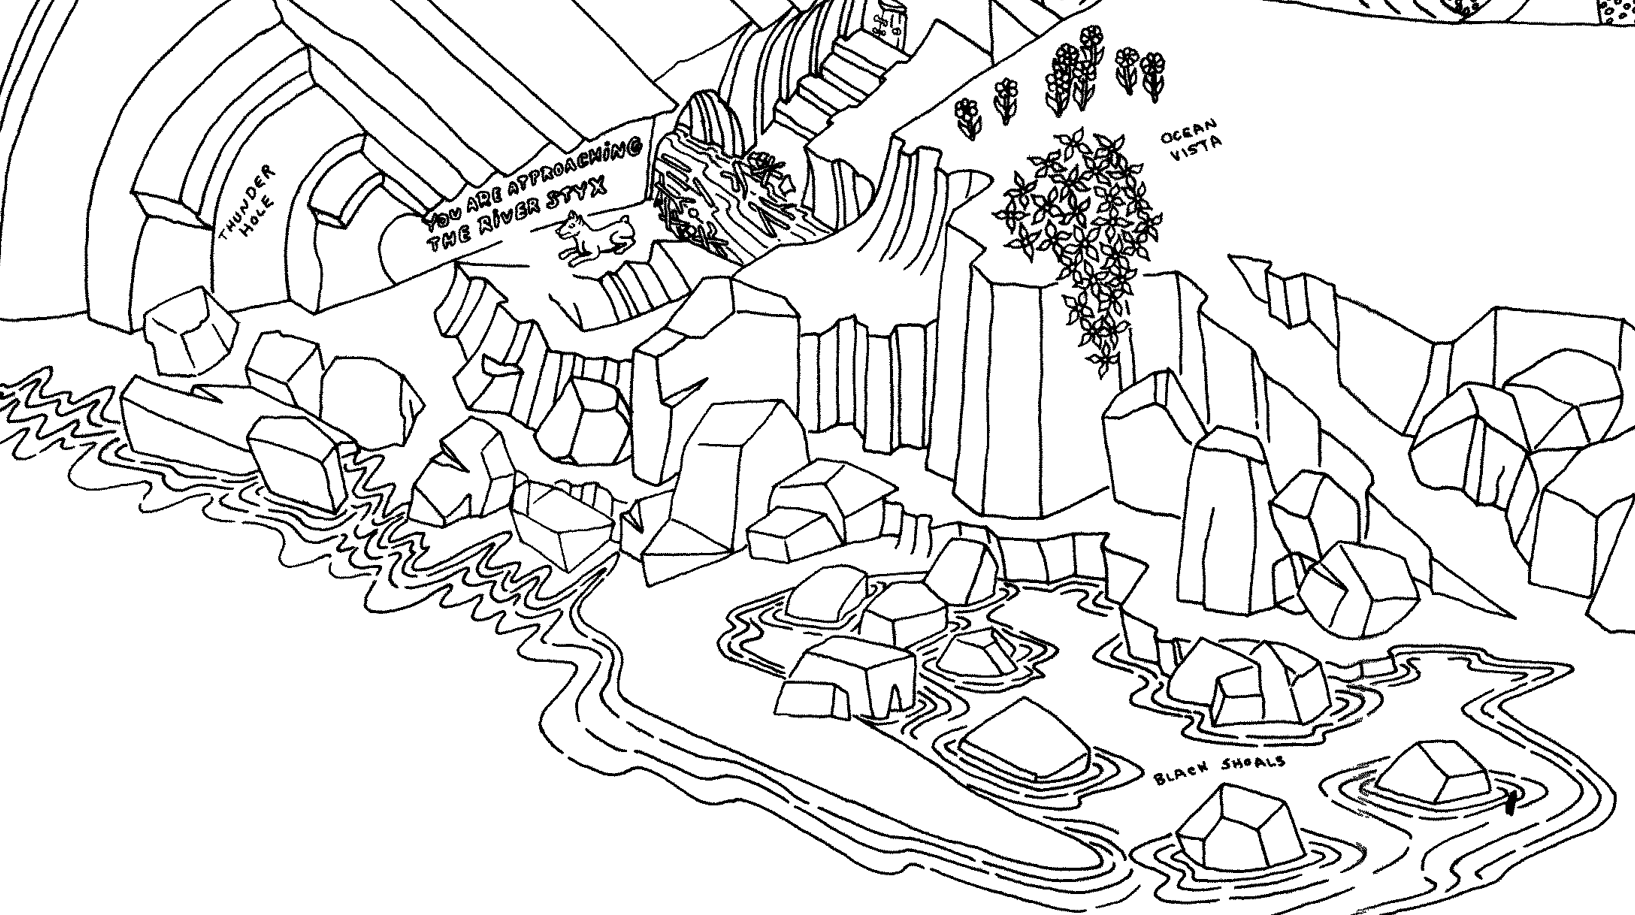
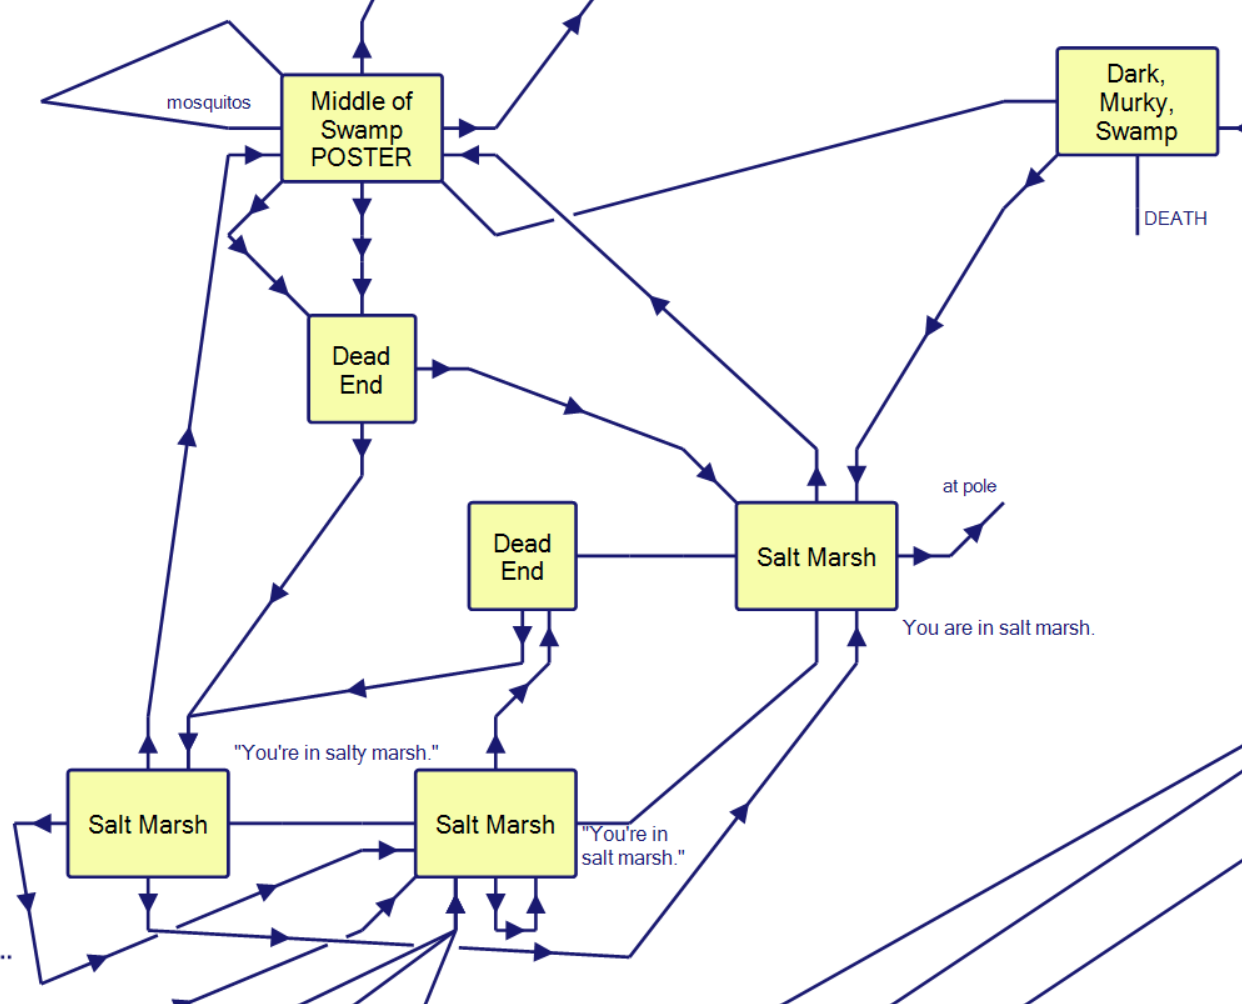
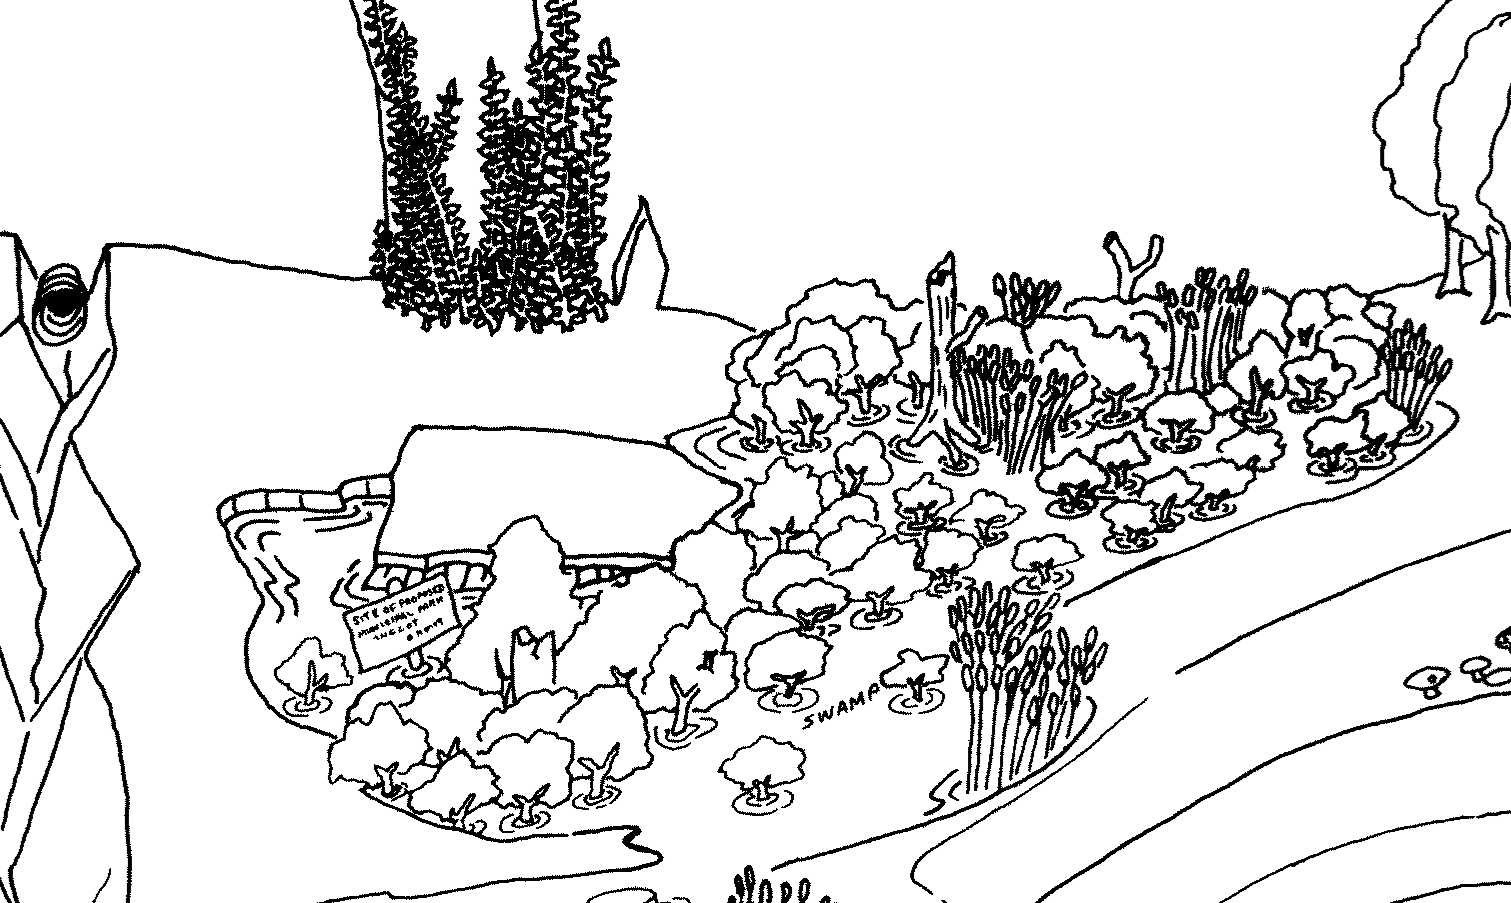


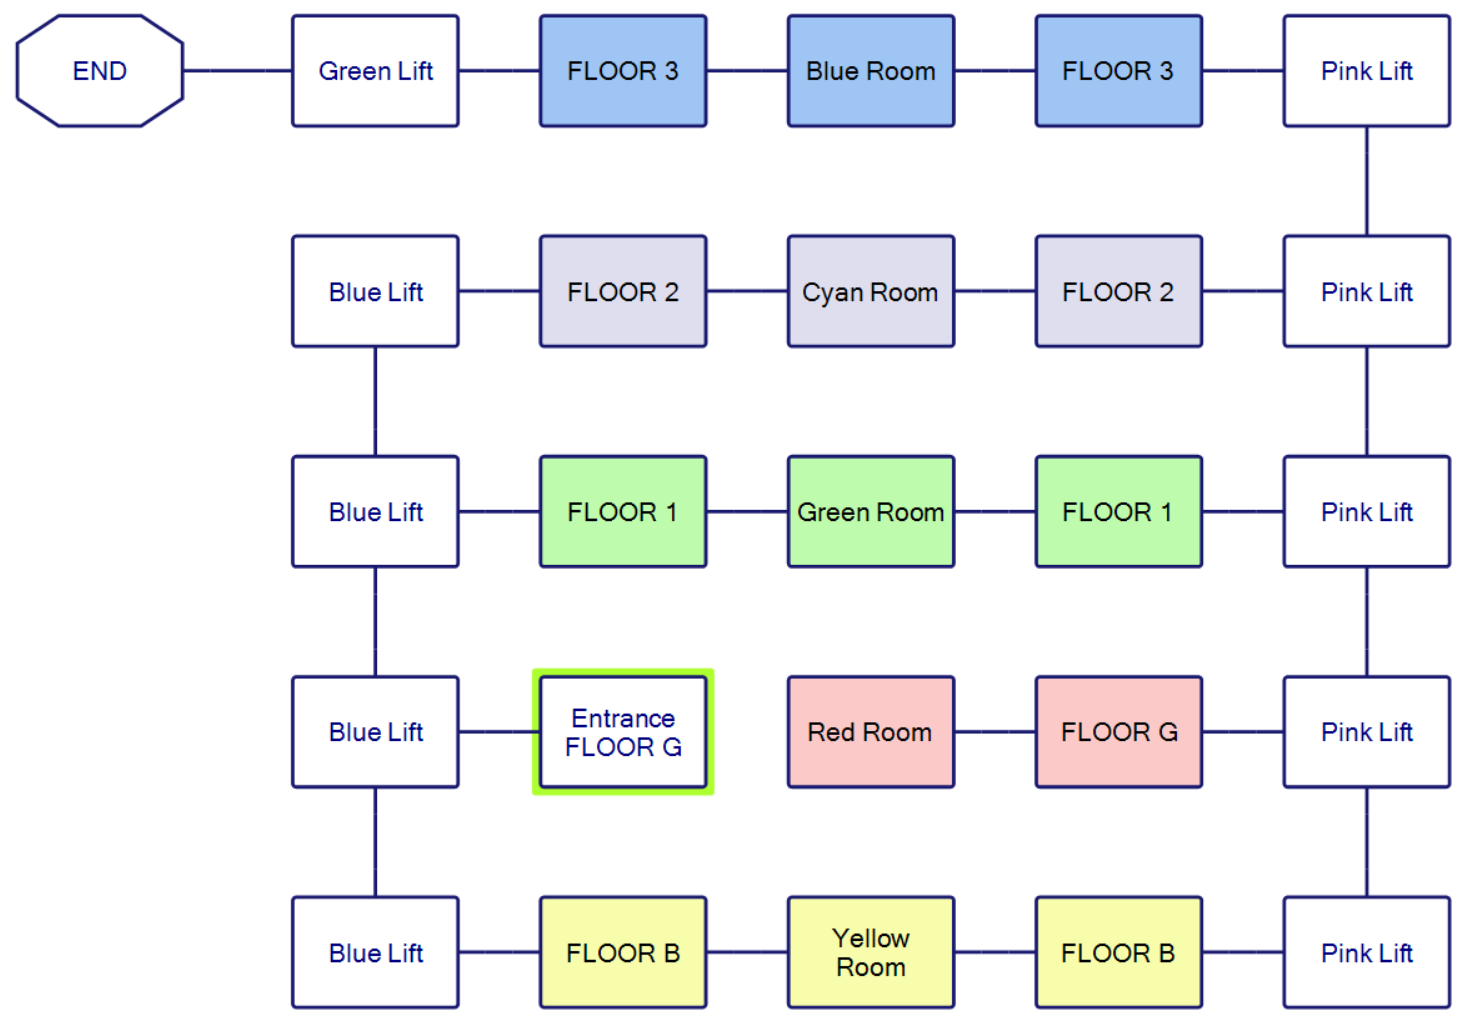


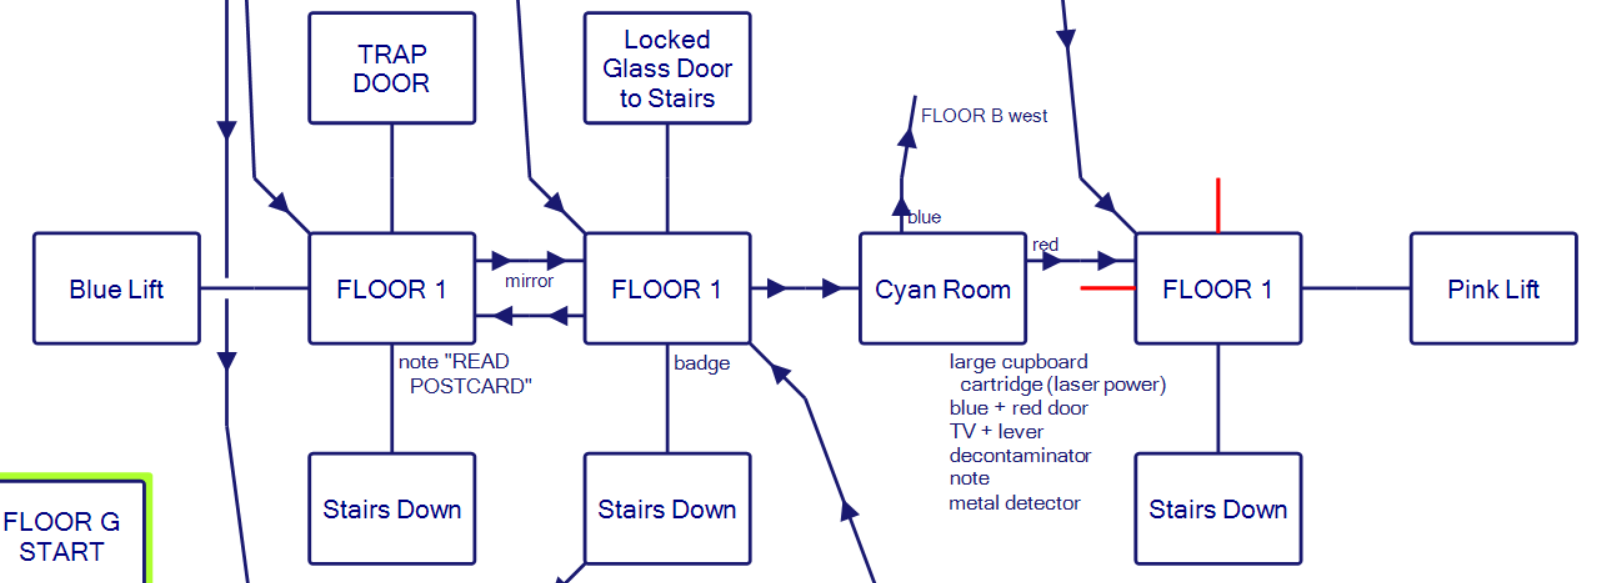
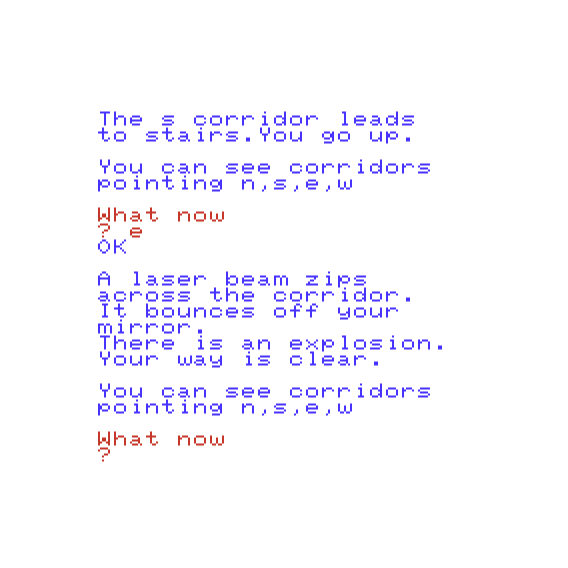
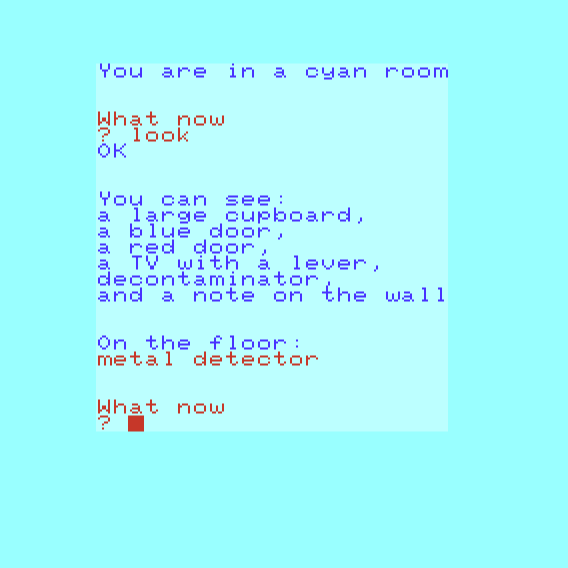
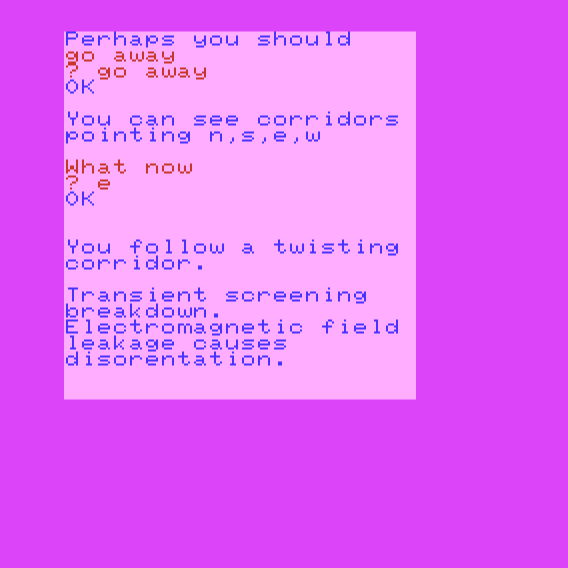
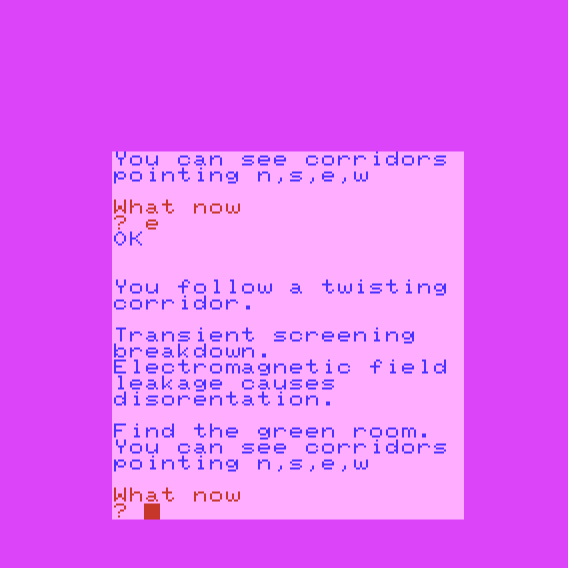

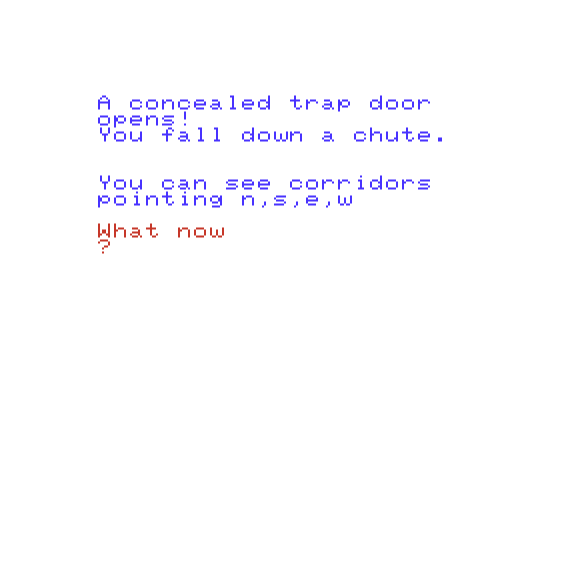
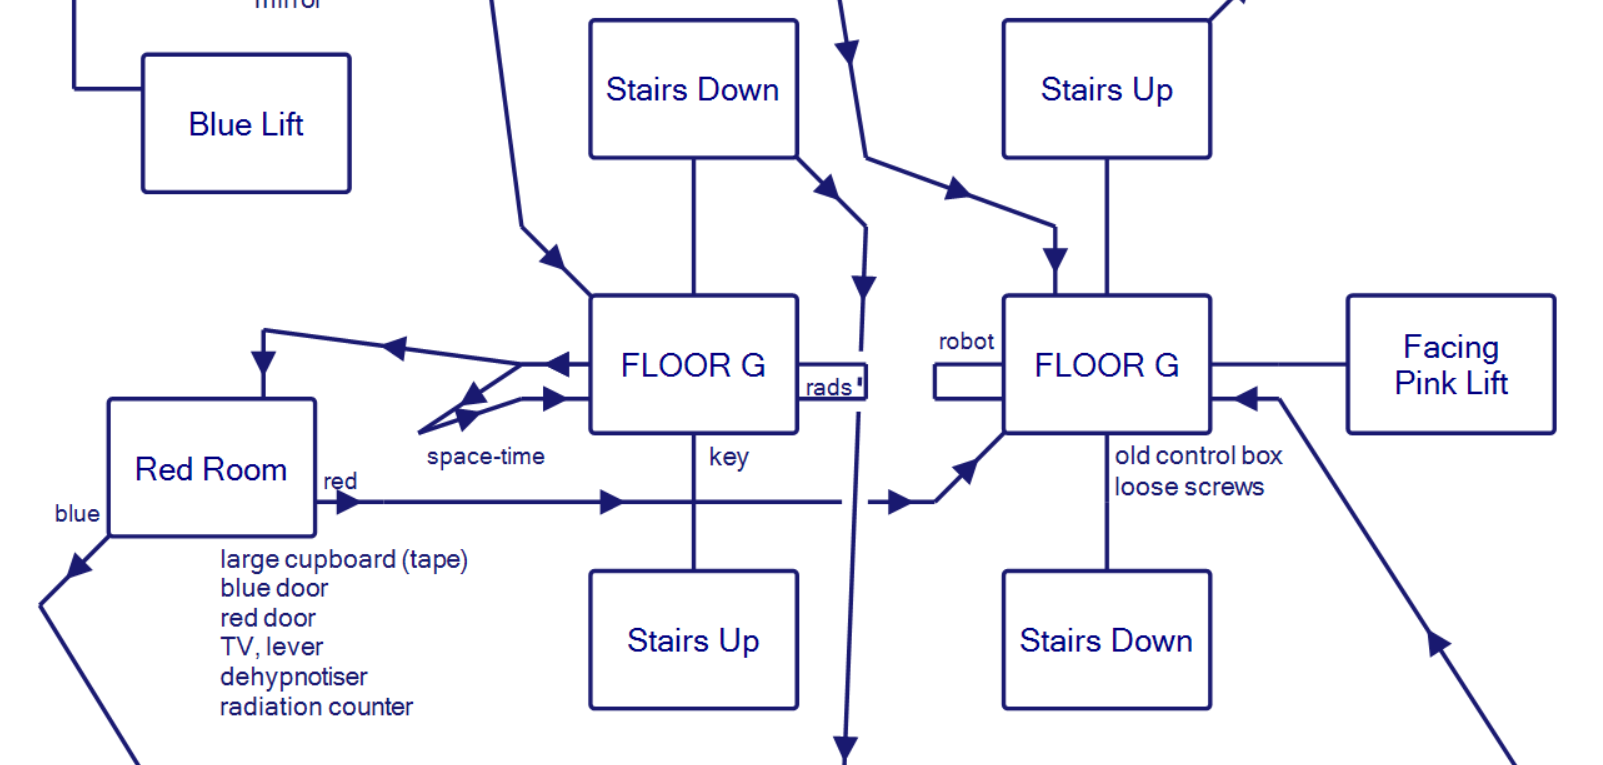
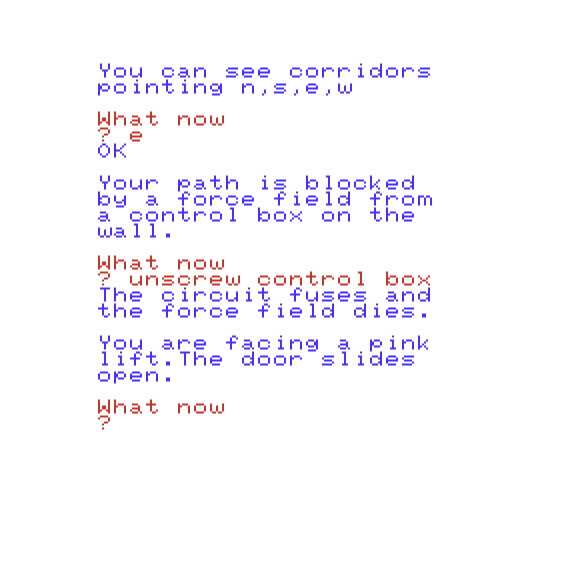
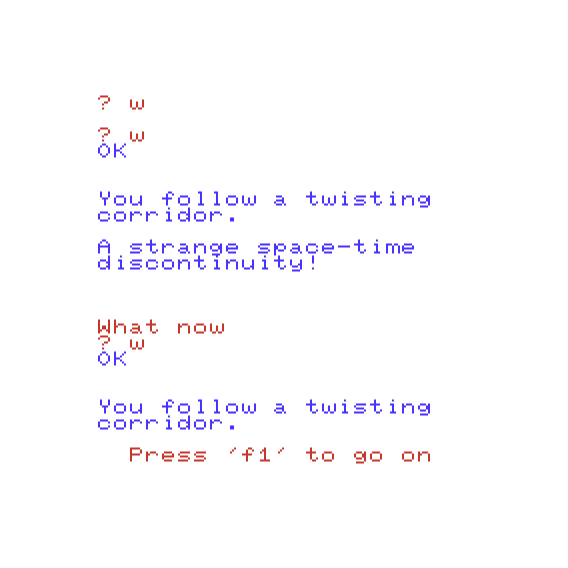
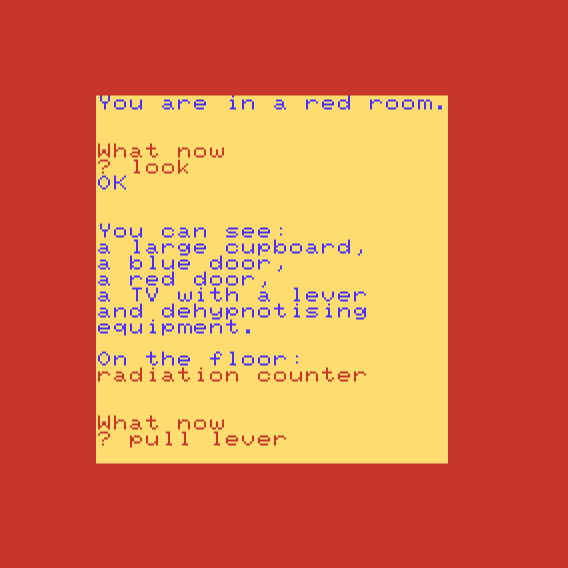
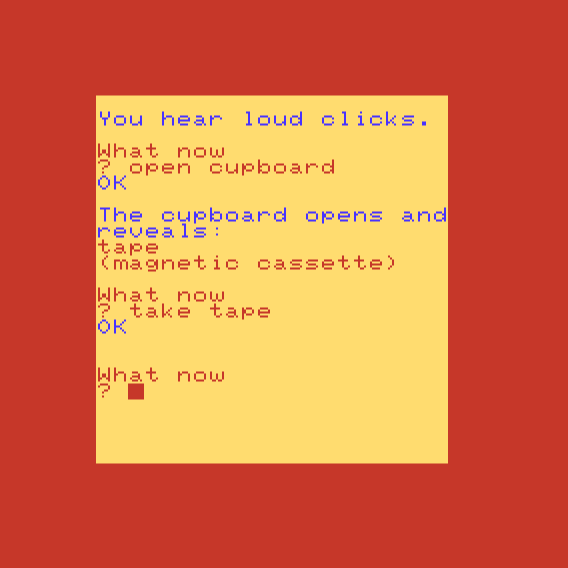
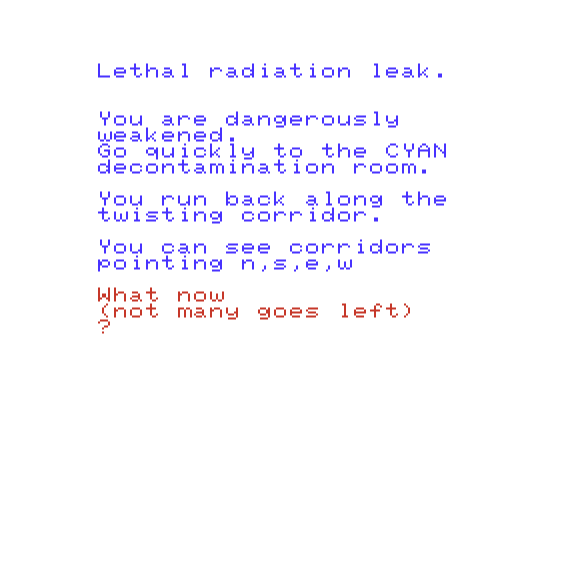
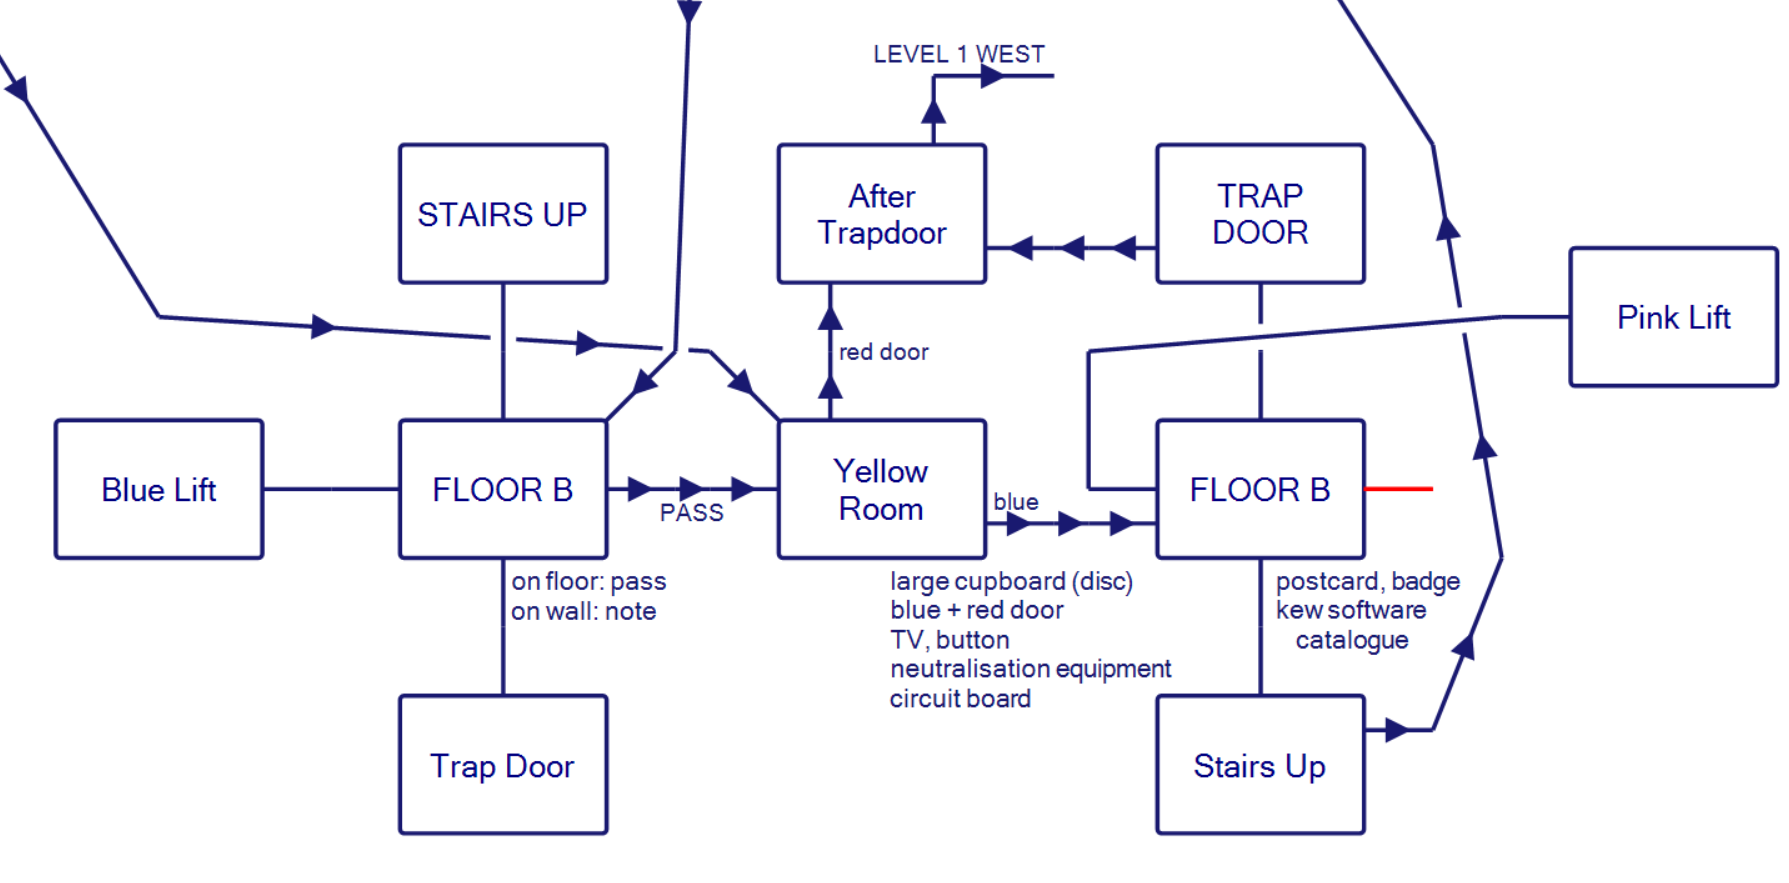
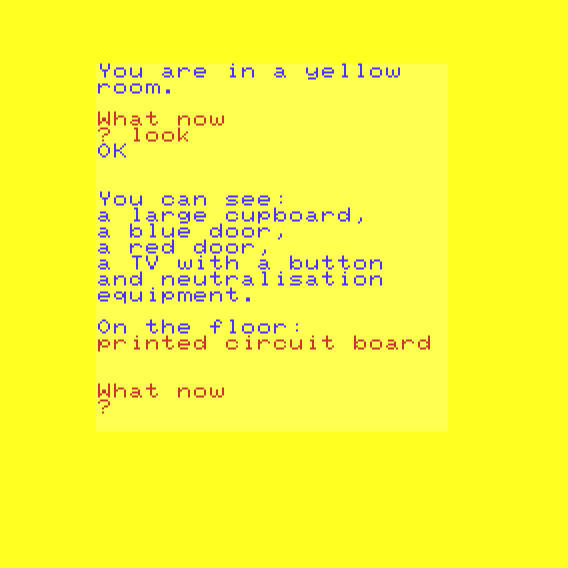
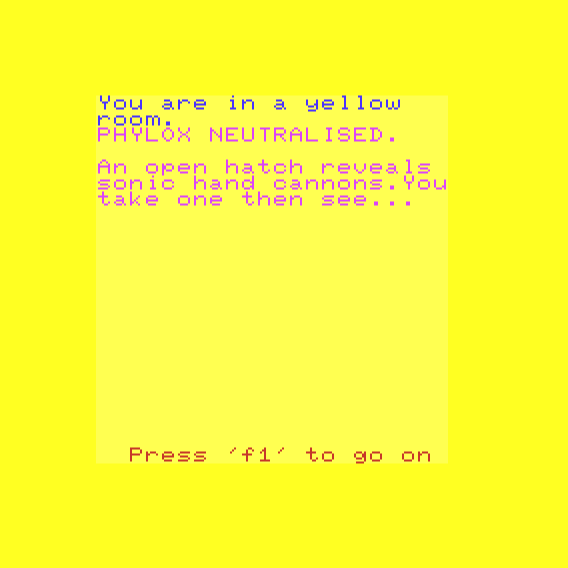
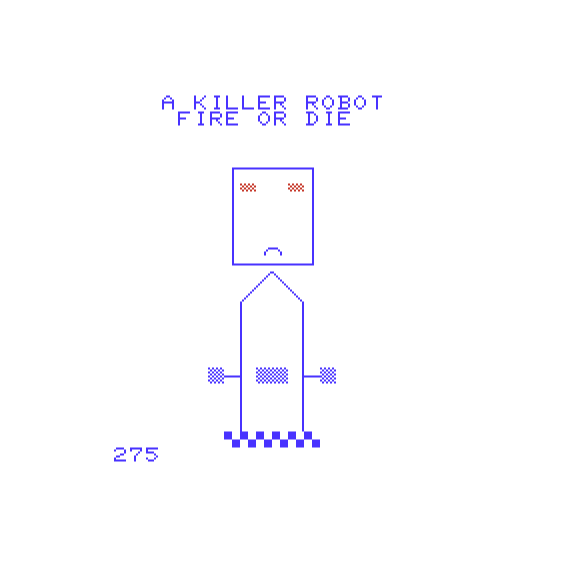
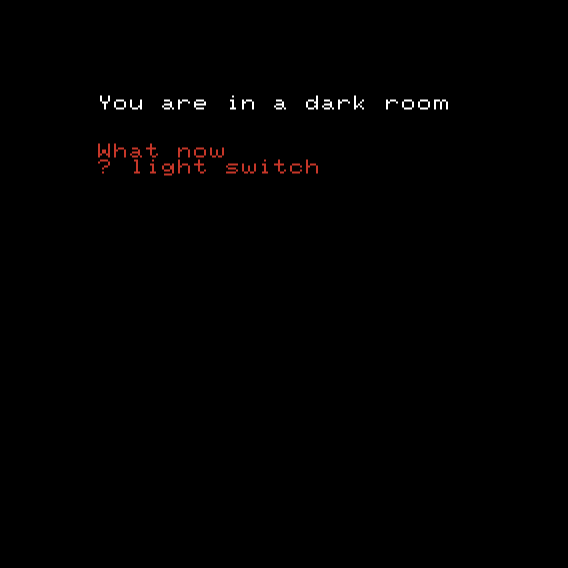
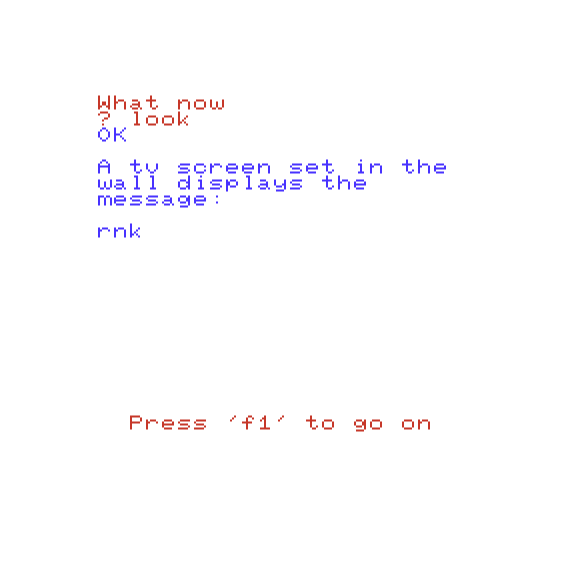
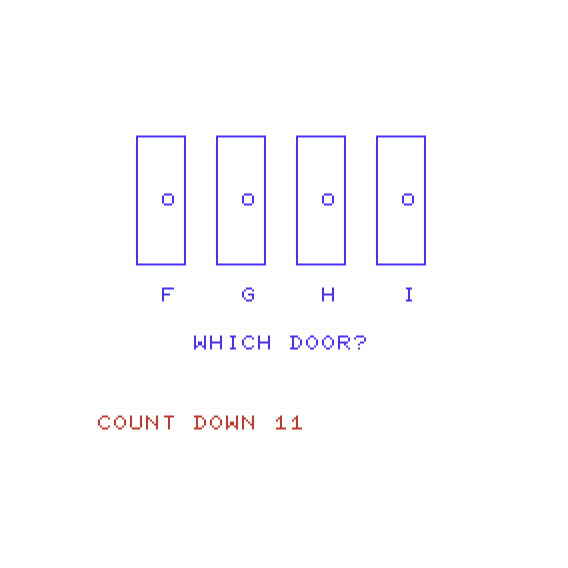
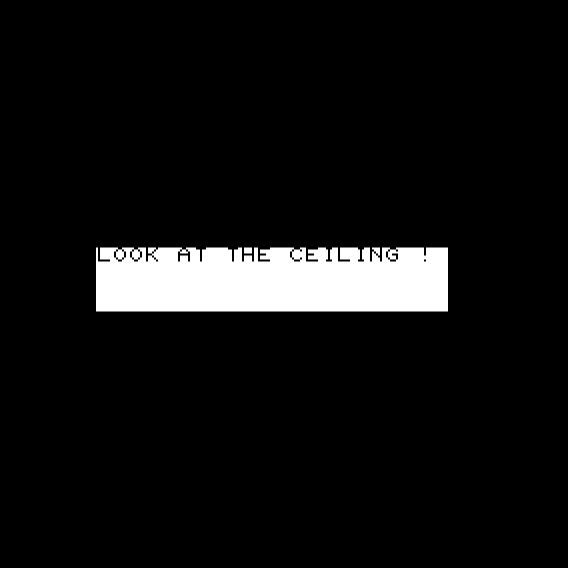
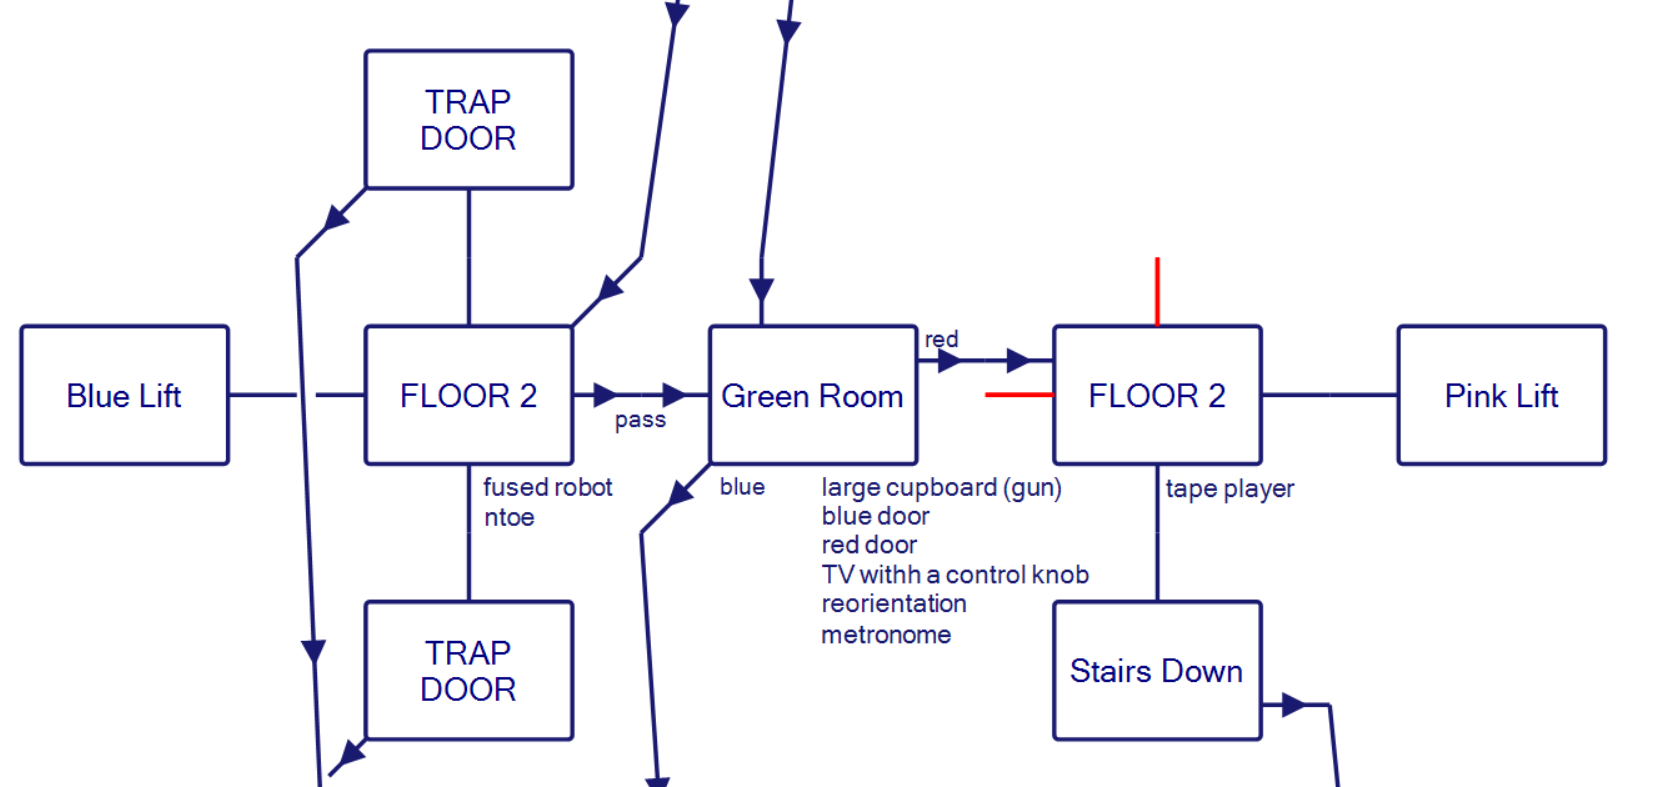
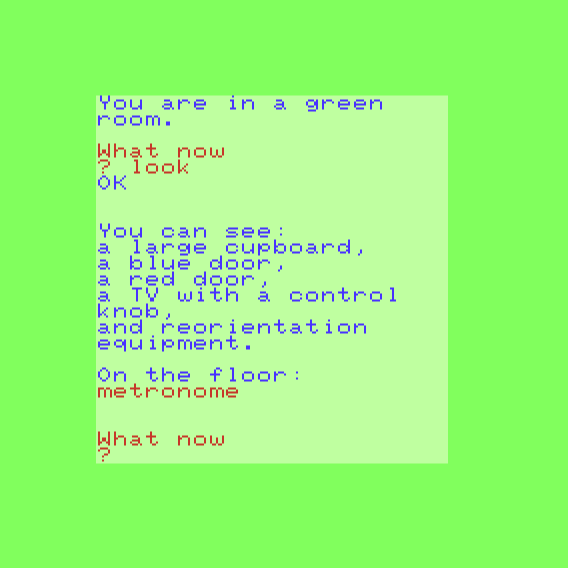
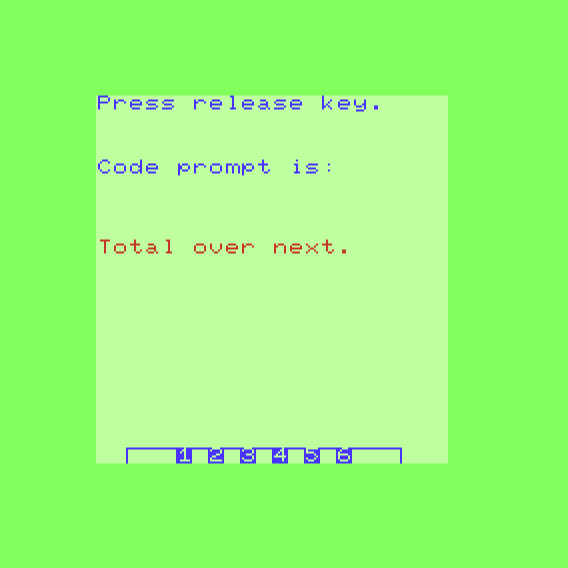

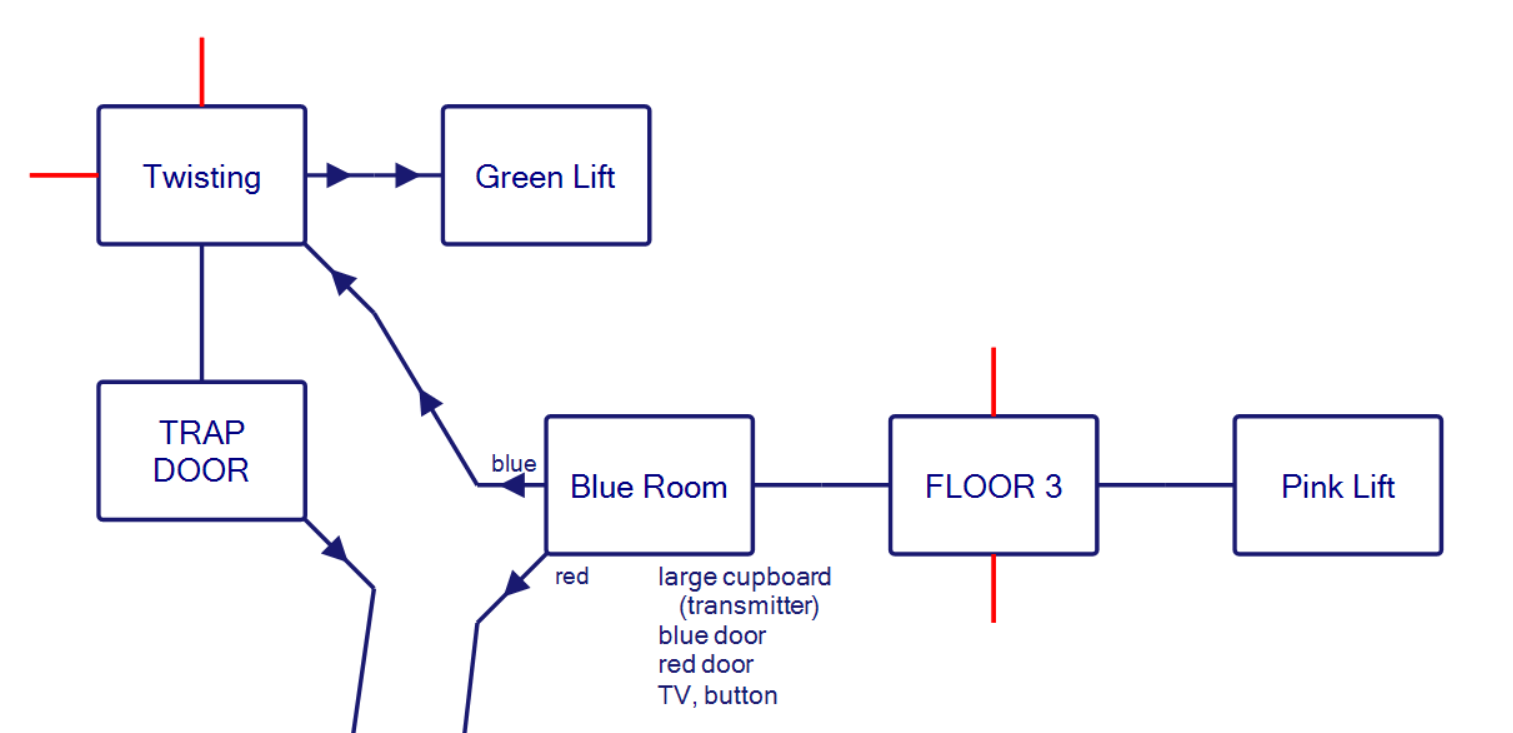
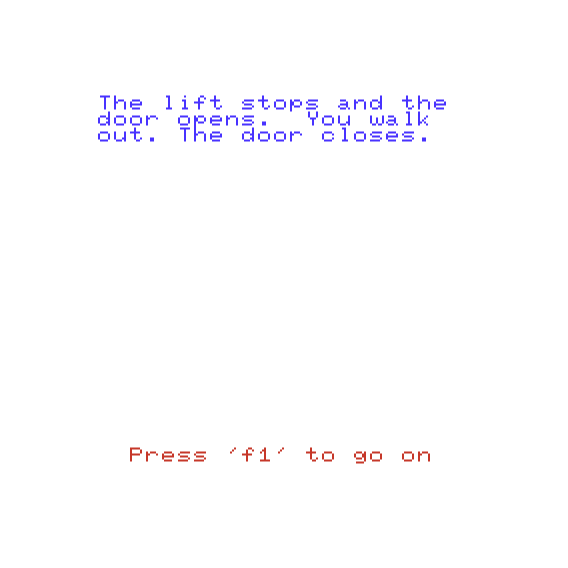

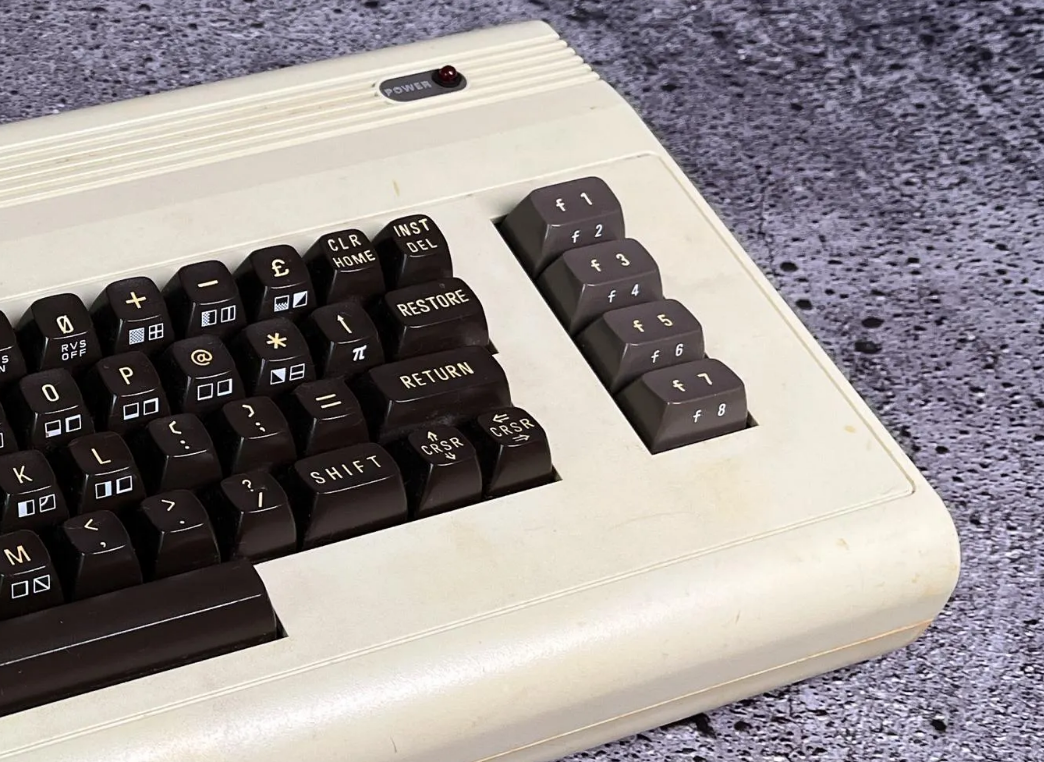

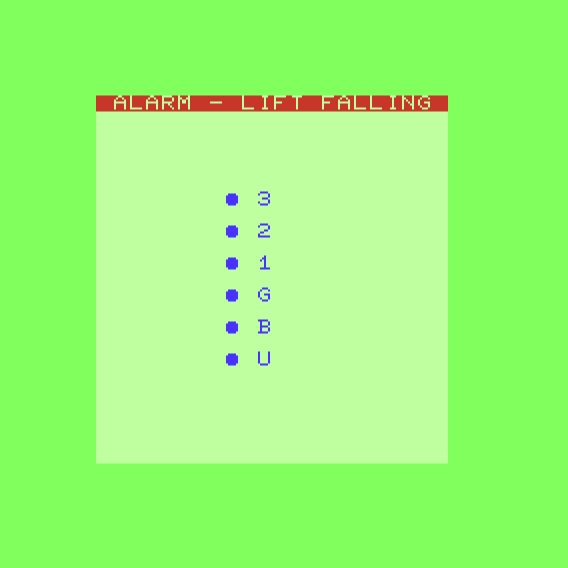
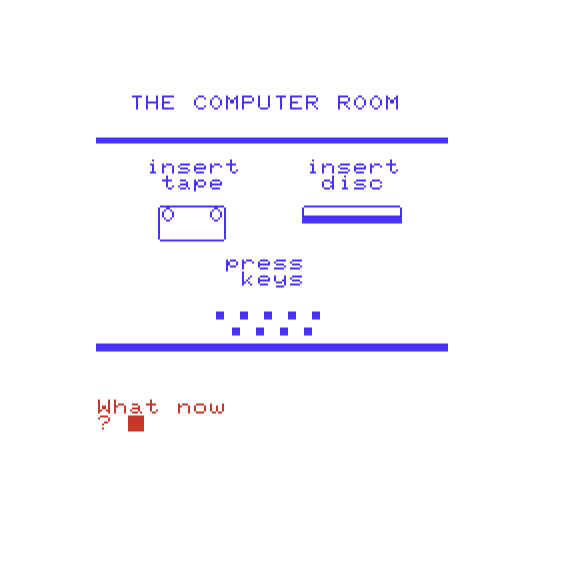

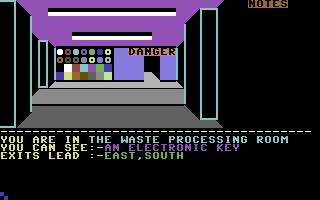
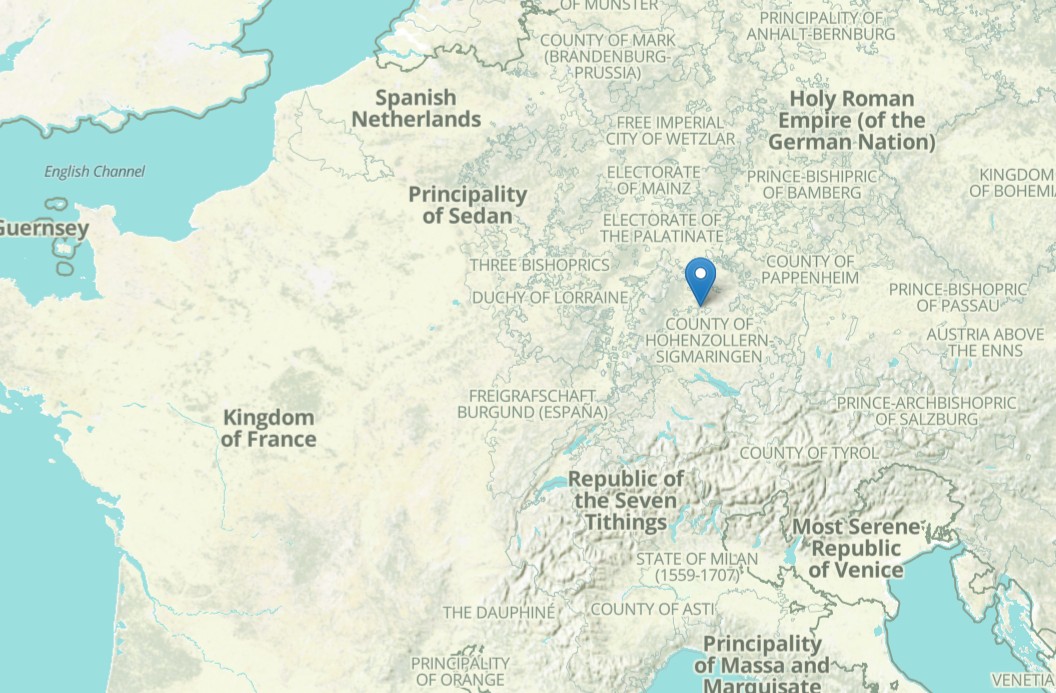

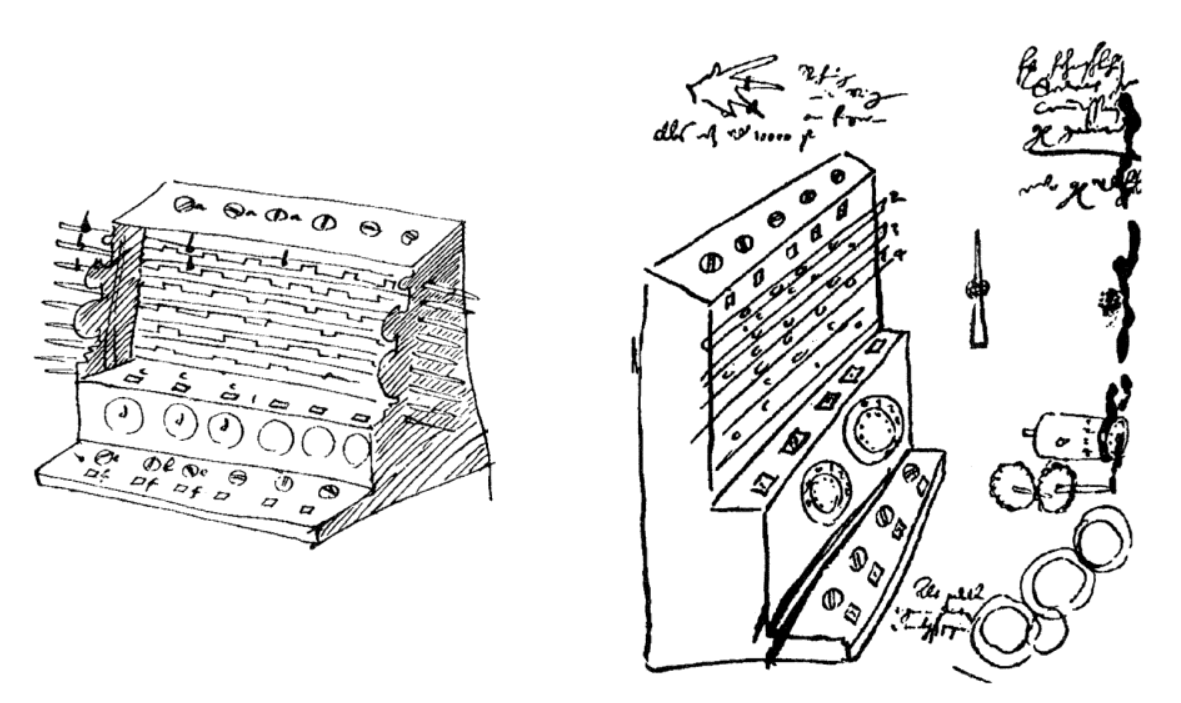
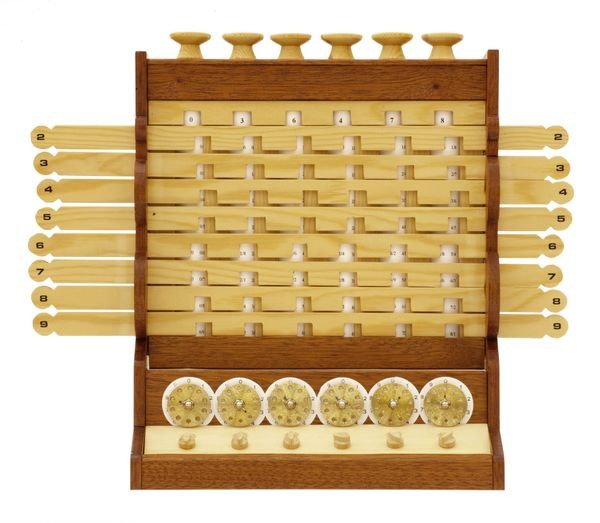

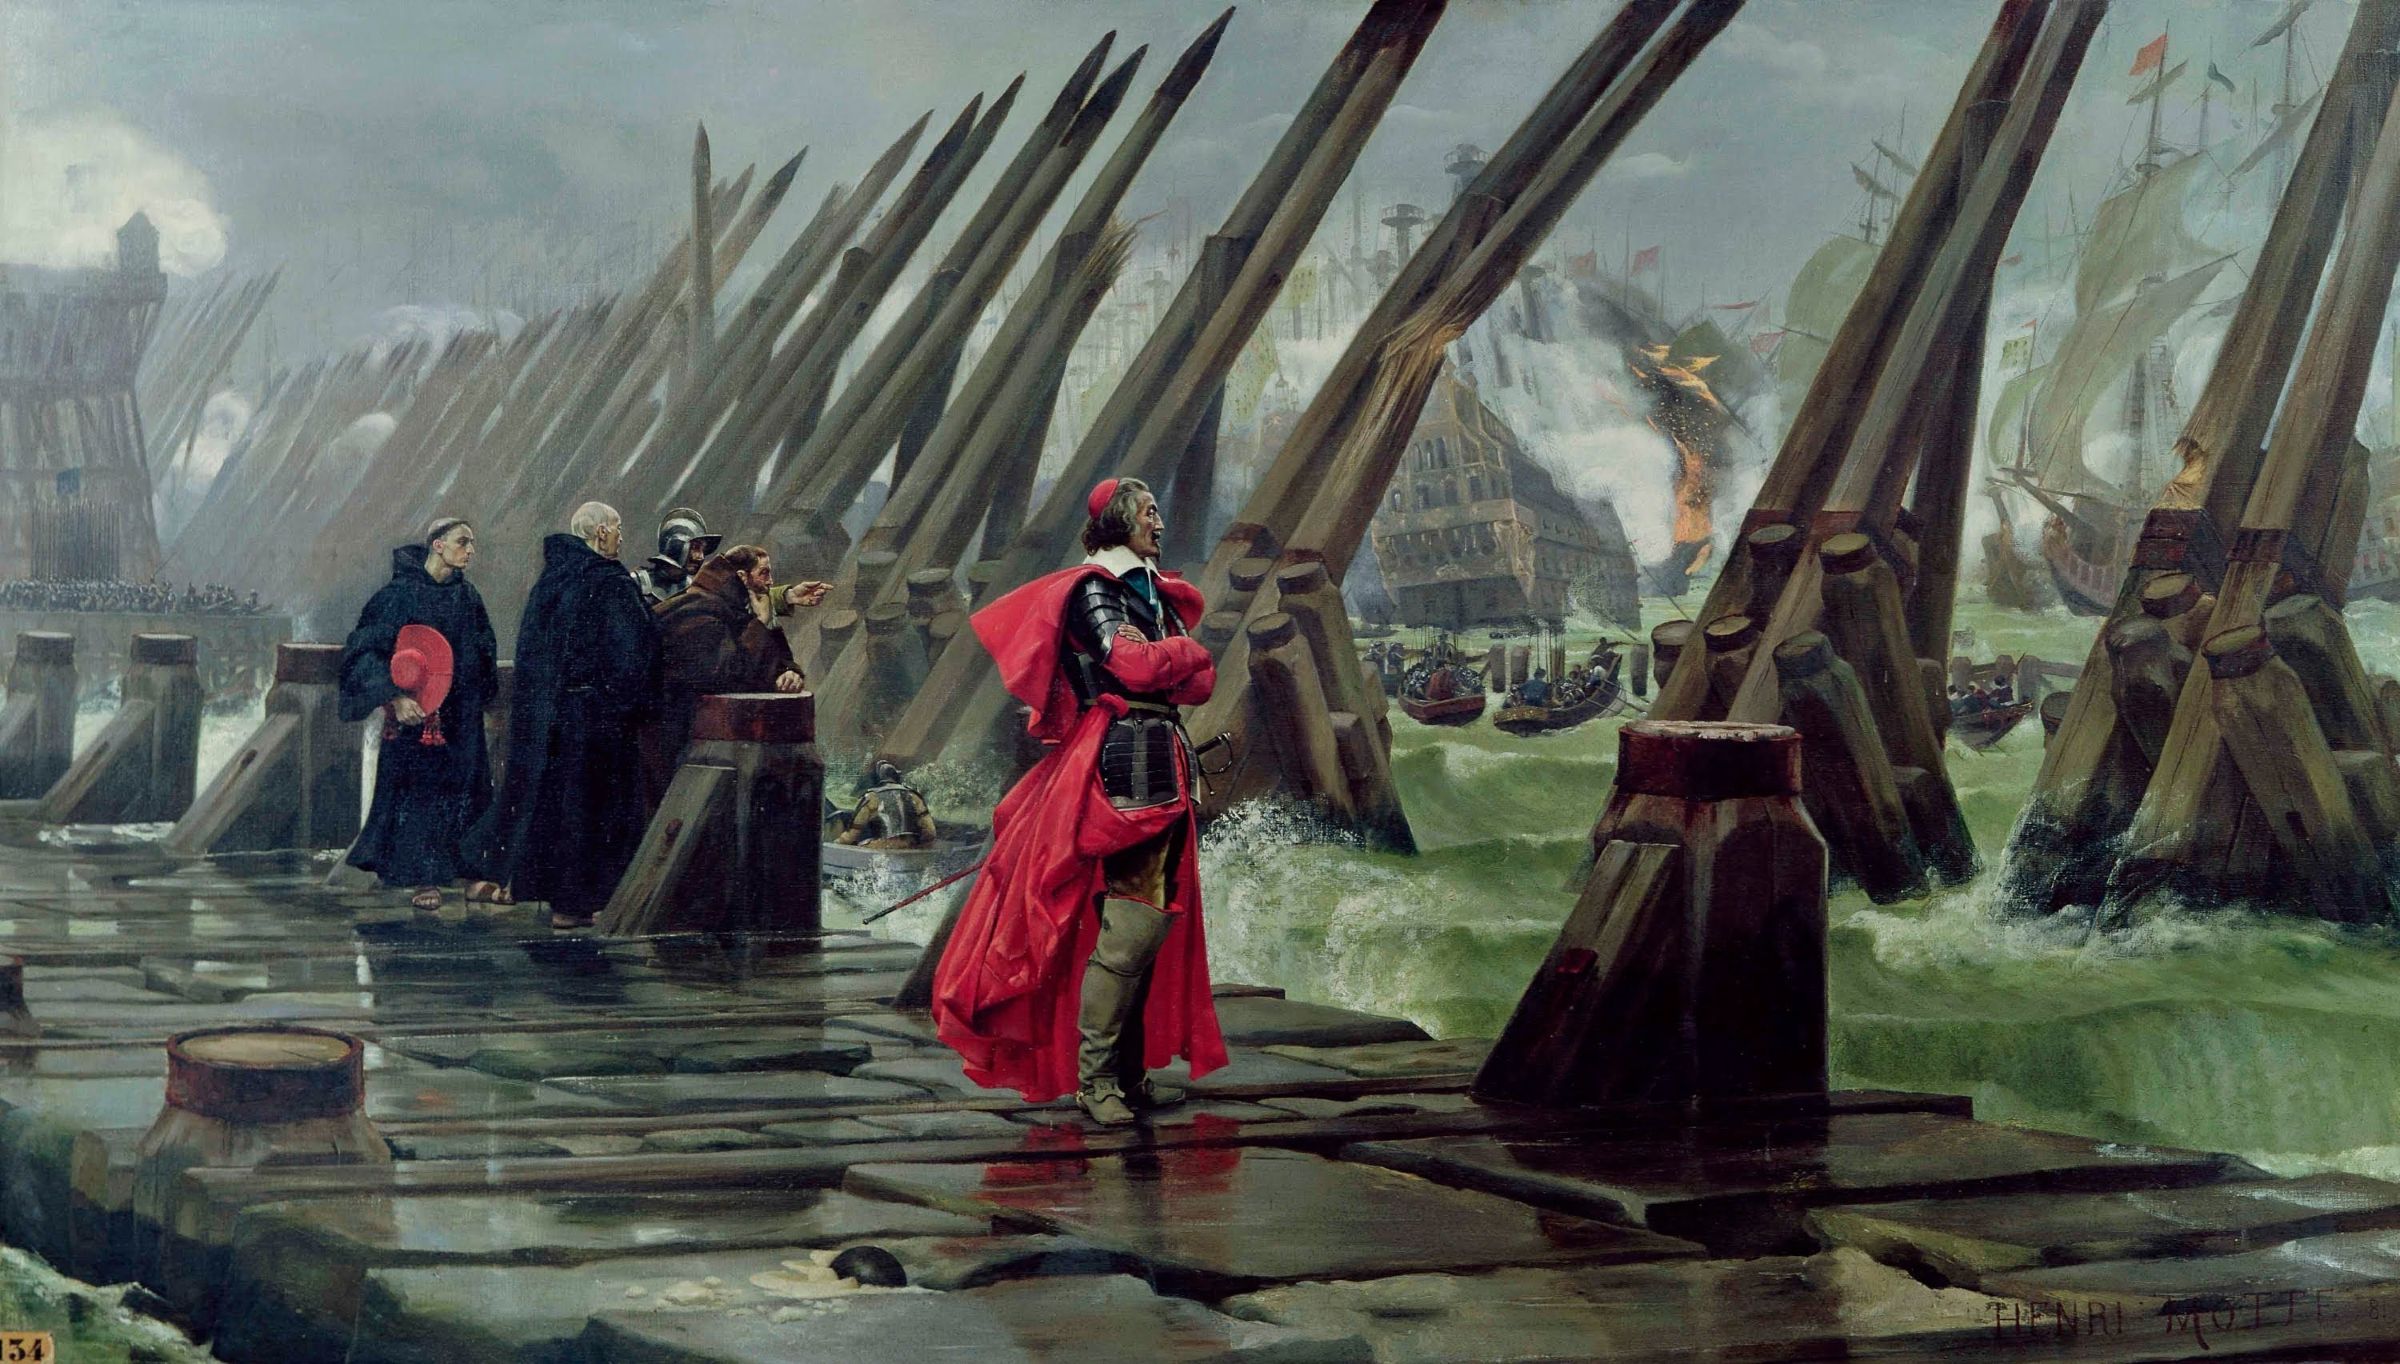
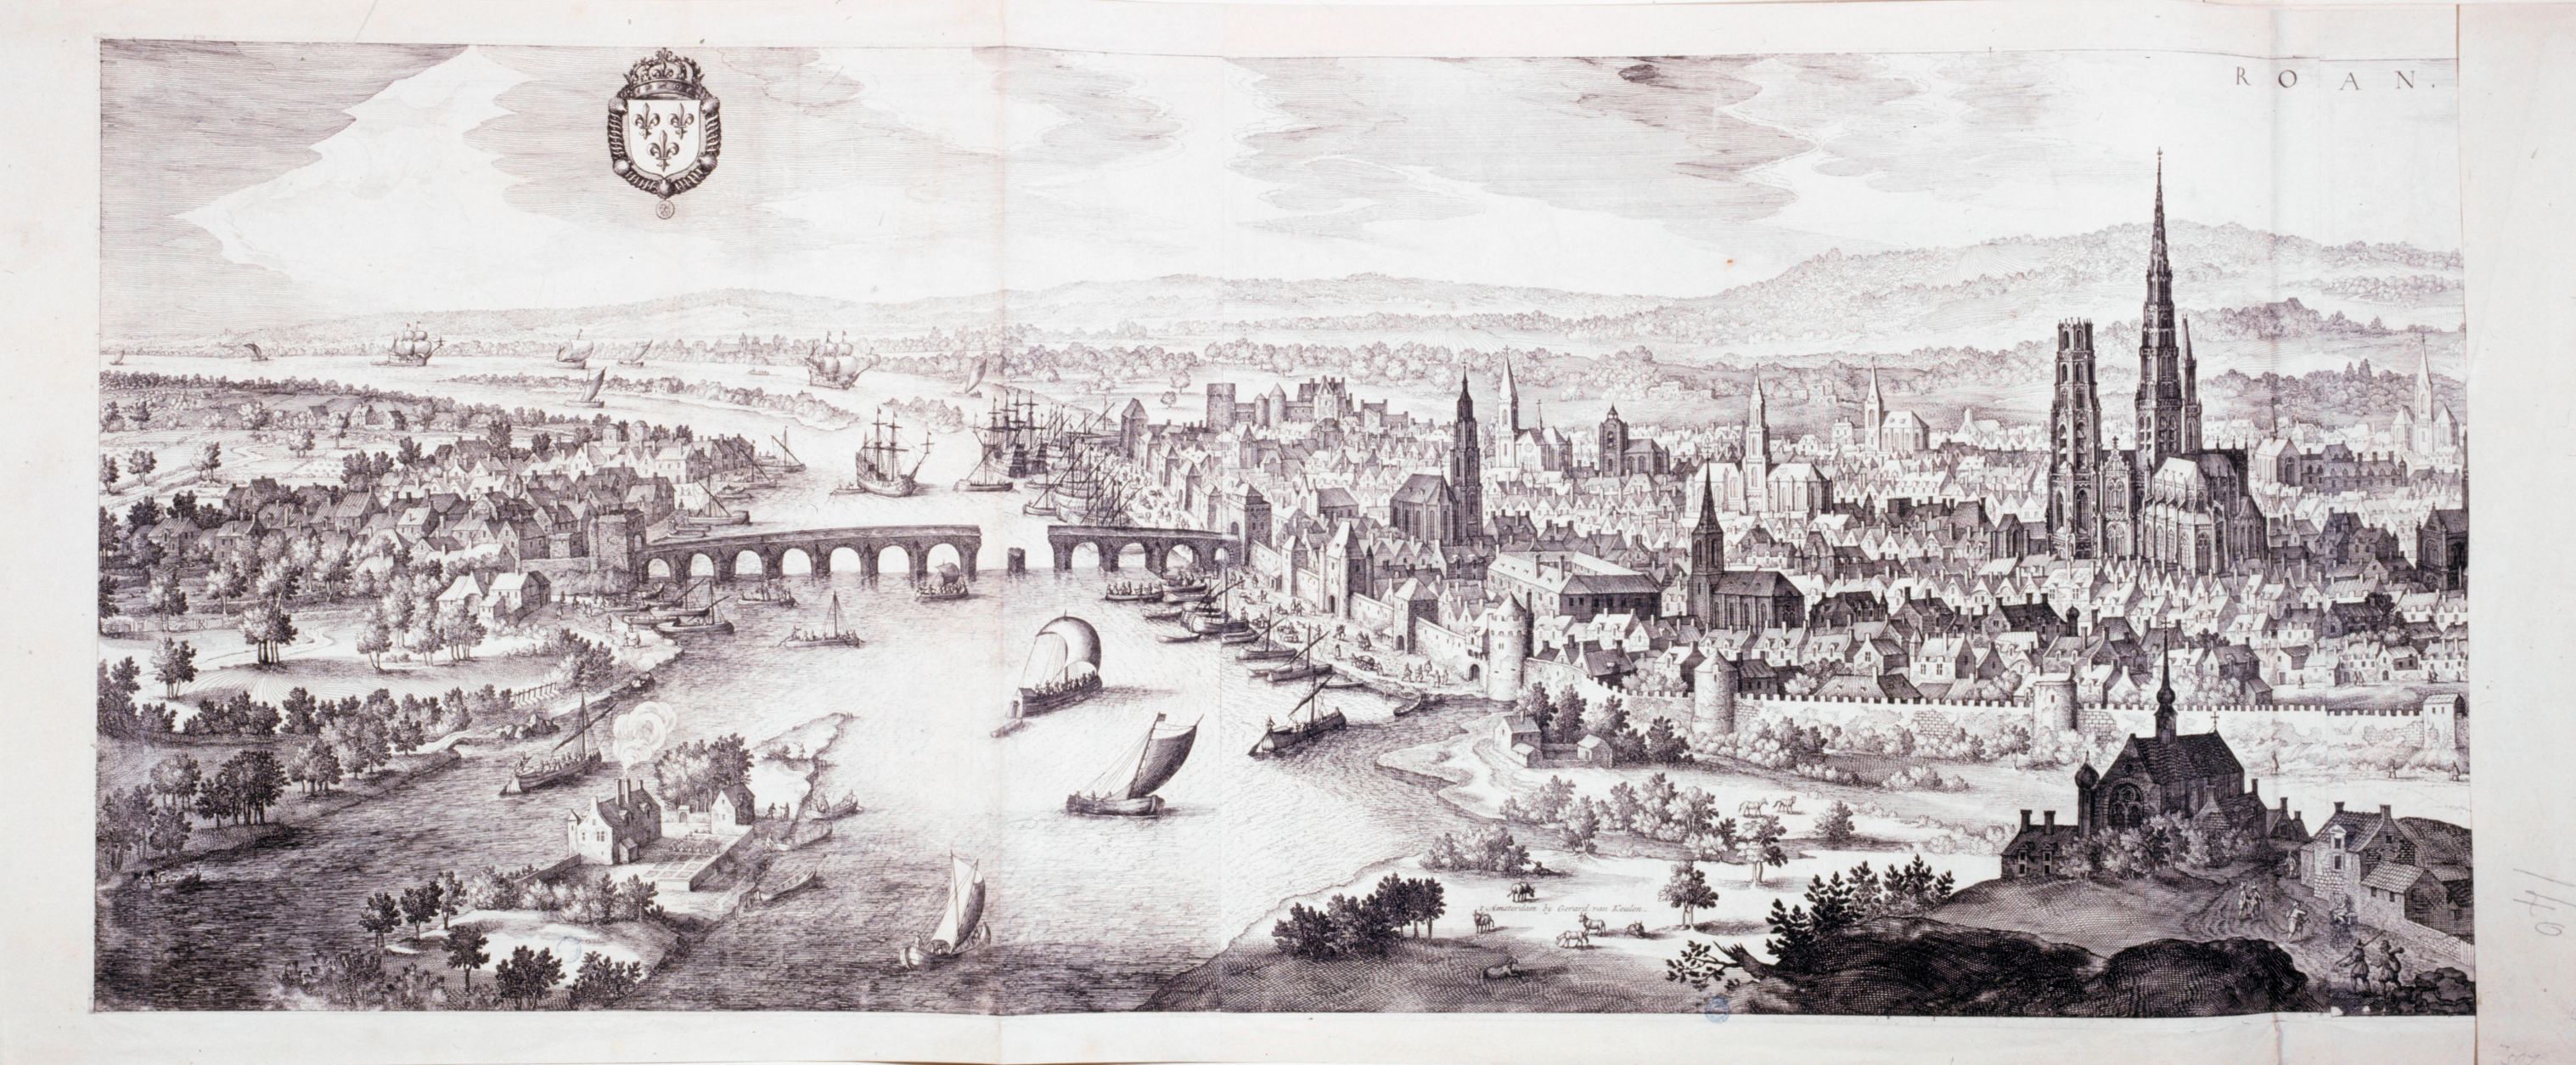
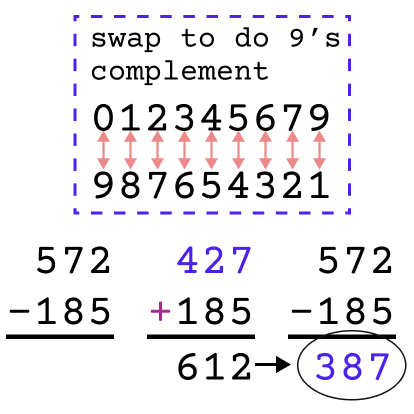
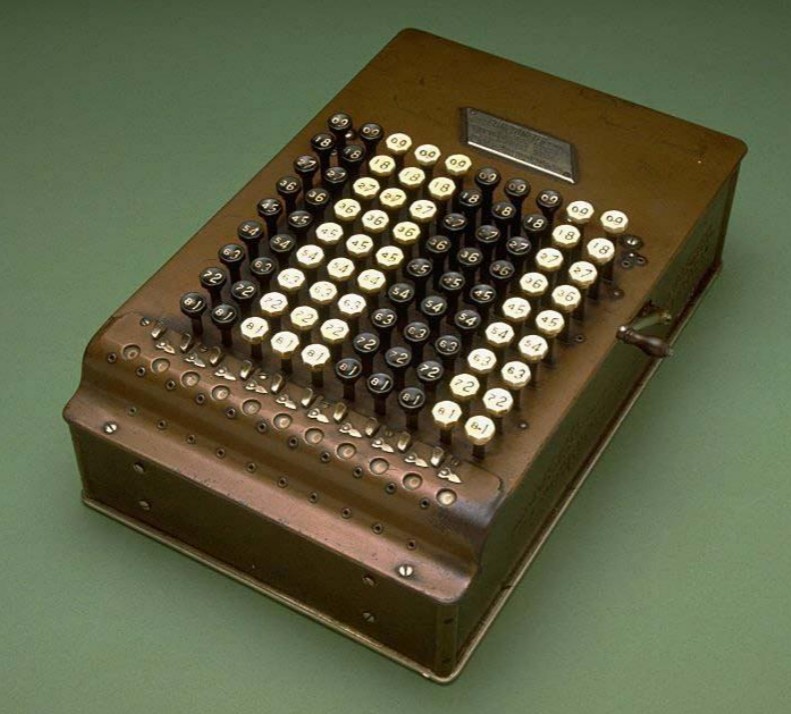
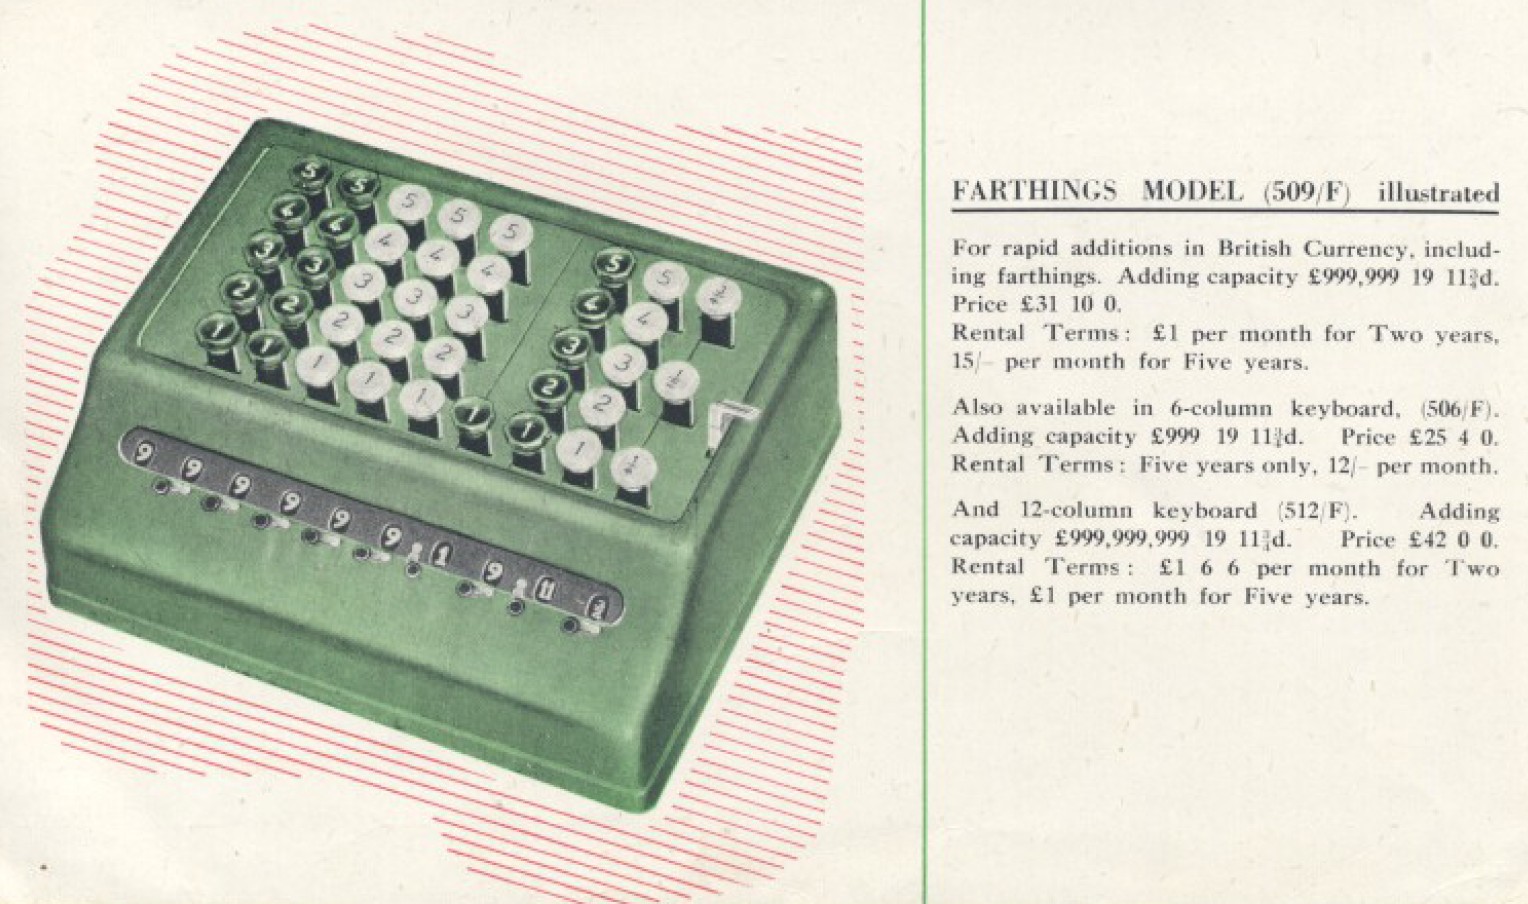
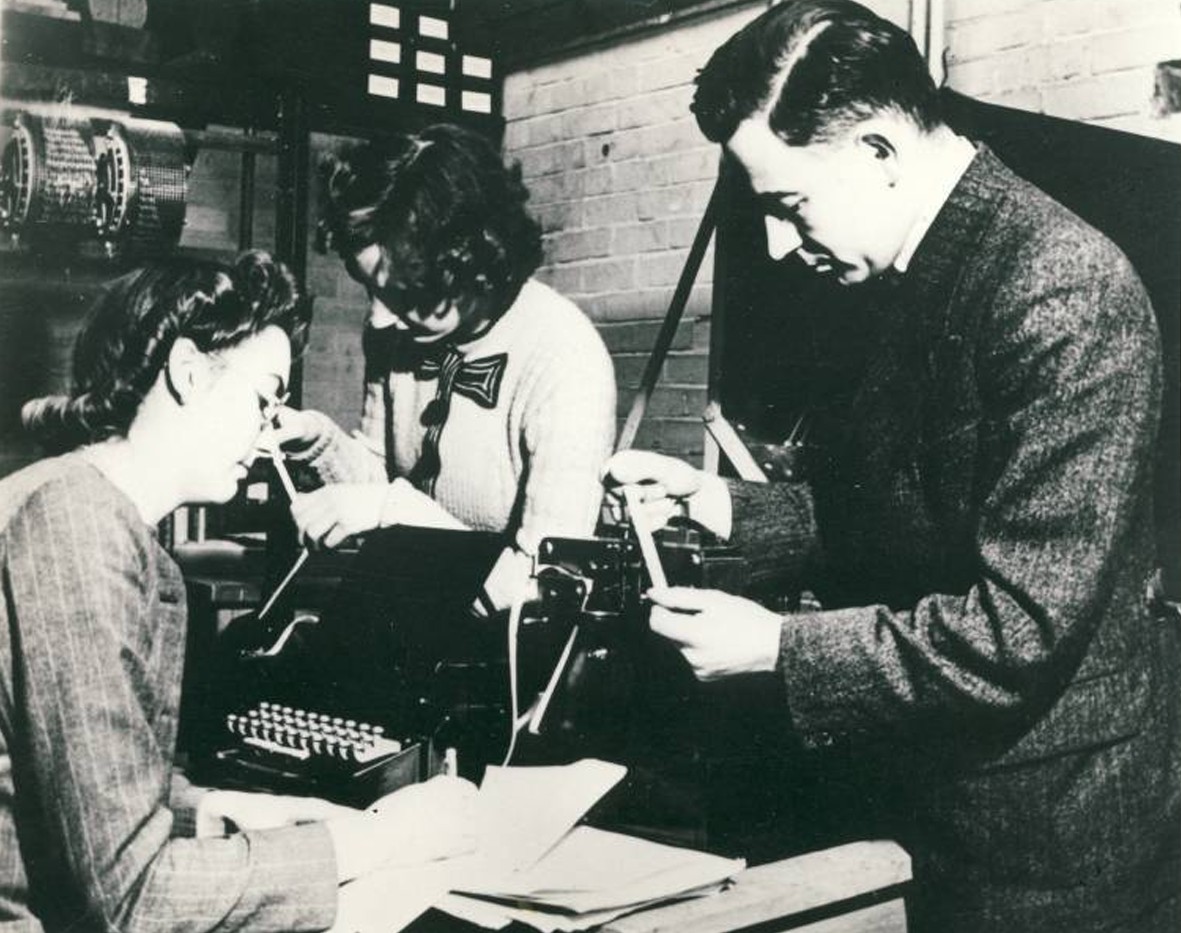

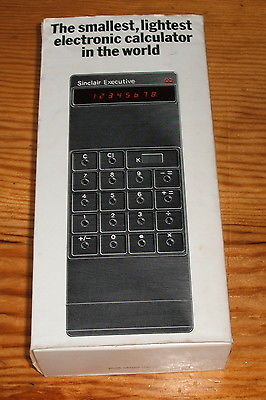
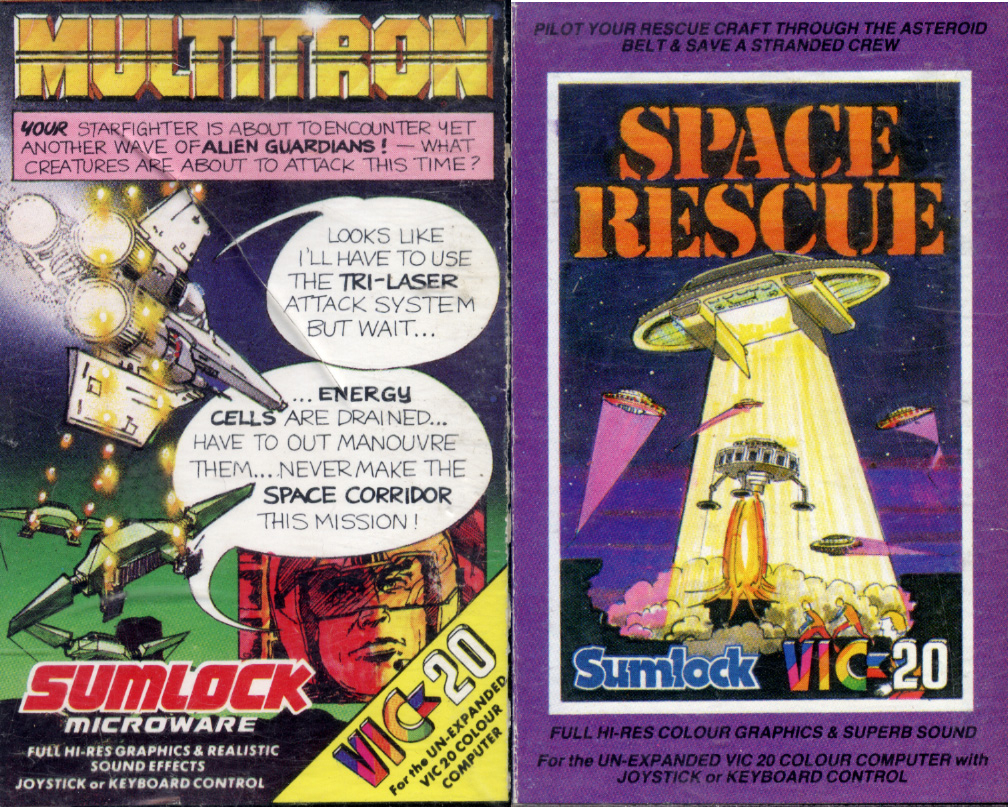

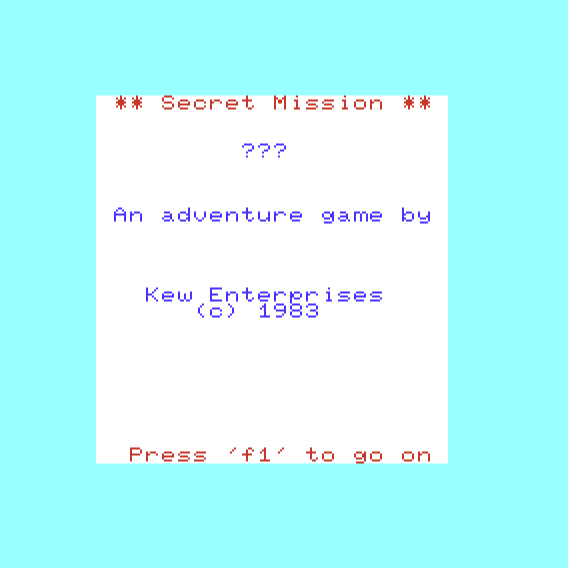
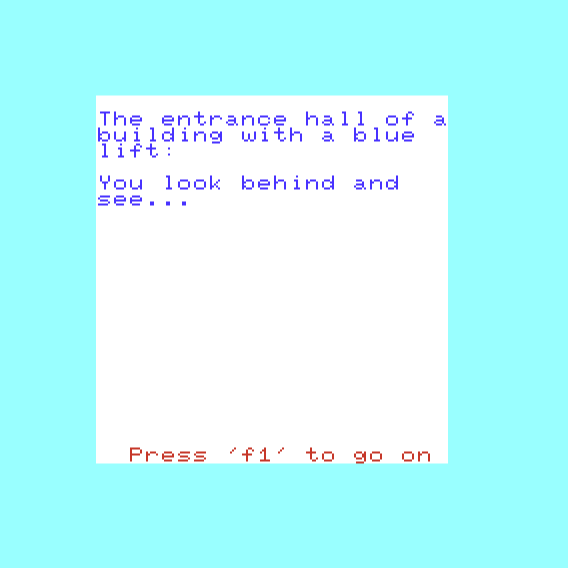

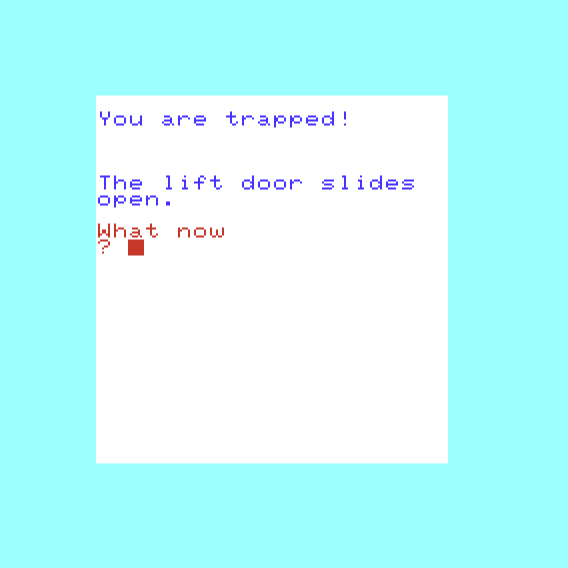


